You watched Ben Stegink’s excellent "Teams Takeover" session from early 2023. It was a masterclass in configuring Microsoft Teams for maximum productivity. However, the Microsoft 365 landscape evolves rapidly.
The introduction of the "New Teams" architecture, Multi-Tenant Multi-Account (MTMA) support, and the deep integration of Microsoft 365 Copilot have fundamentally altered how we configure the client. You saw Ben navigate the classic client, but today, you are dealing with a faster, AI-infused, and deeply integrated platform.
This companion report bridges the gap. I will walk you through exactly how to build and configure those same seven scenarios in the current March 2026 Teams client.
1. What's Changed Since This Session
The foundational architecture of Microsoft Teams has undergone a complete overhaul since early 2023. The transition from the resource-heavy Electron framework to the leaner Edge WebView2 technology fundamentally shifted how settings are applied and synchronized.
The table below outlines the strict technological facts regarding what has changed since the original session.
| Technology | Status in 2026 | What Replaced It |
|---|---|---|
| Teams Desktop Architecture | Deprecated | Teams 2.1+ ("New Teams") client standard. |
| Multi-Tenant Login | Replaced | Multi-Tenant Multi-Account (MTMA) architecture. |
| Third-Party API Tokens | Deprecated | Active-meeting secure pairing prompts (Allow/Block). |
| Settings Navigation Pane | Restructured | Consolidated under new sub-menus like "Appearance and accessibility". |
| Do Not Disturb (DND) Control | Integrated | Subjugated to Windows 11 OS-level Focus Assist. |
| Copilot Chat Access | Restructured | Unified plus (+) menu and infinite scroll integration. |
| Meeting Size Limits | Expanded | Teams Enterprise now supports 3,000 interactive attendees natively. |
| Hardware Integration | Upgraded | Dynamic pairing via the Teams Pro Management portal. |
2. How to Build This Today
The following sections provide a detailed, step-by-step breakdown of how to replicate Ben's 2023 demonstrations in the modern workplace. Each section addresses the exact scenario, the modern click-path, and the critical edge cases you must consider today.
Demo 1: Appearance, Dark Mode, and Chat Density
What Ben Built in 2023:
Ben demonstrated accessing the Teams client settings via the three dots menu. He adjusted the client between light and dark modes. He then configured the chat density, comparing the "comfy" layout against the "compact" layout to fit more chats on the screen. Finally, he ensured new chats opened in a separate window.
How to Build This Today (March 2026): You saw Ben adjust chat density and themes in the old general settings pane. Today, Microsoft has consolidated these visual controls specifically for accessibility and cognitive load management. The "New Teams" client renders these views much faster, meaning you can swap themes without the lag seen in the classic client.
Here is exactly how you navigate and configure this today:
- Open your Microsoft Teams desktop app.
- Click Settings and more, which is displayed as three horizontal dots (
...) located at the top right, directly next to your profile picture. - Select Settings from the dropdown menu to open the main configuration page.
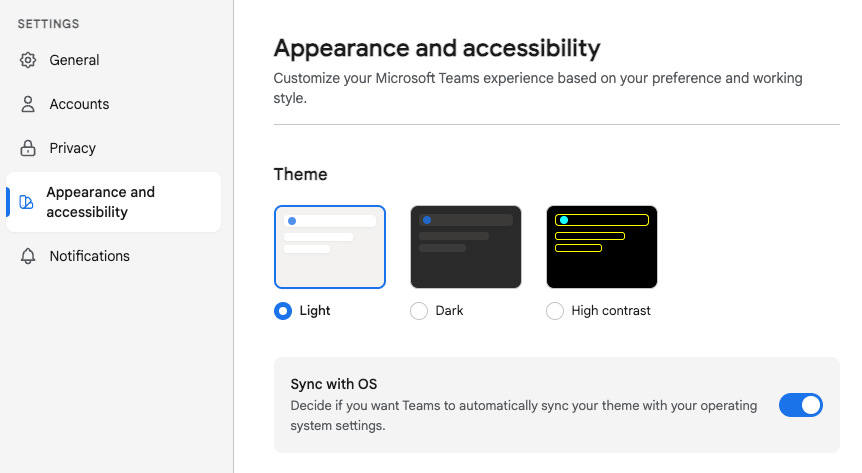
- In the left-hand navigation pane, select Appearance and accessibility.
- Under the Theme section, you will see options for Light, Dark, or Classic. Select your preference.
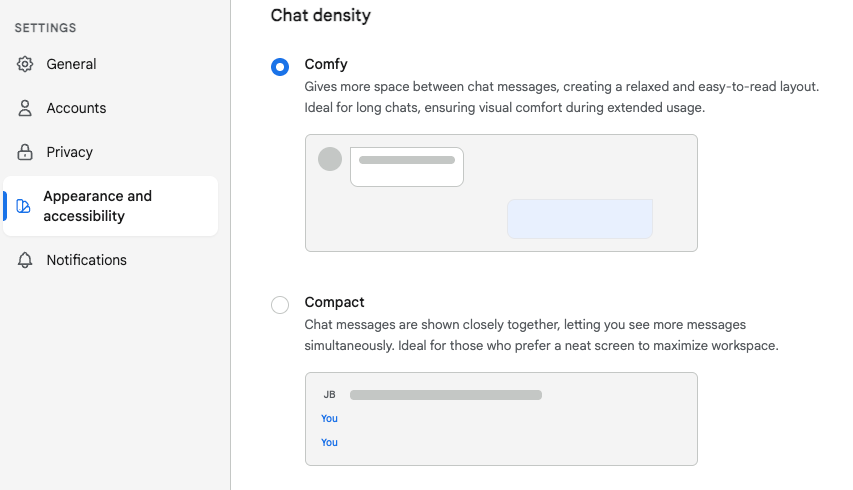
- Scroll down to the Chat density section.
- You will see radio buttons for Comfy and Compact. Select Compact.
- To ensure new chats pop out, navigate to the Chats and channels tab in the Settings menu and check "Open new chats in a new window."
The Modern Interface Philosophy: The choice between Comfy and Compact is more than aesthetic. In Compact mode, chat messages are heavily compressed, letting you view vastly more messages simultaneously without scrolling. This mode is ideal for those who monitor high-volume support channels or busy incident response threads.
Conversely, Comfy mode injects significant white space between messages. This creates a relaxed layout designed specifically to reduce eye strain during extended, text-heavy reading sessions.
Handling High Contrast Conflicts: If you use Windows 11 High Contrast mode at the OS level for accessibility, Teams will default to mimicking that accessibility setting. If you prefer Dark Mode in Teams but High Contrast in Windows, you must actively decouple them. You do this by toggling off the "Sync with OS" setting within the Appearance and accessibility menu.
Configuring Chat Density and Theming in Teams 2026
The Appearance and accessibility menu in the modern Teams client. Note the distinct separation between visual themes and chat density controls.
Data sources: Microsoft Support, Microsoft Support (General Settings), Microsoft Q&A
AI and Copilot Simplifications: In 2026, Microsoft 365 Copilot can interface directly with application settings. If your IT admin has enabled the new unified + menu for Copilot, managing your UI is entirely conversational.
You can simply open Copilot Chat and type: "Change my Teams theme to dark mode and set chat density to compact." The agent will execute the UI change instantly, bypassing the manual settings menu entirely.
Quick Win: Skip the mouse clicks entirely when accessing settings. Press Ctrl + , (Control + Comma) on Windows or Cmd + , on Mac. This universal keyboard shortcut instantly opens the Teams Settings menu directly to your last-used tab, saving significant navigation time.
Official Documentation:
Demo 2: Out of Office Auto-Replies and Outlook Sync
What Ben Built in 2023:
Ben showed the audience how to set up out of office (OOO) auto-replies directly from within the Teams client settings. He demonstrated how scheduling these replies within Teams seamlessly syncs backward into the user's Outlook calendar to maintain presence continuity.
How to Build This Today (March 2026): You saw Ben manage OOO via the classic status mechanism. Today, the integration between Exchange Online, the New Outlook, and Teams is deeply bidirectional and instantaneous. Setting it in one place guarantees it reflects globally across your entire Microsoft 365 tenant.
There are two primary ways to do this in the modern client: via App Settings or via the Profile Picture. I strongly recommend the profile picture method for speed.
Here is exactly how you configure this today:
- Click your Profile Picture located in the upper left or right corner of the Teams interface, depending on your OS layout.
- Click your current status, and select Set status message from the flyout menu.
- At the bottom of this menu, click the Schedule out of office option.
- A dedicated dialog box will appear. Turn on the toggle next to Turn on automatic replies.
- Compose your exact out of office status message in the text box. This message is mandatory; the system will not sync your status to Outlook without text in this field.
- Check the box for Send replies only during a time period. Select your specific start and end dates and times from the dropdowns.
- Click the Save button to apply the changes across the ecosystem.
External Routing and Outlook Sync: If you consult externally, you must check the box to Send replies outside my organization.However, you should exercise caution here. I highly recommend choosing the "Only to contacts" sub-option within this menu. If you select "All external senders," your OOO message will indiscriminately reply to vendor newsletters, automated alerts, and potential junk email, creating unnecessary reply loops.
Once saved in Teams, your Outlook calendar instantly activates its automatic replies using the exact same message and time range. If you open the New Outlook for Windows and navigate to View > View settings > Accounts > Automatic Replies, you will see your Teams configuration mirrored there perfectly. If you subsequently update the message in Outlook, it instantly pushes back to Teams.
AI and Copilot Simplifications:
Copilot has completely revolutionized the return-to-work experience. When your scheduled OOO period ends, you no longer need to manually parse hundreds of missed messages.
Open Copilot Chat in Teams and use this prompt: "Summarize what I've missed in my project channels and direct messages while I was out. Group the summary by priority.". Copilot will instantly parse your missed timeline. Be aware that Copilot defaults to a 30-day history lookback. If your sabbatical was longer, you must specify the timeframe in your prompt (e.g., "Summarize what I missed since January 1st").
Furthermore, you can use the Copilot compose box to draft the OOO message itself. Click the Copilot icon in the status box and prompt it: "Draft a professional out-of-office message stating I am at a conference until Friday, direct urgent IT support to the helpdesk, and sales inquiries to Adele.".
**Quick Win:**Do not use generic OOO messages. Include an @mention of your designated backup person directly in your Teams OOO text. When colleagues hover over your profile card in a chat, they can click your backup's name and message them instantly without searching the directory.
Official Documentation:
Demo 3: Priority Access and Bypassing Do Not Disturb
What Ben Built in 2023:
Ben demonstrated the "Priority Access" feature within the privacy settings. He configured his client to allow specific, critical contacts (such as his colleague Adele) to bypass his "Do Not Disturb" (DND) status, ensuring their messages and calls always triggered an audible notification.
How to Build This Today (March 2026): You saw Ben set this up to ensure VIPs could break through his focus time. Today, the internal Teams configuration remains straightforward, but the underlying Operating System architecture has changed dramatically. Windows 11 now heavily enforces its own native notification rules, which can inadvertently silence Teams entirely if you do not understand the hierarchy.
Here is exactly how you configure Priority Access within Teams today:
- Click Settings and more (
...) and select Settings. - Select Privacy from the left-hand navigation pane.
- Click on the Manage priority access button.
- In the search bar, type the name of your critical contact (e.g., "Adele Vance") and select them to add them to your VIP list.
- Anyone on this explicit list can now send you chats, call you, or
@mentionyou, and you will receive standard notifications even if your Teams status is strictly set to Do Not Disturb.
The 2026 Troubleshooting Reality: As a consultant, the number one ticket I see regarding this specific feature is: "I added my boss to Priority Access, but I still didn't get their message while I was on DND.".
In 2026, you must actively synchronize your OS settings. If the Windows 11 "Focus" mode or OS-level "Do Not Disturb" is toggled ON, it will aggressively override the Teams app-specific Priority Access list. The OS acts as the ultimate gatekeeper. Even if Teams tries to push the notification through for a priority contact, Windows will silently block it at the desktop level.
To resolve this conflict permanently:
- Open your Windows Settings menu.
- Navigate to System > Notifications.
- Ensure Windows Do Not Disturb is either toggled OFF, or explicitly configure the Windows Focus settings to allow Microsoft Teams to bypass the OS barrier.
Notification Hierarchy: Windows OS vs. Teams Client
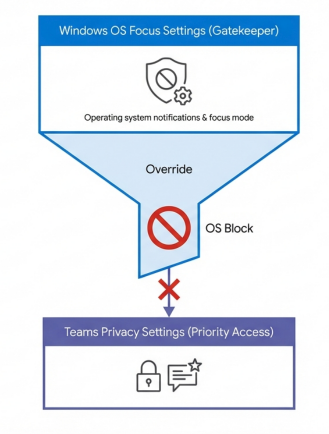
Windows 11 Do Not Disturb settings sit above Microsoft Teams in the notification hierarchy. If the OS blocks notifications, Teams Priority Access cannot bypass it.
Hardware Overrides: Another common failure point in 2026 involves peripheral hardware. If you are using a certified USB headset that features its own physical ringtone settings or hardware-level DND buttons, these can override your Teams software settings. Ensure your headset firmware is updated via the manufacturer's software (like Poly Lens or Jabra Direct) to respect Teams status sync.
AI and Copilot Simplifications:
While Copilot cannot directly alter your Windows OS settings, it serves as a highly effective secondary safety net. If you are going into a deep work session and turning on full DND, you can use the Copilot Chat interface to create an active monitor.
Prompt Copilot: "Monitor my chats for the next two hours. If Adele messages me regarding the Q3 budget, alert me immediately.". While standard Priority Access remains the most reliable instantaneous method, this targeted AI monitoring is invaluable for catching context-specific emergencies from non-VIP contacts.
**Quick Win:**Do not overpopulate your Priority Access list. If you add more than three or four people, you entirely defeat the purpose of deep work. Reserve this list strictly for direct managers, vital project leads, or critical incident responders.
Official Documentation:
How to suppress incoming call dialog and notifications (Note: This support document covers the exact OS override mechanics).
Demo 4: Signing Into Multiple Work Accounts (MTMA)
What Ben Built in 2023:
Ben discussed the severe pain points associated with signing into multiple Office 365 work accounts. In the classic client, this often required signing entirely out of one tenant, typing in credentials, executing MFA, and signing into another. Alternatively, users relied on clunky web browser profiles to keep two tenants active.
How to Build This Today (March 2026): You saw Ben navigate the limitations of the classic Electron architecture. Today, this is arguably the single greatest workflow improvement in the "New Teams" client. The introduction of Multi-Tenant Multi-Account (MTMA) architecture means you can be logged into your primary employer, a partner organization as a guest, and a secondary consulting tenant simultaneously.
Here is exactly how you configure multiple concurrent accounts today:
- Open your Teams desktop app. Ensure you are running the modern client.
- Click your Profile Picture in the top-right corner of the interface.
- Select Add another account from the dropdown menu.
- Choose an account you have used previously on this machine, or click Create or use another account.
- Enter the sign-in credentials (email, password, and MFA prompt) for the secondary tenant.
- Once authenticated, both accounts are active in the background simultaneously.
The MTMA User Experience: You no longer need to manually switch tenants just to see if you have new messages. The profile menu acts as a unified dashboard displaying all active accounts. If you receive a chat or channel ping in your secondary tenant while actively working in your primary tenant, a small notification badge (a red dot or unread count) will appear directly over that specific account's avatar in your dropdown menu.
Clicking that notification badge instantly pivots your client UI to the secondary tenant. Because the connection is held active in the background, there is no loading screen or re-authentication required. You can instantly access chats and make calls with full feature parity.
The PWA Workaround for Strict Separation: Currently, Microsoft Teams does not support viewing two different accounts side-by-side concurrently within a single desktop app window. If your workflow requires you to monitor two tenants simultaneously on separate monitors, you must use the Progressive Web App (PWA) workaround.
To execute the PWA setup:
- Open Microsoft Edge.
- Navigate to
teams.microsoft.comand log into your secondary tenant account. - Click the
...menu in Edge > Apps > Install this site as an app. - Right-click the new icon on your taskbar and select Pin to taskbar. You now have a standalone, concurrent, and fully functional instance of Teams for your second account running alongside your primary desktop app.
AI and Copilot Simplifications: It is crucial to understand that Copilot's data boundary strictly respects the active tenant you are currently viewing. It cannot summarize cross-tenant data. If you are working in Tenant A, Copilot cannot read emails, chats, or files from Tenant B to generate a unified summary. You must physically switch your UI to Tenant B to use Copilot against that specific data silo.
**Quick Win:**Reorder your tenants for efficiency. If you are a guest in 15 different customer tenants, click your profile picture, go to the account list, and use the drag-and-drop capability to pull your most active client tenants to the very top of the list.
Official Documentation:
Demo 5: Keyboard Shortcuts (Unmute via Control + Space)
What Ben Built in 2023:
Ben highlighted several keyboard shortcuts, specifically focusing on the Control + Space command. This shortcut allows a user to temporarily unmute their microphone to speak during a meeting, instantly dropping back to mute as soon as the keys are released.
How to Build This Today (March 2026): You saw Ben demonstrate this as a neat privacy trick. Today, this push-to-talk functionality is deeply embedded in the Teams privacy architecture. It is considered mandatory operational knowledge for anyone working in hybrid environments.
However, you must explicitly enable it before it will work. Here is exactly how you configure and use this today:
- Click Settings and more (
...) > Settings. - Select Privacy from the left-hand navigation pane.
- Scroll down and locate the Keyboard shortcut to unmute toggle. Ensure this is turned ON.
- Join any Teams call or meeting.
- Click the standard microphone icon on the UI to fully mute yourself.
- On Windows: Press and hold
Ctrl + Spacebar. - On Mac: Press and hold
Option + Spacebar. - An alert will appear on your screen confirming you are temporarily unmuted. Speak your piece, then release the keys. Your microphone instantly returns to the muted state.
Important Behavioral Caveats:
Sometimes this shortcut fails for users mid-meeting. You must understand two critical limitations regarding this shortcut:
- Window Focus is Absolute: The shortcut only works if the main Teams meeting window is the currently active focus window on your OS. If you are typing notes in a Word document on your secondary monitor, pressing
Ctrl + Spacewill only add a space to your document; it will not unmute Teams. You must click back to the meeting window first. - Application Stage Interference: The shortcut is disabled if you have clicked into the meeting chat box to type a message. Furthermore, if a presenter is sharing interactive applications like PowerPoint Live or Microsoft Whiteboard on the meeting stage, the shortcut is often temporarily disabled to prevent key-binding conflicts.
Expanding Your Shortcut Repertoire: While Ctrl + Space is vital, modern workflows demand broader shortcut mastery. In 2026, you should rely heavily on the / command architecture.
Click into the search bar at the very top of Teams and type /. You will see a list of instant actions.Typing /unmute and hitting enter will instantly unmute your active meeting without touching the mouse.Typing /goto followed by Ctrl + G allows you to instantly jump to specific channels.
For a quick reference of other vital meeting shortcuts, see the table below:
| Action | Windows Shortcut | Mac Shortcut | Web App Support |
|---|---|---|---|
| Toggle Mute (On/Off) | Ctrl + Shift + M | Cmd + Shift + M | Yes |
| Toggle Video (On/Off) | Ctrl + Shift + O | Cmd + Shift + O | Yes |
| Raise/Lower Hand | Ctrl + Shift + K | Cmd + Shift + K | Yes |
| Toggle Live Captions | Alt + Shift + C | Option + Shift + C | Yes |
AI and Copilot Simplifications: Copilot's ability to generate accurate meeting recaps relies entirely on the quality of the live transcription. If you use Ctrl + Space to interject quickly, you must ensure you speak loudly and clearly.
Brief, clipped audio injections are notoriously difficult for Copilot's Natural Language Processing to accurately attribute to specific speakers in the transcript. If you are providing a critical project update, it is better to fully unmute (Ctrl + Shift + M), speak your update clearly, pause, and mute again. This ensures Copilot captures your action items accurately for the post-meeting summary.
Quick Win: If your screen locks frequently during long webinars, your mic may stay live. Navigate to Settings > Privacy and toggle ON "Turn off my camera and mic when my screen locks". This guarantees you are muted if you step away from your desk.
Official Documentation:
Demo 6: Popping Out Existing Chats
What Ben Built in 2023:
Ben covered the workflow of "popping out" existing chats. This allowed him to decouple a specific conversation from the main Teams client window and drag it to a different screen or monitor for easier side-by-side multitasking.
How to Build This Today (March 2026): You saw Ben pop out chats to manage his workspace. Today, mastering multi-window management is absolutely vital, especially when referencing complex documentation or utilizing the new Copilot agents alongside human conversations.
There are three primary ways to pop out an existing chat in the modern client. I will detail all three, progressing from novice to power-user workflows.
Method 1: The Hover Action (Mouse-Driven)
- Navigate to the Chat tab in the left-hand rail of the main Teams window.
- Hover your mouse pointer over the name of the person or group chat you wish to separate.
- Click the Pop out chat icon (represented by a square with an arrow pointing up and to the right) that appears upon hover.
Method 2: The Command Menu
- While actively inside the chat you want to pop out, click the More options (
...) menu located in the upper right corner of that specific chat pane. - Select Pop out chat from the dropdown.
Method 3: The Power User Keyboard Shortcuts If you want to move at consulting speeds, you must abandon the mouse. This workflow turns navigating the UI into a near-instantaneous action.
- Windows Desktop: Ensure the chat you want is active, then simply press
Ctrl + O(Control + letter O). - Mac Desktop: Ensure the chat is active, then press
Command + O. - Starting a New Thread: If you want to start a brand-new conversation directly in a popped-out window instantly, press
Ctrl + Shift + N.
By popping out active chats using the Ctrl + O shortcut, users can maintain continuous conversation context on a secondary monitor. This allows you to work completely undisturbed in primary applications like Microsoft Excel or PowerPoint on your main display, seamlessly glancing over for updates. It is the ultimate dual-monitor productivity hack.
AI and Copilot Simplifications: In early 2026, Microsoft introduced "infinite scroll" to the Copilot chat history, allowing seamless access to older data.Copilot Chat can deeply interact with popped-out windows.
If you pop out a high-velocity chat to monitor a live incident response, you can open Copilot in your main Teams window and leverage Context IQ. You can prompt it: "Summarize the ongoing status in the popped-out 'Sev-1 Outage' chat." Copilot will parse the real-time context of that specific thread, even while it floats on another screen. You can also highlight specific text within a popped-out window; an "Ask Copilot" button will instantly appear, allowing you to run translations or request summaries on that precise snippet of text.
**Quick Win:**Use Windows Snap Assist in tandem with popping out chats. Once you press Ctrl + O to pop out a chat, press the Windows Key + Right Arrow to instantly snap the chat to the right half of your screen. Then, select your primary work document to fill the left half. This creates a perfect split-screen workspace in under two seconds.
Official Documentation:
Demo 7: Third-Party API Access (Elgato Stream Deck)
What Ben Built in 2023:
Ben previewed a highly advanced configuration: enabling third-party API access within the privacy settings. This allowed external hardware devices, specifically macro pads like the Elgato Stream Deck, to interface directly with Teams. Ben used this to control his camera and microphone using physical buttons on his desk.
How to Build This Today (March 2026):
You saw Ben configure this using the legacy API token system, copying and pasting a long string of characters. Stop exactly what you are doing. If you try to follow a 2023 guide for this today, you will fail entirely.
In late 2025, Microsoft radically altered this architecture for security reasons, deprecating the vulnerable background API interface. You no longer copy and paste manual API tokens. The New Teams client handles hardware pairing strictly from within an active, live meeting environment to ensure explicit user consent and prevent unauthorized hardware hijacking.
Here is the exact, modern procedure to pair a Stream Deck (or similar certified hardware) in March 2026:
- First, ensure your Elgato Stream Deck software is updated to version 6.4 or higher.
- You must download and install the official Microsoft Teams plugin (version 2.0.27 or higher) directly from the Elgato Marketplace.
- Open your Teams desktop app.
- Click Settings and more (
...) > Settings. - Select Privacy on the left-hand rail.
- Scroll down to the Third-party app API section and click Manage API.
- Consultant Warning: If this button is greyed out, your IT Administrator has restricted hardware pairing via global policy. You must submit an IT ticket; there is absolutely no local workaround.
- Turn the toggle ON next to Enable API.
- The Critical New Step: You must now start or join a live Teams meeting. This cannot be a 1:1 chat or a test call; it must be a fully active meeting space.
- While in the active meeting, press any Teams-assigned physical button on your Stream Deck (for example, the mute macro button).
- A pop-up security window will appear inside Teams asking you to Allow or Block the new connection request. Click Allow.
- If the connection fails or the API token field looks empty in the prompt, click Generate to force a fresh handshake token.
Once authorized, your physical buttons will control meeting functions reliably.Supported functions include Raise/Lower Hand, Send Reactions, Mute/Unmute Audio, Turn Camera On/Off, and Blur Background.
Hardware Specific Troubleshooting: If you are using third-party headsets (like Jabra or Poly), be aware that their proprietary desktop software (Jabra Direct, Poly Hub) frequently interferes with Teams API button functionality. If your headset buttons fail to mute Teams, the first troubleshooting step is always to close the vendor software entirely. Furthermore, avoid using legacy hardware; older models like the Polycom CX100 or Jabra Pro 930 have known API issues in the 2026 client.
AI and Copilot Simplifications: While Stream Decks control the mechanical functions of a meeting, Copilot handles the cognitive functions. Many power users are now mapping a macro button on their Stream Deck to launch a browser URL pointing directly to their Microsoft 365 Copilot Dashboard. This allows them one-touch access to their AI agent hub during complex calls, enabling rapid data retrieval without breaking eye contact with the camera.
**Quick Win:**Do not waste a physical button on your Stream Deck for the "Leave Meeting" function. It is far too easy to bump accidentally, dropping you from a critical client call instantly. Stick to Mute, Video, and Raise Hand for your physical macros.
Official Documentation:
3. Licensing Quick Reference
To execute the modern workflows and features described in this guide, your tenant must be appropriately licensed. Following the major Microsoft licensing updates implemented in April and July of 2026, Microsoft shifted several premium features into standard enterprise tiers, while heavily isolating advanced AI capabilities.
The pricing structure also evolved, with Office 365 E3 increasing to $26.00/user/month and Office 365 E5 increasing to $41.00/user/month (effective July 1, 2026).
The table below outlines the specific licensing requirements for the configurations discussed in this report:
| Feature / Configuration | Required License(s) | Consultant Notes |
|---|---|---|
| Core Client Settings (Theme, Density, MTMA, Pop-outs) | Microsoft 365 E3 / E5, Office 365 E3 / E5, or Teams Enterprise | Standard functionality included in all base commercial suites. |
| Out of Office / Outlook Sync | Exchange Online Plan 1 or 2 (Included in M365 E3/E5) | Requires an active Exchange mailbox for bidirectional calendar synchronization. |
| Priority Access / Privacy Routing | Microsoft 365 E3 / E5 or Teams Enterprise | Included in base privacy management features. |
| Third-Party API / Stream Deck | Microsoft 365 E3 / E5 or Teams Enterprise | Requires base license, plus explicit IT Admin policy authorization via Teams Admin Center. |
| Advanced Copilot Chat Integration (Settings, Summaries) | Microsoft 365 Copilot (Add-on) | Requires an eligible base license plus the specific $30.00/user/month Copilot add-on. |
| Advanced Meeting Architecture (Up to 10k Attendees) | Teams Enterprise | Teams Enterprise now natively includes view-only events for up to 10,000 attendees and Microsoft eCDN support. |
| Massive Event Scaling (10k - 100k Attendees) | Teams Enterprise + Attendee Capacity Packs | Events scaling past standard limits require specialized capacity packs purchased by the organizer. |
| Shared Physical Workspace Routing | Teams Shared Space - Single Space | A single license (formerly Shared Device) now manages up to four individual desks/phones. |
By understanding these modern configurations, you can fully leverage the performance improvements of the 2026 Teams architecture while harnessing the cognitive offloading provided by Microsoft 365 Copilot.
Briefing published by Collab365 Spaces. Cite as "Teams Takeover: The 2026 Companion Guide", Collab365 Spaces. 43 sources referenced.