The landscape of the Microsoft 365 ecosystem has evolved dramatically since the original recording of this workshop. The introduction of Microsoft 365 Copilot, the rebranding of advanced content services, and the retirement of several legacy Viva modules have fundamentally altered intranet architecture and administration.
This report serves as a definitive April 2026 companion guide. The analysis details the transition from manual, static site assembly toward dynamic, AI-driven provisioning, centralized brand management, and embedded automation.
1. What's Changed Since This Session
The following table summarizes the critical technological shifts relevant to the core scenarios presented in the original session. The data highlights the transition from classic manual configurations to the modern, automated 2026 toolset.
| Technology (Circa 2023) | Status in 2026 | What Replaced It (If Applicable) |
|---|---|---|
| SharePoint Manual Site Creation | Legacy / Updated | SharePoint Site Creation with AI (Copilot) 1 |
| SharePoint Classic Theming | Replaced | SharePoint Brand Center 2 |
| Flat Hub Site Architecture | Expanded | Hub-to-Hub (Parent/Child) Associations 3 |
| Single Viva Connections Dashboard | Legacy | Multiple Viva Connections Experiences 4 |
| Microsoft Viva Topics | Retired (Feb , 2025) 5 | Microsoft 365 Copilot / SharePoint Agents 6 |
| Microsoft Viva Goals | Retiring (Dec , 2025) 7 | No direct replacement announced; export data 7 |
| Microsoft Syntex | Rebranded (Nov 2023) 8 | SharePoint Premium 9 |
| Third-Party eSignature | Optional | SharePoint Native eSignature 9 |
| Classic Power Automate UI | Legacy / Updated | Unified Workflows & Quick Steps in Lists 10 |
| Classic Microsoft Teams Client | Retired (July , 2024) 11 | New Microsoft Teams 11 |
2. How to Build This Today
The original session outlined a comprehensive strategy for building a Teams-first employee experience. While the foundational principles of modern intranets remain relevant, the mechanical execution has shifted entirely. The following sections provide exhaustive, step-by-step instructions for executing the original session's six core demos using the definitive April 2026 toolset.
Demo 1: Creating a Home Page and Departmental Site using Modern SharePoint
The session showed you creating a home page and departmental site using Modern SharePoint. Here's how you'd build that same thing today in April 2026.
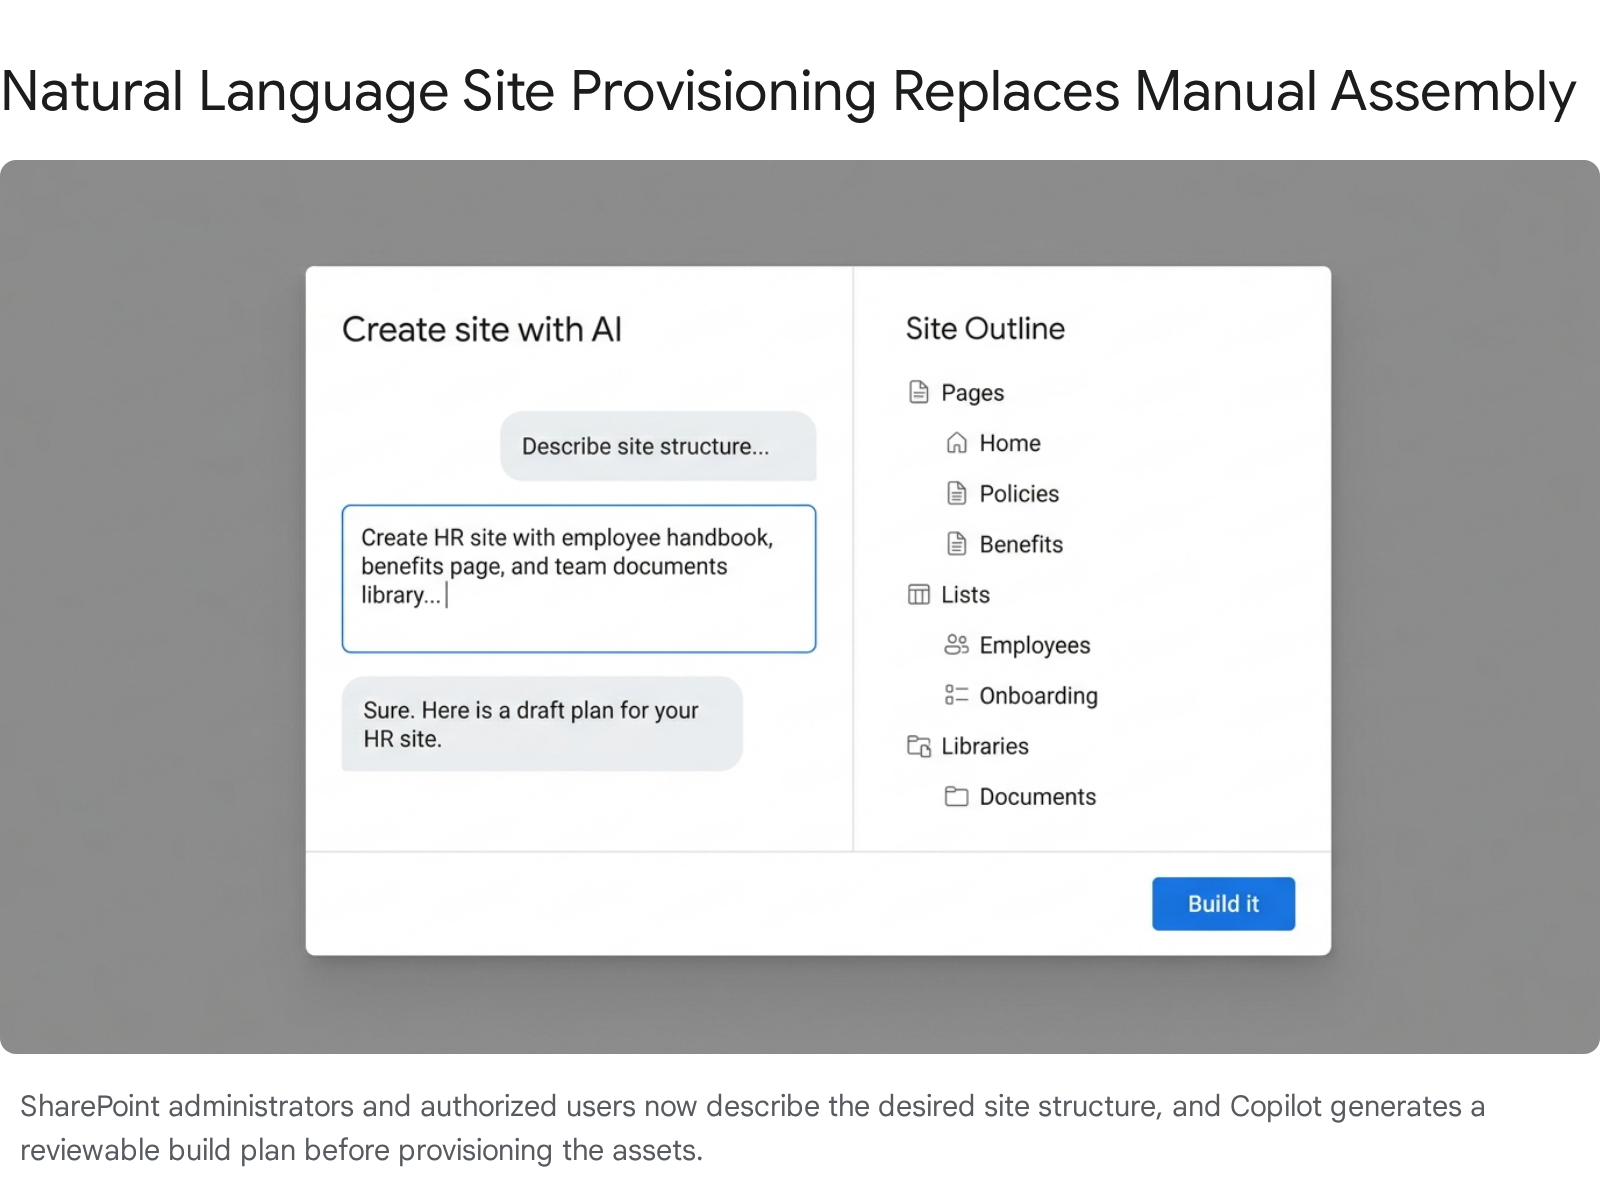
The original approach required manually selecting out-of-the-box templates, dragging and dropping web parts, and manually configuring navigation. This process was highly manual and required a baseline understanding of SharePoint page layouts. Today, manual assembly is no longer the standard. The approach now relies entirely on Microsoft 365 Copilot for Site Creation, the centralized SharePoint Brand Center, and the deployment of intelligent SharePoint Agents.
Provisioning the Site with AI (Copilot)
Instead of starting from a blank canvas, Copilot leverages natural language processing to generate the site structure automatically. The AI generates a SitePlan.md file in the background, which governs the provisioning process, configures navigation, and generates sample data.
To execute this, the tenant must have opted into the preview or general availability config, users must hold an active Copilot license, and self-service site creation must be enabled.
- Navigate to the SharePoint start page.
- Select Create site from the primary command bar.
- Choose the Create with AI option.
- Enter a detailed natural language prompt. Example: "Build a departmental site for the Human Resources team. Include a document library for policies, a list for onboarding tracking, and a news section for organizational announcements.".12
- Review the AI-generated build plan. Copilot will propose an outline containing specific pages, lists, and libraries.
- Interactively adjust the plan through the chat interface. Request changes such as, "Add an FAQ page for benefits.".1
- Select Build it. Confirm the site name and sensitivity label.
- The system will provision the site, configure navigation, create the specified lists/libraries, and populate them with sample data.
Quick Win: The most efficient way to generate high-quality pages is to utilize existing organizational documents as grounding data. When using Copilot to author an individual page via the SharePoint Page Agent, attach up to five existing files (e.g., Word, PowerPoint, PDF). Copilot will intelligently extract the contents to populate the page sections, eliminating manual data entry.
Applying Corporate Branding via the Brand Center
The original session demonstrated applying themes manually per site. In April 2026, styling is governed centrally by the SharePoint Brand Center. This is a dedicated application that manages custom fonts, colors, and imagery across the tenant.
The Brand Center leverages the SharePoint Organization Asset Library (OAL) to store and manage assets in the background. A Global Administrator must enable it to allow the use of custom font packages and centralized color palettes.
- Ensure the Global Administrator has activated the Brand Center in the Microsoft 365 Admin Center (Settings > Org settings > Brand Center).
- Navigate to the newly provisioned departmental site.
- Select Settings (the gear icon), then select Change the look.
- Select Font.
- Choose a custom Font Package defined by the organization's brand manager. This applies the typography uniformly across the site and associated Viva Connections experiences.
- Return to Change the look and select Theme to apply centralized brand colors.
Deploying SharePoint Agents
Every modern SharePoint site now comes equipped with a built-in, intelligent assistant known as a SharePoint Agent. The original session relied on manual search to find information. Today, these agents act as subject matter experts for the site's content.
Every site includes a "Ready-made agent" automatically scoped to the site's content without any administrative setup. However, administrators can create "Custom-built agents" to tailor the experience.
- Navigate to the newly created departmental site homepage.
- Select New from the command bar, then select Agent.
- Define the agent's behavior and identity in the setup pane.
- Select the specific sources the agent should use to ground its answers. This can include specific document libraries, lists, or individual files.
- Save and share the custom agent. Team members can now interact with this agent directly in Teams or Copilot Chat to query department-specific information securely.
Official Documentation:(https://support.microsoft.com/en-us/office/create-an-agent-in-sharepoint-d16c6ca1-a8e3-4096-af49-67e1cfdddd42) ,(https://learn.microsoft.com/en-us/sharepoint/brand-center-overview).
Demo 2: Linking SharePoint Team Sites and Teams to the Intranet
The session showed you linking SharePoint team sites and Teams to the intranet by creating and associating Hub Sites. Here's how you'd build that same thing today in April 2026.
The original session demonstrated linking a departmental site to a primary intranet hub. This flat architecture, featuring one hub with many associated sites, was standard practice. Today, intranets require deeper architectural flexibility to support complex enterprise structures.
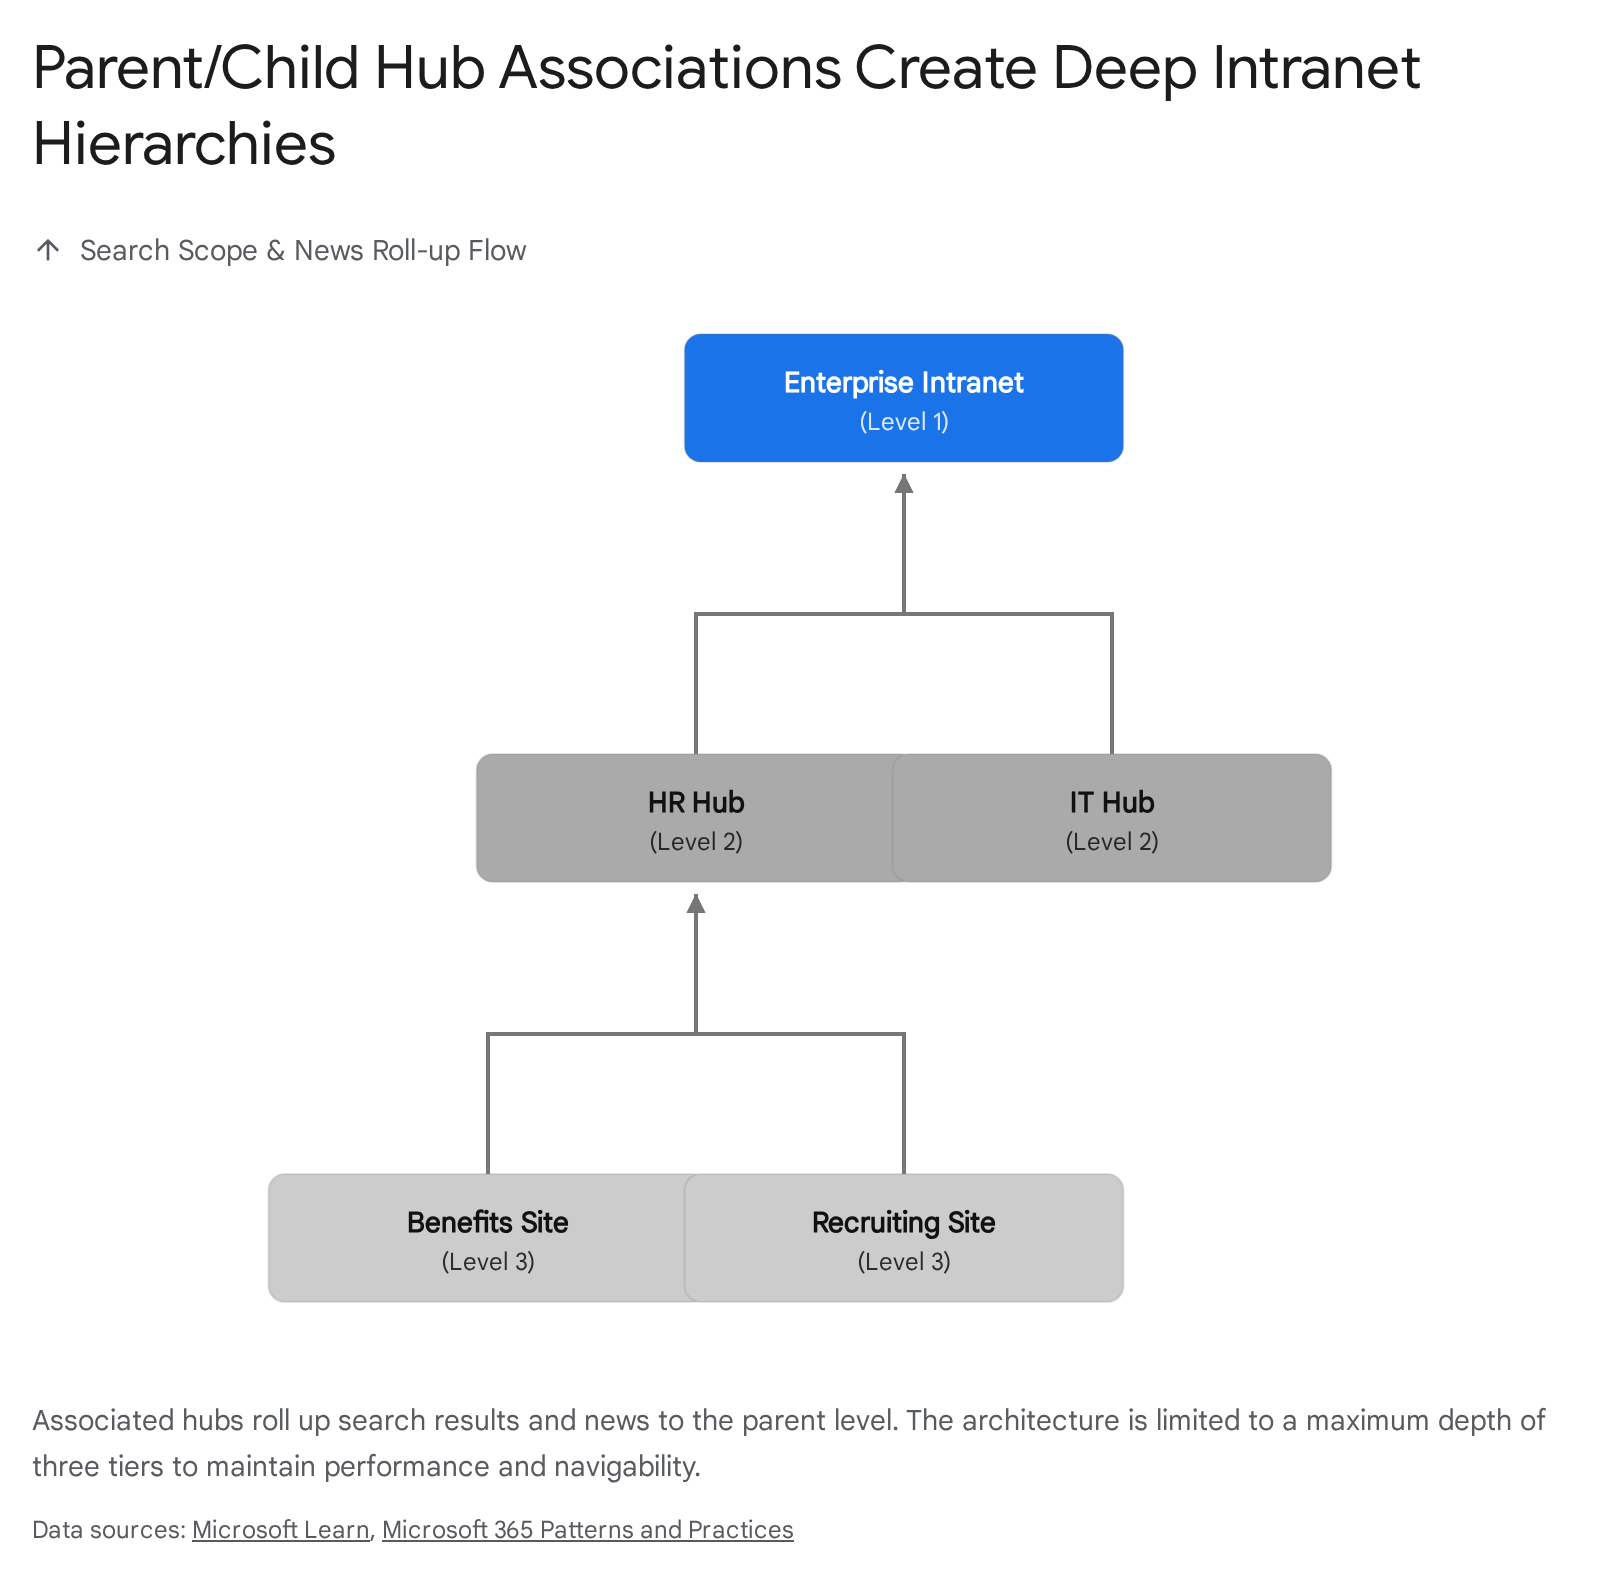
The 2026 standard utilizes Hub-to-Hub (Parent/Child) Associations. This feature allows organizations to nest hubs up to three levels deep. This creates a comprehensive search scope and rolls up news across complex, multi-divisional enterprises seamlessly.
Executing Parent/Child Hub Associations
The process is executed exclusively within the modern SharePoint Admin Center. It requires an account with SharePoint Administrator privileges.
Organizations are limited to a maximum of 2,000 hubs per tenant. Careful planning of the three-tier structure is essential before initiating associations in the admin center.
- Navigate to the SharePoint admin center (admin.microsoft.com > SharePoint).
- Select Sites > Active sites from the left-hand navigation pane.
- Select the departmental hub site that needs to be associated with the main enterprise intranet hub.
- On the command bar, select Hub, then choose Edit hub site settings to open the properties panel.
- Locate the Parent hub association field.
- Select the primary enterprise intranet hub from the dropdown menu.
- Select Save.
- To verify the architecture, select View hubs associated to this hub from the settings panel.
Updating Navigation for Associated Hubs
While search scope automatically cascades down the hub hierarchy, navigation links must be explicitly configured. Hub site owners must add links to ensure users can discover the parent hub.
- Navigate to the child hub site.
- Select Edit on the hub navigation bar.
- Select Associated hubs to automatically generate navigational links pointing upward to the Parent hub.
- Save the navigation changes.
Warning: It is critical to note that while search scopes and news roll-ups cascade through parent/child associations, theme inheritance does not flow between associated hubs. Each hub maintains its distinct branding, which must be centrally managed via the Brand Center to maintain corporate consistency.
Official Documentation: Associate a hub to another hub.
Demo 3: Integrating SharePoint Home with Teams using Viva Connections
The session showed you integrating SharePoint home with Teams using Viva Connections and other Viva components for a Teams-first experience. Here's how you'd build that same thing today in April 2026.
The session originally showcased pinning a single SharePoint home site inside Microsoft Teams using Viva Connections. At the time, organizations were restricted to a single, monolithic dashboard for all employees. The 2026 reality provides significantly more granular control over the employee experience.
Organizations can now deploy Multiple Viva Connections Experiences. Administrators can configure up to 50 distinct dashboards tailored to specific divisions, roles, or geographical locations.
Furthermore, the broader Viva suite has undergone significant consolidation. Legacy components like Viva Topics were officially retired in February 2025.5 Viva Goals is scheduled for retirement in December 2025.7 AI-powered Copilot experiences and SharePoint Agents have fully absorbed their knowledge management functions, providing natural language discovery without the need for manual topic curation.
Configuring Multiple Viva Connections Experiences
This configuration occurs in the Microsoft 365 Admin Center and requires SharePoint Administrator permissions.
- Navigate to the Microsoft 365 Admin Center (admin.microsoft.com).
- Expand the Settings menu and select Viva.
- Select Viva Connections to open the dedicated admin center.
- Select Create and manage Viva Connections experiences.
- Select + Create new, displayed at the top of the interface.
- Select Create a Connections experience, then select Next.
- Enter a distinct name and description for this specific dashboard (e.g., "Frontline Workers Portal"). Specify the underlying SharePoint Home Site URL if applicable.
- Select Create experience.
Audience Targeting and Permissions
To ensure the correct dashboard reaches the correct users, precise audience targeting is required. Administrators must carefully map dashboards to directory groups.
- From the Viva Connections admin center, select the newly created experience.
- Under the Permissions tab, assign two or more Owners to manage the dashboard and its specific web parts.
- Under the Audience tab, designate the specific Microsoft Entra security groups or Microsoft 365 groups that should see this dashboard (e.g., "All Frontline Staff").
- Adjust the order of experiences in the main menu. If a user belongs to multiple targeted groups, they will receive the dashboard ranked highest in the priority list.
- Enable the experience to push it live to the designated audience.
Quick Win: Do not force users to search for the new app in the Teams store. Navigate to the Teams Admin Center (Teams apps > Setup policies), select the Global policy, and add the Viva Connections app to the Pinned apps list. Drag it to the top position to guarantee immediate visibility on the Teams app bar for all employees upon their next login.
Official Documentation:(https://learn.microsoft.com/en-us/viva/connections/set-up-admin-center).
Demo 4: Document Management Best Practices in SharePoint
The session showed you document management best practices in SharePoint document libraries. Here's how you'd build that same thing today in April 2026.
The session emphasized basic document management: creating folders, relying on simple content types, and standard version control. It relied heavily on users manually inputting data. In April 2026, standard document libraries have been supercharged by SharePoint Premium.
This suite represents the evolution and rebranding of Microsoft Syntex. Document management is no longer passive; it is highly automated, AI-driven, and intensely governed. SharePoint Premium introduces content processing tools that automate classification and extract metadata directly from files.
Implementing AI-Driven Content Processing
Instead of relying on users to manually tag files, SharePoint Premium automates classification using advanced AI models. This ensures high data fidelity and robust search indexing.
- Navigate to the target document library where high-value documents are stored.
- Add a new column to the library.
- Utilize the Autofill columns feature. SharePoint Premium's AI will automatically suggest and extract values (e.g., extracting a "Contract Value" or "Expiration Date" directly from the uploaded documents) to populate the column without human intervention.
- Configure PII Detection. Administrators can set policies to automatically flag files containing sensitive information like credit card numbers or addresses immediately upon upload.
- Enable Translation Services if operating in a multi-national tenant. This automates at-scale translation for files and video transcripts across dozens of languages.
Executing Native SharePoint eSignature
The historical reliance on third-party integrations (like Adobe or DocuSign) for basic sign-offs has been mitigated. SharePoint eSignature securely digitizes approvals directly within the Microsoft 365 trust boundary.
Recent updates have introduced free-text fields for capturing additional metadata during the signing process, and signed documents now automatically save back to their original locations.
- Ensure the administrator has enabled eSignature via the Microsoft 365 admin center (Pay-as-you-go services > Settings > Document & image services > eSignature).
- Open the target PDF or Word document from the SharePoint document library.
- In the document viewer, select the pen icon (eSignature icon) from the ribbon.
- Select the native SharePoint eSignature provider.
- Add the necessary signature fields and initial blocks to the document canvas.
- Utilize the new free-text fields to capture additional details from the signer, such as their job title or employee ID number, directly during the signing event.
- Specify the recipients and dispatch the request.
- Once signed, the executed document is automatically saved back to the original originating folder alongside the unsigned version. This ensures a complete audit trail without the file ever leaving the tenant.
Official Documentation:(https://learn.microsoft.com/en-us/microsoft-365/documentprocessing/esignature-overview).
Demo 5: Using Microsoft Lists with Automation Features
The session showed you using Microsoft Lists with automation features. Here's how you'd build that same thing today in April 2026.
The session demonstrated building automation by navigating away from SharePoint into the Power Automate portal, constructing complex logic trees, and struggling with JSON formatting to create custom action buttons.
Today, automation lives directly where the work happens. The updated Workflows experience provides a unified interface across SharePoint and Teams. This shift allows users to define processes with significantly less technical effort, utilizing guided configurations and one-click approvals.
Implementing List Grid Automation via Quick Steps
Quick steps are lightweight, no-code action buttons that appear directly in the list command bar. They leverage existing metadata to execute immediate actions without requiring users to design complex flows from scratch.
The interface features a "Mad-Lib" style creation panel. Users configure lightweight automations directly within the List context by completing guided sentences with dropdown variables. For example, a user selects an action from a dropdown to target a specific user or role, inputting a subject line directly into the inline text field. This eliminates the need to write code or navigate to separate workflow portals.
- Open the target Microsoft List or SharePoint library in the browser or via Teams.
- Select the ellipsis (...) on the command bar near the top of the page.
- Select Integrate, navigate to Quick steps, and choose Create a quick step.
- The system presents the guided, natural-language sentence structure.
- Select the primary action from the dropdown menu (e.g., Execute a flow, Draft an email, Move file).
- Complete the sentence parameters based on the chosen action. If executing a flow, the user must locate their specific Flow ID by navigating to 'My flows' and selecting 'Get flow identifier' in the export menu, then pasting that ID into the parameter field.
- Provide a display name for the button and select Create.
- The custom action button now appears permanently at the top of the Automate menu whenever an item or file is selected in the grid.
Configuring Built-in Approvals
Custom approval flows built in Power Automate are largely obsolete for standard use cases. SharePoint has simplified governance by integrating approvals directly into lists via a single toggle switch.
- Navigate to the target List or Document Library.
- Select Automate from the command bar dropdown menu, then choose Configure Approvals.
- In the resulting dialog box, switch the Enable Approvals toggle to the 'On' position and select Apply.
- To initiate an approval, a user selects a list item, clicks the new status pill located under the 'Approval status' column, and designates an approver.
- During the active approval process, the item is locked into view-only mode. Microsoft Word, Excel, and PowerPoint will show that the document is "Marked as final" to prevent tampering.
- Approvers can respond directly from the list interface or via the unified Approvals app in Microsoft Teams.
Warning: Enabling modern approvals on a list will automatically disable the "Lists sync" feature for that specific list. Furthermore, if a user forces a metadata update or saves changes to a file while an approval is active, the in-flight approval request is automatically cancelled.
Official Documentation: Create a quick step for your list or library ,(https://support.microsoft.com/en-us/office/approvals-in-lists-document-libraries-2bd0954d-5797-4be3-b78a-846f26338e17).
Demo 6: Governance and Information Architecture
The session showed you governance and information architecture concepts for Teams and sites to keep content organized. Here's how you'd build that same thing today in April 2026.
The original session discussed governance purely in terms of keeping folders organized and applying basic site permissions. In April 2026, the proliferation of Microsoft 365 Copilot has elevated governance from a structural preference to an urgent security mandate.
Because Copilot indexes and surfaces all accessible SharePoint content to answer user prompts, overshared files immediately become high-visibility data leaks. Effective governance now requires programmatic access control and aggressive lifecycle management.
Executing AI-Driven Content Governance
To combat permission sprawl and oversharing, organizations must utilize the advanced governance tools embedded in SharePoint Premium and Microsoft Purview.
- Navigate to the modern SharePoint Admin Center.
- Utilize Data Access Governance (DAG) Reports. Generate comprehensive reports filtered by sensitivity labels and sharing policies to identify sites with excessive permissions or anomalous high-volume sharing events.
- Trigger Site Access Reviews. From the DAG report, IT administrators can initiate automated workflows that force content owners to certify that their site permissions are accurate. If the owner fails to respond, access can be programmatically restricted.
- Implement Restricted Access Control (RAC). Apply strict policies that dictate exactly which Microsoft Entra security groups can access a site. This policy supersedes and neutralizes any file-level links that may have been inappropriately shared by end-users.
Modernizing Lifecycle Management
Data retention is critical to limiting Copilot's indexing scope. Stale data must be archived or destroyed to maintain a secure and relevant knowledge base.
- Access the Microsoft Purview compliance portal.
- Configure Auto-apply retention labels utilizing trainable classifiers. These classifiers use machine learning to automatically identify document types (e.g., resumes, contracts) and apply the correct retention or deletion policy without user intervention.
- Leverage Microsoft 365 Archive. For inactive sites that must be retained for compliance but removed from active search and Copilot indexing, administrators can transition the entire site to low-cost cold storage. The metadata and version history remain intact within the Microsoft 365 boundary, but the content is no longer actively queryable.
Quick Win: Utilize Copilot directly within the SharePoint Admin Center. Administrators can use natural language prompts to instantly identify sites lacking classification labels, exhibiting inactive status, or suffering from oversharing. This allows for immediate remediation policy building without requiring complex PowerShell scripts.
Official Documentation:(https://www.2tolead.com/resources/sharepoint-to-microsoft-purview-governance-guide-2026) ,(https://techcommunity.microsoft.com/blog/spblog/introducing-sharepoint-premium-%E2%80%93-the-future-of-ai-powered-content-management-and/3981076).
3. Licensing Quick Reference
The advanced capabilities demonstrated in this 2026 update require specific licensing tiers. Microsoft announced pricing and packaging updates effective July , 2026, which impact the core enterprise suites. The following table provides a concise breakdown of the licenses necessary to execute the recommended architecture.
| Capability / Feature | Required License(s) | Notes |
|---|---|---|
| SharePoint Site Creation & Hubs | Microsoft 365 E3 or E5 | Core functionality included in standard enterprise suites. M365 E3 increases to $39.00/user/month and E5 increases to $60.00/user/month in July 2026.36 |
| SharePoint Brand Center | Microsoft 365 E3 or E5 | Available to all standard tenants; requires Global Admin to configure the Org Asset Library. |
| Viva Connections (Multiple Experiences) | Microsoft 365 E3/E5 | Up to 50 experiences are included. (Note: Premium Viva modules require the Viva Suite). |
| SharePoint Premium (Content Processing) | SharePoint Premium (Pay-as-you-go) | Billed per transaction for Autofill columns, PII detection, and translation. Promotional free tier active until Dec 2025/2026.34 |
| SharePoint eSignature | SharePoint Premium (Pay-as-you-go) | Billed per signature request. Limited free requests available through June 2026.32 |
| Advanced Governance (DAG, RAC) | SharePoint Advanced Management | Available as a standalone add-on or bundled within specific premium tiers for advanced IT controls. |
| Site Creation with AI / Agents | Microsoft 365 Copilot | Add-on license ($30/user/month) required for prompt-based authoring and full custom agent creation/interaction. |
| Microsoft Purview Automated Labeling | Microsoft 365 E5 | E5 is required for auto-apply retention labels via trainable classifiers and advanced compliance reporting. |
Briefing published by Collab365 Spaces. Cite as "2026 Update: Creating a Modern Teams-First Employee Experience Intranet", Collab365 Spaces. 15 sources referenced.