What's Changed Since This Session
The landscape of Microsoft 365 project management has undergone a massive architectural shift since Lindsay's original 2023 session. We have moved away from manual list configuration and disjointed site provisioning toward an entirely AI-led, agentic workflow system. The platform now actively manages execution rather than just storing data.
To get you up to speed quickly, review this definitive summary of the legacy components demonstrated in the original session and their precise status as of April 2026. This table strips away the marketing jargon and gives you the exact technical reality on the ground today.
| Technology | Status in April 2026 | What Replaced It |
|---|---|---|
| SharePoint Classic Site Creation | Legacy interface retired; Modern experience enforced. | SharePoint Build Experience (Reached General Availability late April 2026). |
| Manual SharePoint Lists | Active, but manual column creation is obsolete. | Microsoft Lists with Copilot for instant, AI-generated list structures. |
| Standard Teams Channels (Only) | Active, but insufficient for external vendor collaboration. | Shared Channels (B2B Direct Connect) bypassing guest account requirements. |
| Microsoft Planner (Classic) | Replaced by a unified architecture. | The New Microsoft Planner integrating To Do, Project for the web, and Copilot. |
| Manual Project Status Updates | Deprecated, manual workflow. | Project Manager Agent generating automated Loop component status reports. |
| Desktop Power BI Integration | Active, but no longer necessary for basic list reporting. | Direct 'Export to Power BI' generating cloud-based semantic models directly from lists. |
| SharePoint Add-ins & Azure ACS | Officially retired and non-functional as of April , 2026.3 | Microsoft Entra ID and modern Microsoft Graph API integrations. |
How to Build This Today
1. Dedicated SharePoint Project Site and Teams Connection
The session showed you create a dedicated SharePoint project site as the foundation for all documents and lists, then connect it to a Team to ensure proper versioning and permissions inheritance. Here's how you'd build that same thing today in April 2026.
The days of manually provisioning a SharePoint site and subsequently wrestling with Microsoft Teams linkage are over. Microsoft has streamlined this into the SharePoint Build experience, which reached General Availability in late April 2026.3 This modern interface completely eliminates the friction of disjointed provisioning. It ensures that security labels, privacy settings, and Microsoft 365 Group memberships are synchronized from the very first click.
To build this architecture today, you must begin directly within the Microsoft 365 ecosystem. Navigate to the Microsoft 365 App Launcher, which is the familiar nine-dot icon in the top left corner of your browser. From there, select the SharePoint tile to access your organizational intranet hub.
Once on the SharePoint home page, direct your attention to the updated left-hand app bar. You will select the Build node, which is the new gateway for all workspace creation. This action launches the modern provisioning wizard designed to guide you through a secure setup.
Under the Start building section of the wizard, click on the Site card. You will then be prompted to select the type of workspace you need; choose Team site to initiate the collaborative template engine. The platform will present an array of visually rich templates tailored for specific business scenarios.
Quick Win: Do not manually build a Microsoft Team first. By creating the SharePoint Team Site via the Build node, the system automatically provisions the backing Microsoft 365 Group and the connected Microsoft Team simultaneously, saving you several administrative steps.
For a standard project management baseline, select the Standard team template. Before committing, you can review the template’s details and visual previews to confirm it includes the necessary document libraries and web parts. Once verified, click Use template to proceed to the configuration parameters.
You must enter a unique Site name for your project. As you type, the system provides real-time feedback on name availability and automatically generates a corresponding Microsoft 365 Group email address. This unified naming convention is critical for maintaining a clean global address list.
Next, you must select the appropriate Sensitivity label as dictated by your organizational governance policies. This ensures that any data loss prevention (DLP) policies configured in Microsoft Purview are applied immediately to the site's contents. Note that as of April 2026, Purview DLP policies for SharePoint now allow admins to configure policy tips and email notifications entirely independently.
Set your Privacy settings to Private to ensure that only authorized project members can access the documents and lists. You will also be prompted to select a default language for the site. Be absolutely certain of this choice, as the primary language cannot be altered after the site is provisioned, although alternate languages can be added later.
Once the primary configuration is set, input the names or emails of your project stakeholders into the Add members box. Assign the Project Manager as the Owner and your contributors as Members. The synchronization engine immediately cascades these permissions down to the SharePoint document libraries and outward to the connected Microsoft Team.
For optimal access, return to the SharePoint home page and locate your newly minted site. The visual indicator of a successful connection is the Microsoft Teams channel icon displayed immediately next to the site's title in the header. Clicking this icon routes users directly to the connected Team, cementing the unified workspace.
If you plan to connect this project to a broader portfolio, navigate to your departmental SharePoint hub site first. By clicking the Create site link directly from that hub location, your new team site will automatically be associated with that hub, inheriting its navigation and branding instantly.
Finally, ensure your team is aware of the new security postures rolling out this month. Microsoft Entra ID is adding FIDO2 passkeys to registration campaigns in early April 2026.3 Admins will be nudging users toward these phishing-resistant authentication methods, which will fundamentally secure how your team accesses this new SharePoint data.
2. Structuring Teams Channels for Project Phases
The session showed you structure Teams channels to match project phases like planning, execution, and review. Here's how you'd build that same thing today in April 2026.
Channel architecture has evolved significantly beyond the rigid internal boundaries we dealt with in 2023. The modern approach utilizes a hybrid structure of Standard Channels for internal core team execution and Shared Channels for cross-organizational phase collaboration. Shared Channels are powered by Microsoft Entra B2B direct connect, which entirely eliminates the legacy requirement of managing complex guest accounts for external vendors.
To structure your project workspace efficiently, open your newly connected Microsoft Team. Click the More options (...) menu located next to the Team name and select Add channel. You should create standard channels sequentially named to maintain timeline clarity: 01 - Planning, 02 - Execution, and 03 - Review.
For project phases that require external contractor input—such as a third-party audit during your Review phase—you must create a Shared Channel. During the channel creation wizard, pay close attention to the privacy dropdown menu. You must select Shared - People you choose from your org or other orgs to enable this cross-tenant functionality.
Warning: Shared Channels currently possess critical limitations regarding the New Microsoft Planner. As of early 2026, the Planner app cannot be installed within a Shared Channel, and linking external plans disables the communications panel and attachment picker. You must house the master project schedule exclusively within a Standard Channel.
To properly manage the flow of information across these phases, you need to establish rigorous channel moderation. In the 01 - Planning channel, navigate to Channel settings > Moderation and restrict posting privileges exclusively to Team Owners. This simple step prevents vital scope documents and baseline schedules from being buried in conversational clutter.
For the 02 - Execution phase, you should deploy embedded Microsoft 365 applications directly into the channel tabs. The 2026 ecosystem heavily emphasizes consolidating daily operations directly into the Teams collaboration environment to drastically reduce context switching. Pin the master SharePoint document library to the top of your Execution channel to ensure all stakeholders operate from a single, auditable source of truth.
You should also leverage the integrated Microsoft 365 Copilot to manage the velocity of conversations within these phase channels. Users can instruct Copilot to "Summarize the decisions made in the Execution channel this week.".13 This allows late-joining stakeholders or executives to catch up instantly without scrolling through dense, historical thread histories.
If your team utilizes unmanaged devices for quick check-ins, be aware of new management capabilities. Microsoft Edge for Business will support cross-tenant Intune Mobile Application Management (MAM) starting in April 2026.3 This enables highly secure work profile access to your Teams channels without requiring full device enrollment, easing the burden on external contractors.
Finally, keep your channel app ecosystem clean and compliant. Microsoft is introducing rule-based Teams app management in early April 2026.3 This allows your IT administrators to bulk-govern certified third-party apps by publisher and scope. Ensure any project management add-ins you intend to use in your channels comply with these new automated governance rules.
3. Building a RAID LOG in SharePoint Lists
The session showed you build a RAID LOG (Risks, Assumptions, Issues, Decisions) using SharePoint lists with custom columns. Here's how you'd build that same thing today in April 2026.
The tedious days of manually provisioning columns, defining specific data types, and writing JSON for status formatting are completely over. Today, the entire list creation process is automated through the integration of Microsoft 365 Copilot within Microsoft Lists. The underlying architecture remains a robust SharePoint List, but the creation interface is now entirely conversational.
To begin, navigate to the Microsoft Lists application via your Microsoft 365 app launcher. Select the + New list button from the primary organizational dashboard. Instead of choosing a blank list or settling for a rigid legacy template, you will select the Describe it to Copilot option.
Quick Win: Use highly specific prompt engineering to dictate your exact column architecture. Instruct Copilot: "Create a comprehensive RAID log for enterprise project management. Include distinct columns for Category (Risk, Assumption, Issue, Decision), Description, Owner, Priority (High, Medium, Low), and Status."
Copilot will analyze your prompt and instantly generate a visual preview of the list structure directly in the interface. It automatically configures the appropriate underlying column types for you. It expertly deploys 'Choice' columns for your Category and Priority fields, and assigns 'Person or Group' columns for the Owner field to ensure identity integration.
Take a moment to review the generated schema in the preview window. If the structure requires any adjustment, simply converse with Copilot directly in the chat interface. You can command it to "Add a Date column for Target Resolution" or "Change the Priority column to include a 'Critical' option."
Once the schema is perfected to your exact specifications, click Create. The resulting list is automatically provisioned and housed securely within your designated SharePoint site.
To align this new RAID log with the project phases you built earlier, navigate directly to the 02 - Execution channel in Teams. Click the + Add a tab button at the top of the channel, select the Lists app, and choose your newly generated RAID Log.
This deep integration ensures the RAID log remains front-and-center during the execution phase, eliminating the need to hunt for links. Because the list is deeply integrated into the Microsoft 365 fabric, assigning an Owner to a risk in the list automatically triggers a notification to that user via their Teams Activity feed.
If you plan to extend this list into a custom application later, be aware of severe legacy retirements. Microsoft officially retired the SharePoint 2013 Workflow engine and Azure ACS for SharePoint Online on April , 2026.3 Legacy SharePoint Add-ins have also reached their end-of-life and will no longer function for any existing tenants.
Therefore, any custom automations or third-party app access tied to your RAID log must rely entirely on modern Power Automate cloud flows or the Microsoft Graph API. Furthermore, if you plan to surface this list data in model-driven apps, note that custom theming using the Microsoft Fluent 2 design system is now generally available. Classic theming is no longer honored, as the modern look became mandatory in April 2026.17
4. Implementing Project Startup Checklists
The session showed you implement project startup checklists in SharePoint lists to standardize kickoffs. Here's how you'd build that same thing today in April 2026.
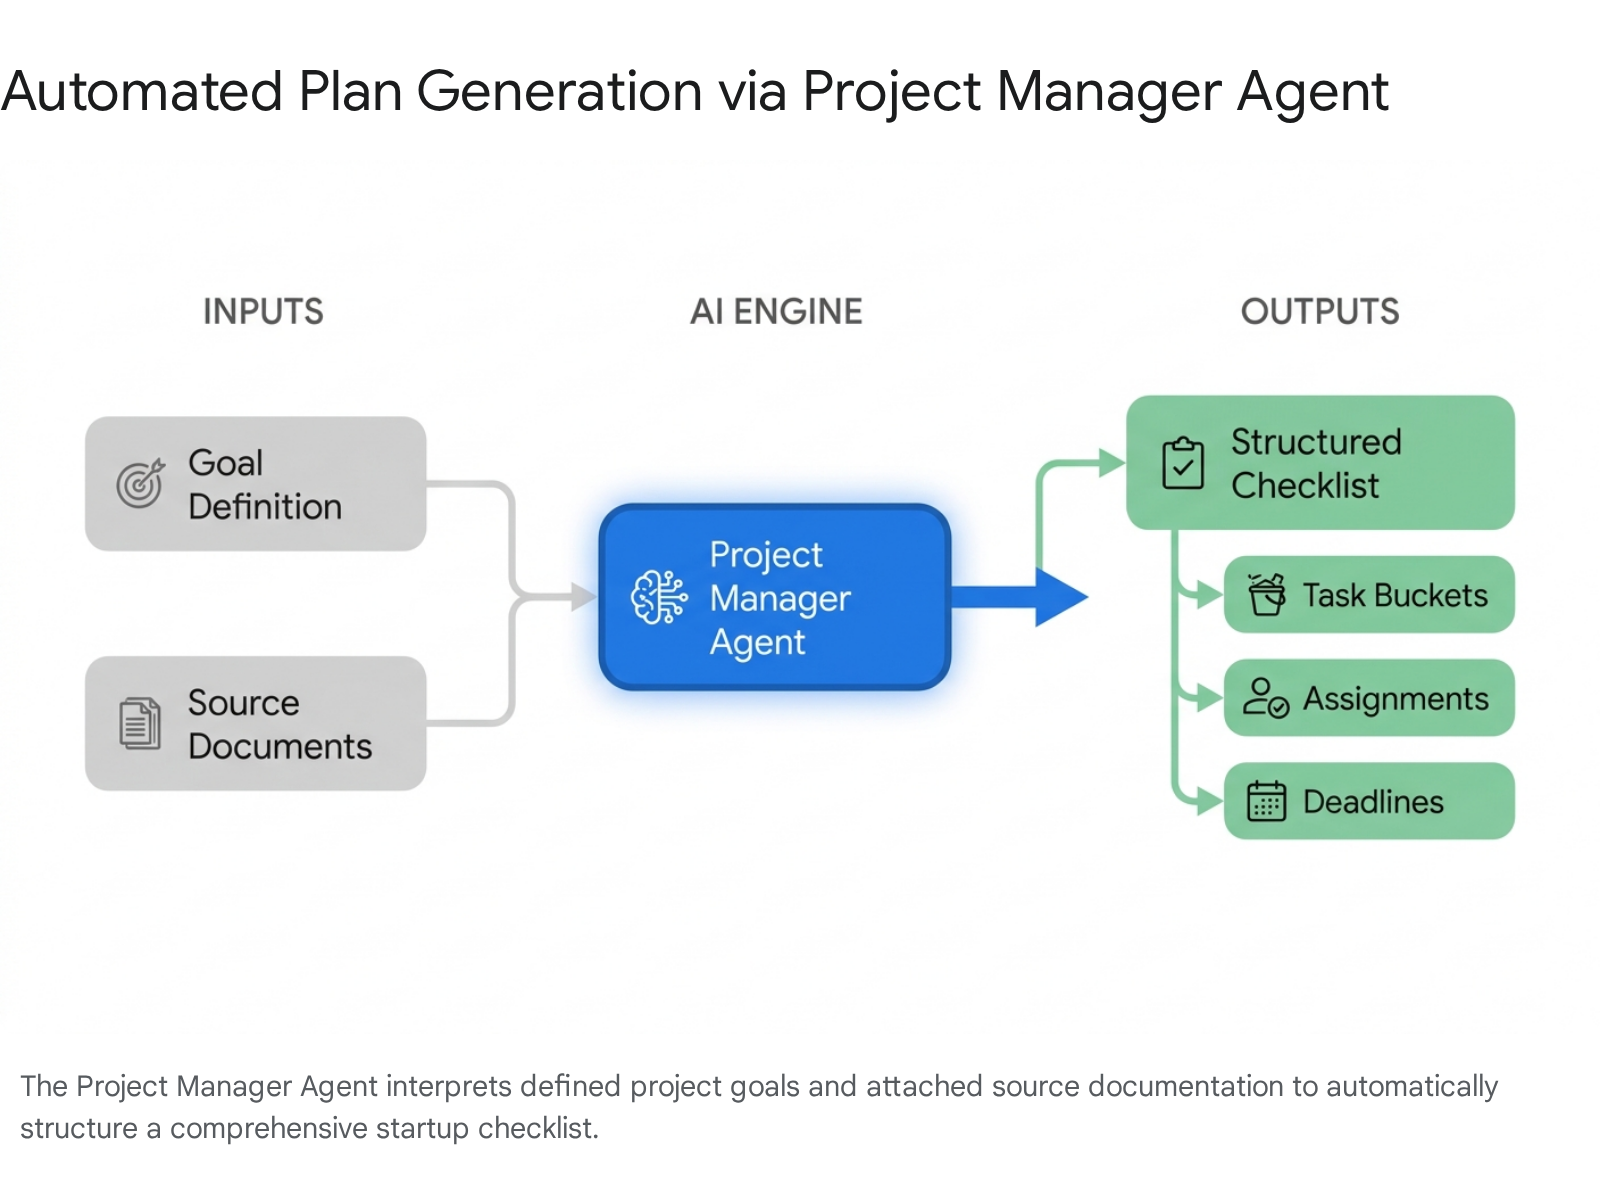
Standardized project kickoffs are no longer managed via static, disconnected SharePoint lists. The New Microsoft Planner—a unified work management solution combining To Do, Planner, and Project for the web—now features the powerful Project Manager Agent to automate startup scheduling. This agent utilizes generative AI to transform static kickoff documents into dynamic, executable plans.
To build an intelligent startup checklist, navigate to the unified Planner app within Microsoft Teams. Select + New plan located in the top left corner of the main interface. You must choose Premium plan to ensure access to the advanced agent capabilities and timeline views. However, basic plan users who hold a Microsoft 365 Copilot license will also have access to the agent functionality.
Provide a comprehensive and identifiable name for the plan. Crucially, attach it to the existing Microsoft 365 Group that was generated during your initial SharePoint site creation. Once the blank plan initializes, navigate directly to the Goals view. This is a newly introduced feature in 2026 that allows teams to explicitly connect specific granular tasks to high-level project objectives.
In the Goals tab, locate the Add goal section and type a detailed, highly specific objective. For example, you might enter: "Successfully launch the Q3 infrastructure migration with all security compliance checks validated by the external audit team.".18
To properly ground the AI and prevent hallucinations, select the Add files button located within the prompt interface. Select relevant kickoff documentation directly from your connected SharePoint library. This should include the finalized Statement of Work (SOW), the master architectural blueprint, or your corporate brand guidelines.
Quick Win: By explicitly attaching the SOW to your prompt, the Project Manager Agent will extract specific deliverables and contractual deadlines, converting them directly into assigned tasks grouped by operational buckets.
Click Generate tasks to initiate the AI process. The Project Manager Agent will synthesize the provided files against your stated goal, automatically populating the Planner board with a structured, phased startup checklist. The Agent intelligently creates individual task cards, applies appropriate tracking labels, and sets baseline due dates based strictly on the context of the uploaded documents.
You must understand the architectural limits of the platform you are deploying this on. Because you selected a Premium plan, your project is governed by robust Project for the web constraints. A Premium plan supports up to 3,000 active tasks, 300 total resources, and 2,000 successor links per project.
Conversely, if you attempt this on a Basic plan, you are restricted to a simpler architecture. Basic plans limit you to 200 buckets per plan, and users are capped at owning 400 plans globally. For enterprise scale, the Premium engine running on Dataverse is heavily recommended to avoid hitting unexpected capacity ceilings during complex kickoffs.
Regardless of the tier, the project manager always retains full editorial authority. You can refine, reassign, or mass-delete these AI-generated tasks prior to moving the board into active execution. The agent simply provides an accelerated baseline to start your project correctly.
5. Setting Up Wind-Down Checklists and Lessons Learned
The session showed you set up wind-down checklists in SharePoint for smooth project closures and lessons learned capture. Here's how you'd build that same thing today in April 2026.
Project closure is no longer a dreaded administrative burden relying on manual list updates and endless email chasing. The Project Manager Agent now fully automates the aggregation of completed work, outstanding risks, and captured lessons learned into highly polished Status Reports. These reports are deployed natively as dynamic Loop components, ensuring fluid collaboration.
To initiate your project wind-down protocol, navigate to your master plan within the Planner app in Teams. Verify that your plan contains at least ten tasks, as the AI requires sufficient data density to operate effectively. Ensure the plan is actively shared with your designated Microsoft 365 Group to maintain proper access controls.
Once verified, navigate to the dedicated Reports tab located in the top navigation bar of your plan. Select Get Started on the prominent top banner to launch the reporting wizard. The interface will prompt you to define a specific reporting time period.
For a complete closure report, use the dropdown menu to select a custom range encompassing the entire lifecycle of the project. Next, direct your attention to the Provide more details text box.
Quick Win: Do not rely on the default AI generation. Instruct the Agent precisely by typing: "Generate a comprehensive project closure report. Summarize all successfully completed milestones, highlight any items that remained overdue, and extract key lessons learned based on the comments in resolved issue tasks.".25
Select Generate. The Project Manager Agent will rapidly synthesize the vast array of plan signals—including task progress, completion dates, assignment histories, and user comments—to draft the final closure document.
The resulting output is deliberately not a static PDF or isolated Word document. It renders as a live Loop canvas directly within the application. This format is absolutely critical for modern 2026 workflows, as it allows the entire project team to co-author, comment on, and refine the generated lessons learned in real-time.
If your team conducted a post-mortem Teams meeting, you can further enhance this report. The Facilitator agent in Microsoft Teams can automatically extract verbal decisions and action items directly from the meeting transcript. The Project Manager Agent works alongside the Facilitator to pull context from that transcript and inject it directly into your closure documentation.
To distribute the finalized closure document, use the natively integrated sharing tools. You can copy the Loop component directly into the 03 - Review Teams channel chat for immediate visibility. Alternatively, you can select Share as newsletter to instantly generate a polished, highly visual SharePoint email targeted at executive stakeholders. This streamlined process ensures vital institutional knowledge is captured securely and disseminated widely without administrative overhead.
6. Integrating Power BI Basics for Project Dashboards
The session showed you integrate Power BI basics for simple project reporting dashboards connected directly to SharePoint lists data (e.g., burndown charts, risk heatmaps). Here's how you'd build that same thing today in April 2026.
The integration between SharePoint and Power BI has been radically simplified for the end user. You no longer need to launch the heavy Power BI Desktop client, locate your specific SharePoint URL, and manually map complex data models. As of 2026, robust semantic models are generated directly from the SharePoint web interface with a single click.
Navigate to your target SharePoint list, such as the AI-generated RAID log you created during the execution phase. On the top actions bar, locate and click the Export dropdown menu, then select Export to Power BI.
This action triggers a seamless, authenticated handoff to the Power BI service. A dialog box will immediately prompt you for a semantic model name and ask you to designate a destination workspace. By default, the system suggests saving the model to My workspace using the exact name of the list.
Confirm the destination or route it to a shared organizational workspace if broader access is required. The system will then automatically provision a fully functioning Power BI semantic model bound directly to your live SharePoint list data.
To construct a visual Risk Heatmap without requiring any advanced DAX coding knowledge, open your newly created report canvas. From the Visualizations pane on the right, select the standard Matrix visual icon.
Quick Win: Drag your list's "Impact" column into the Rows field and the "Probability" column into the Columns field. Place the "Count of Risk ID" into the Values field. Your matrix grid will instantly populate with the cross-section data.
To apply the required heatmap aesthetic, navigate to the formatting options for your Matrix visual. Select the Cell elements dropdown and toggle on the Background color option. Click the conditional formatting icon (fx) to establish your color scale.
Configure the lowest probability and impact value to display as a light green, and set the highest overlapping value to a deep, cautionary red. The matrix instantly transforms into a professional, easy-to-read risk heatmap that rivals custom third-party visuals.
Because this semantic model is hosted entirely in the Power BI service, your data remains perpetually fresh. Configure a scheduled refresh within the dataset settings to ensure your heatmap continually reflects the live state of the underlying SharePoint RAID log. Finally, pin this visual to a master dashboard and embed it as a dedicated tab in your Teams 02 - Execution channel for maximum stakeholder visibility.
7. Applying Work-In-Progress (WIP) Limits
The session showed you apply work-in-progress (WIP) limits in SharePoint lists or Planner tabs integrated into Teams to avoid overload. Here's how you'd build that same thing today in April 2026.
Managing team capacity and strictly enforcing Kanban methodologies require concrete Work-In-Progress (WIP) limits. In 2026, while the basic Planner engine enforces broad architectural boundaries, true column-level Kanban WIP enforcement relies on Azure DevOps integrations or AI-assisted auditing.
For software development teams or highly structured operational workflows requiring hard constraints, you must map your Microsoft Team directly to an Azure DevOps Board. Open the connected DevOps board and select the Gear icon in the upper-right corner to access the page settings.
Navigate to the Columns tab. For each distinct workflow phase mapped on your board (e.g., 'In Progress', 'Code Review', 'QA Testing'), enter a specific numerical value in the WIP Limit field. When a team member attempts to drag a task into a column that has reached its defined WIP limit, the board will immediately highlight the column in red. This creates an unavoidable visual signal of a bottleneck and prevents further task accumulation.
For general business units utilizing the New Microsoft Planner Board View, rigid algorithmic limits are intentionally absent to maintain flexibility. However, Microsoft 365 Copilot expertly bridges this operational gap by dynamically monitoring the board.
Quick Win: Instead of manually counting cards to track overload, use Copilot to audit your team's capacity continuously. Ask Copilot directly in the Teams chat interface: "Analyze per-person WIP. Show the count of active work items per team member in the Q3 Launch Plan and flag anyone with more than 5 items in progress.".32
Additionally, you should leverage the newly introduced Team Workload View available within Planner Premium. This advanced view provides detailed, visual insights into exactly how work is distributed across your resource pool. Project managers can observe capacity graphs to identify which specific team members are dangerously over-allocated before blindly assigning new tasks.
Consistent monitoring and team communication remain key to enforcing these limits. Schedule frequent, brief team meetings to discuss the specific bottlenecks surfaced by the DevOps board highlighting or your Copilot audits. Identifying columns where items sit unworked for days is absolutely crucial for eliminating workflow waste and optimizing your team's throughput during the execution phase.
Taking periodic snapshots of your board to track average item counts per column will further refine your understanding of where work stalls. Using Copilot to query, "List work items in the active state that haven't been updated in 14 days," ensures nothing slips through the cracks of your WIP strategy.
Licensing Quick Reference
Deploying these advanced 2026 architectures requires specific, modern licensing tiers. The introduction of the Microsoft 365 E7 suite—heavily marketed as the "Frontier Suite"—in May 2026 has fundamentally restructured how enterprise organizations acquire and govern AI agents.
The following matrix and table outline the core licenses and their respective capabilities to cleanly guide your procurement decisions.
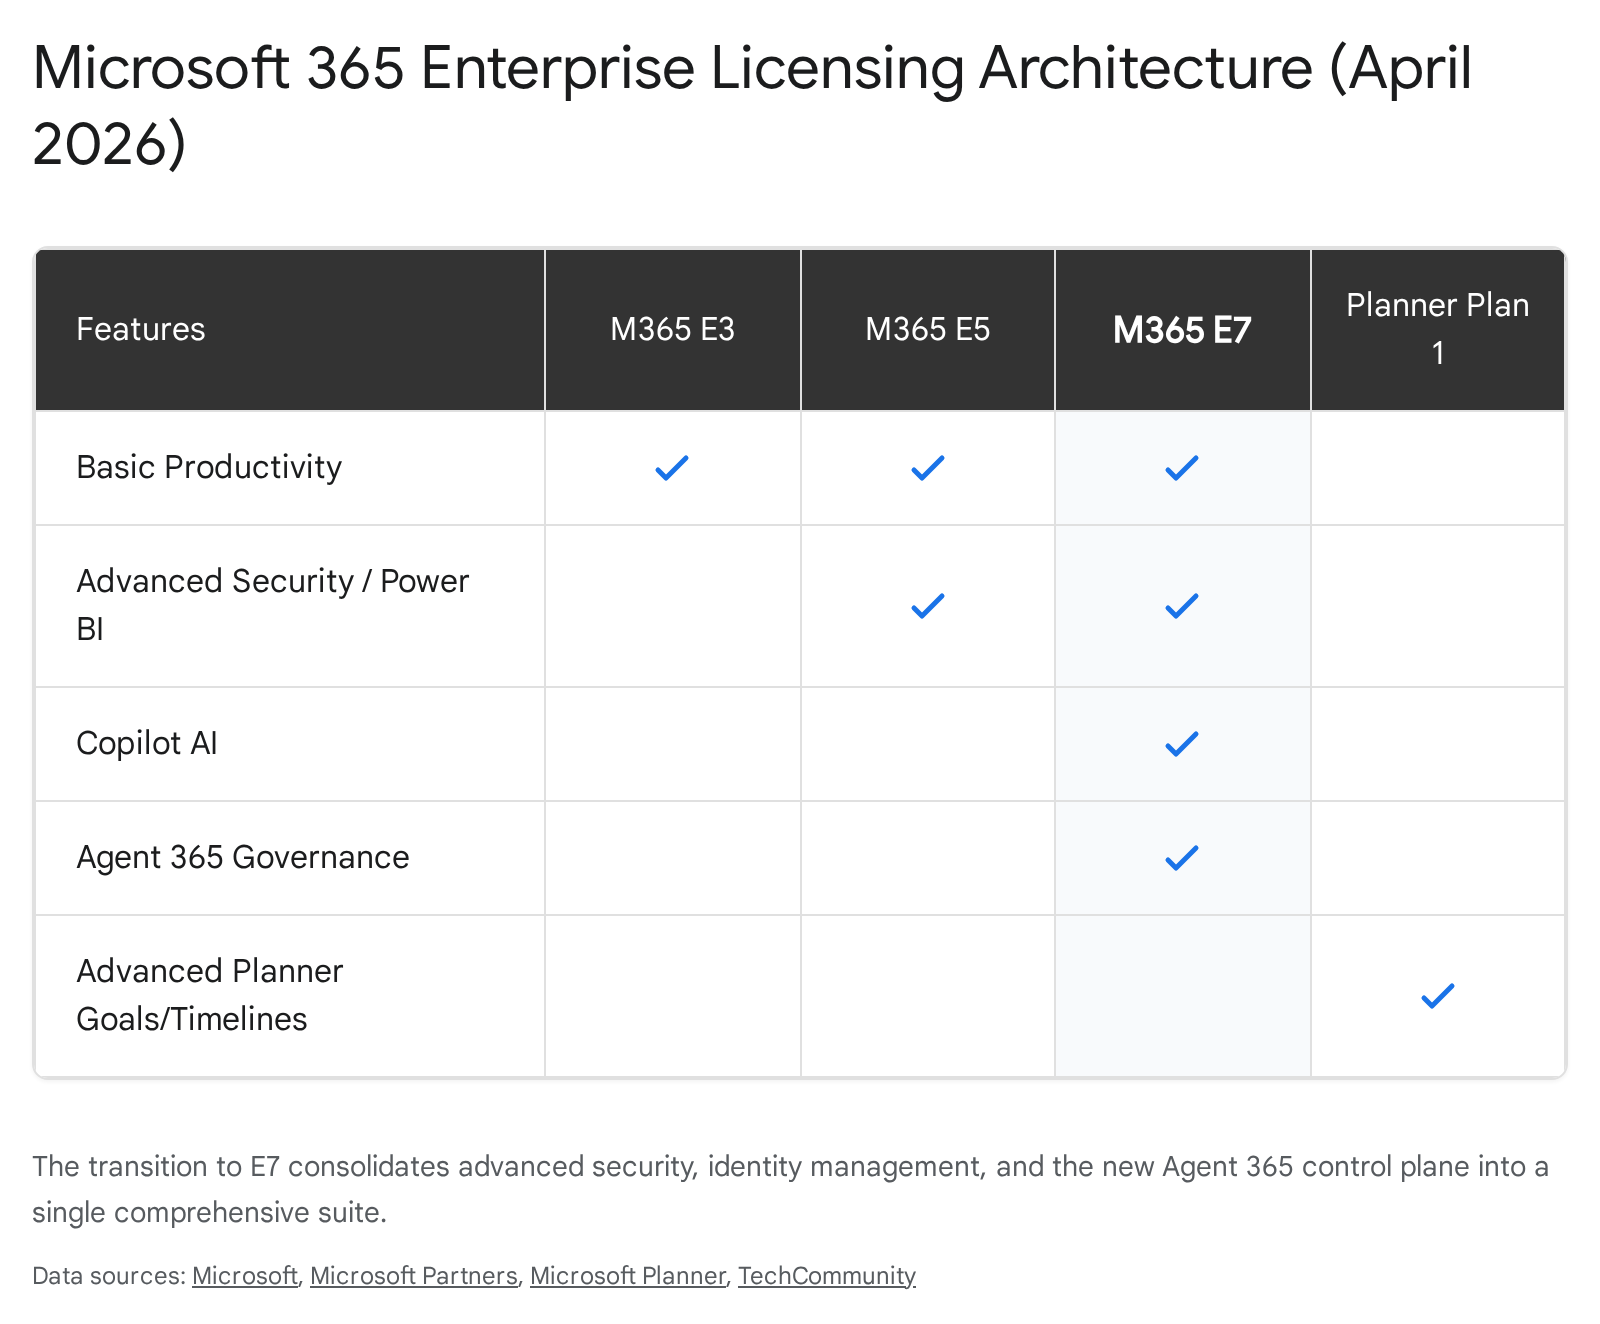
| License Tier | Target Audience | Key Capabilities Included |
|---|---|---|
| Microsoft 365 E3 | Standard Knowledge Workers | Core productivity apps, SharePoint, standard Teams, basic Planner, standard security. |
| Microsoft 365 E5 | Advanced Analysts & Managers | Everything in E3 + Power BI Pro, Advanced Security (XDR), and Security Copilot. |
| Microsoft 365 E7 | AI-Forward Enterprises | Everything in E5 + Entra Suite, Copilot, and Agent 365 (unified AI agent governance). |
| Planner Plan 1 | Project Managers | Premium Planner features: Timeline (Gantt), dependencies, backlogs, and Goals view. |
| Microsoft 365 Copilot | Content Creators & Planners | Available as an add-on for E3/E5. Enables the Project Manager Agent in basic plans. |
Organizations investing heavily in Copilot and custom agents should seriously evaluate the Microsoft 365 E7 suite. Slated for general availability on May , 2026, at $99 per user/month, it aggressively bundles E5 capabilities with the new Agent 365 control plane. This provides centralized governance and security for all AI agents operating within your tenant, mitigating shadow IT risks.
If your organization intends to upgrade, note that Microsoft is offering significant promotional discounts on E7 starting May , 2026. Annual commitments are seeing 10% to 15% discounts for minimum license tiers, allowing lower-friction entry points for enterprise execution.
For teams requiring advanced project timelines but not enterprise-wide AI governance, combining a standard E3 license with the Planner Plan 1 add-on remains the most cost-effective path. This secures access to critical Gantt charts and dependency tracking without forcing a full organizational suite upgrade. Keep in mind that impending Microsoft 365 pricing updates take effect globally on July , 2026, making spring renewals highly strategic.
Briefing published by Collab365 Spaces. Cite as "2026 Update Companion Guide: Using Teams and SharePoint for Project Management", Collab365 Spaces. 5 sources referenced.