1. What's Changed Since This Session
The foundational architecture of Microsoft 365 has shifted dramatically since the original recording. Artificial Intelligence, specifically Microsoft 365 Copilot and Agent 365, now orchestrates the platform's creation and management workflows. The user interface has been streamlined to elevate content generation over manual configuration.
The following summary table outlines the most critical paradigm shifts. This serves as a strict factual baseline for understanding the 2026 environment.
| Technology / Feature | Status in 2026 | What Replaced It |
|---|---|---|
| SharePoint Home Page | Renamed and restructured. | SharePoint Start Page featuring the new centralized Build hub. |
| Manual Site Creation | Legacy option; hidden by default. | Create sites with AI using multi-turn natural language chat prompts. |
| SharePoint Syntex | Rebranded and significantly expanded. | SharePoint Premium handling native AI document processing and assembly. |
| Page Authoring (Blank Canvas) | Available, but secondary to AI methods. | Page with Copilot and Smart Sections generating intelligent layouts. |
| Custom JSON Formatting | Reserved for advanced developer scenarios. | Suggested Formatting featuring native Choice Pills and Board Views. |
| OneDrive "Sync" Button | Deprecated for large libraries; moved to settings. | Add shortcut to OneDrive utilizing cross-device symbolic links. |
| Static Chatbots | Replaced by context-aware intelligent agents. | AI in SharePoint (formerly Knowledge Agent) for dynamic intranet queries. |
| Document Library "My Uploads" View | Custom filtered views are largely obsolete. | My Library providing native tabs for Uploads, Shared, and Playlists. |
| SharePoint Framework (SPFx) | Yeoman generator replaced; gulp replaced. | SPFx v1.23 featuring open-source templates and Heft/Rushstack toolchains. |
2. How to Build This Today
The core philosophies of corporate intranets and structured document management remain intact. However, the execution methods have shifted completely from manual web part configuration to natural language prompting and AI-driven generation. This section details the precise 2026 methodologies for reproducing the original session's demonstrations.
Demo 1: Creating Communication Sites and Team Sites
The session showed you creating communication sites for company homepages and team sites backed by Office 365 groups. Here's how you'd build that same thing today in April 2026.
The manual selection of classic templates and blank canvases has been superseded. Today, site creation is an interactive, AI-guided process located within the new SharePoint Start Page. Users leverage the Create sites with AI wizard to provision complete site architectures using natural language.
Quick Win: Do not manually build pages and lists. Navigate directly to the Build hub on the SharePoint start bar, describe the desired site in natural language, and let Copilot generate the assets automatically.
The AI-Driven Site Creation Process
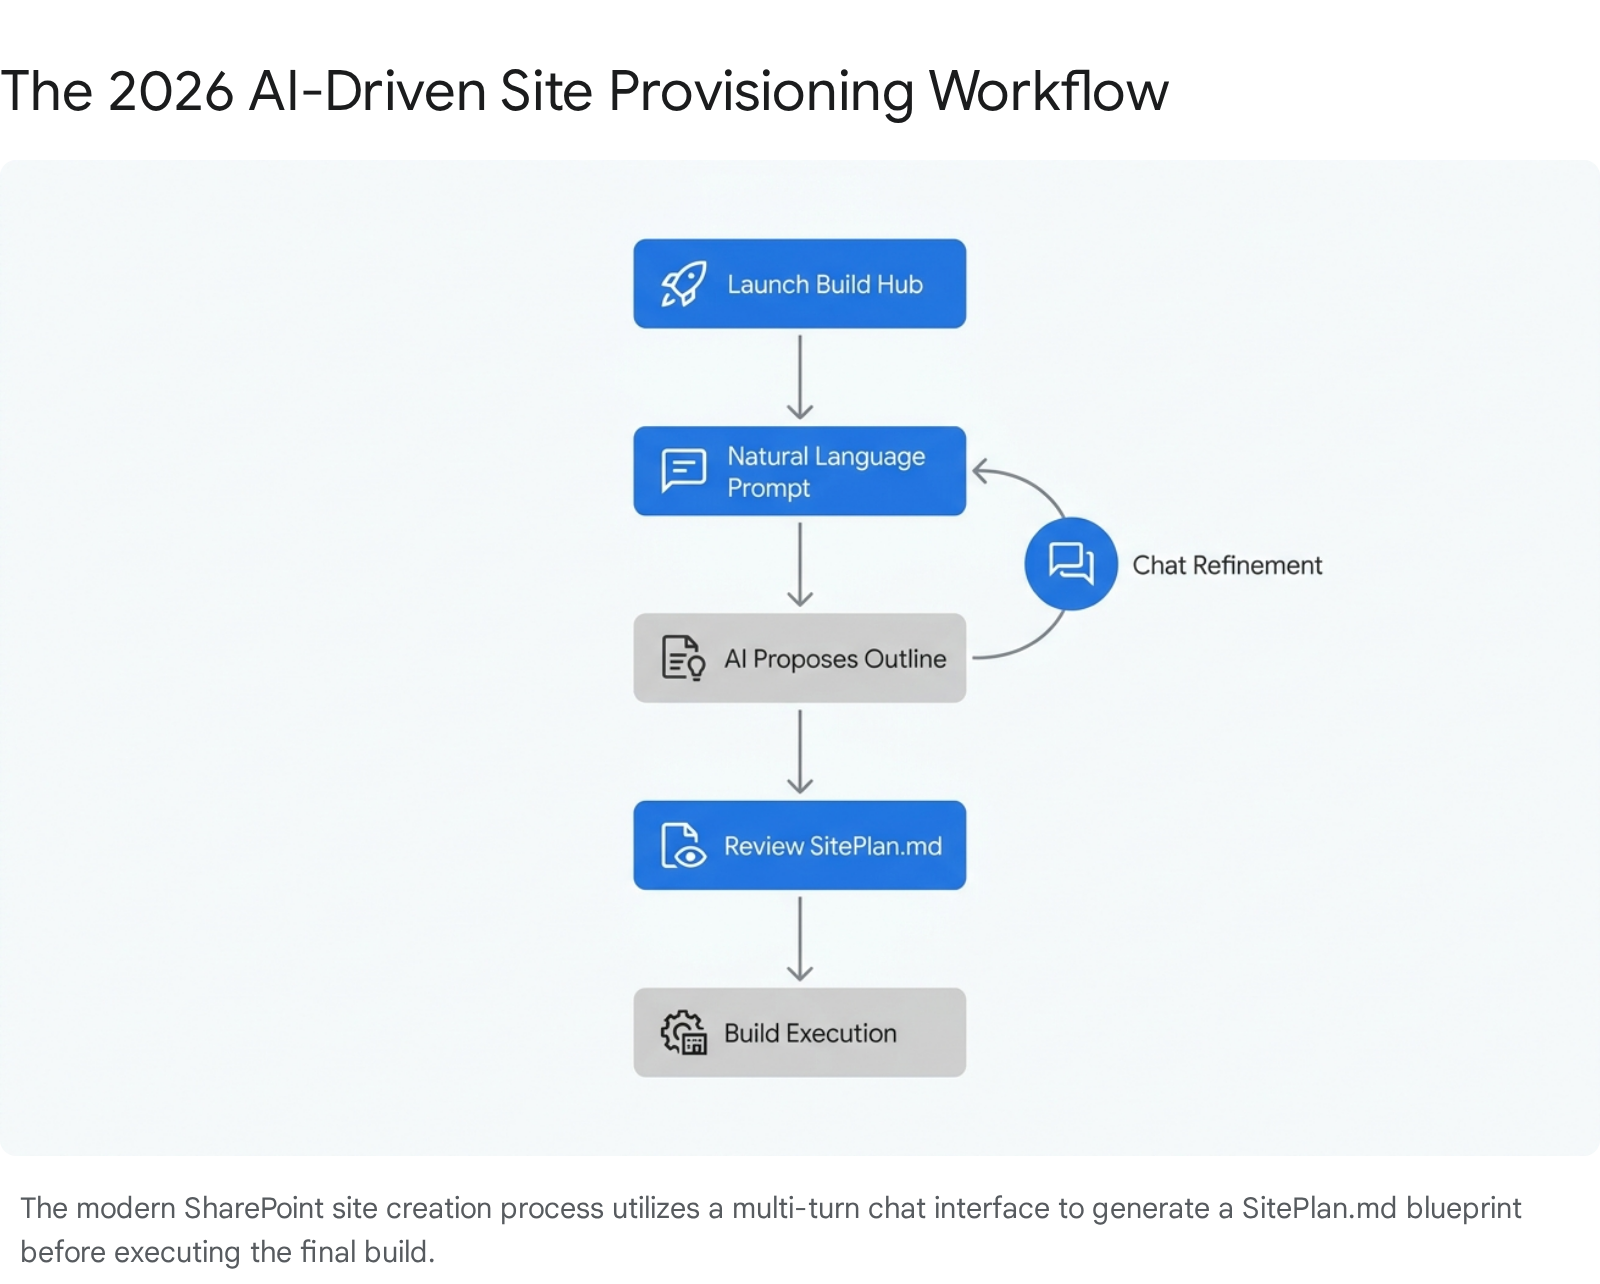
Before utilizing this feature, administrators must ensure self-service site creation is enabled. Furthermore, users must possess active Microsoft 365 Copilot licenses, and the tenant must be opted into the AI preview. The site generation process operates via a multi-turn conversational interface.
- Navigate to the SharePoint start page via the Microsoft 365 app launcher.
- Select Build from the left-hand navigation pane to access the centralized creation hub.
- Click the Create site button, then explicitly select Create a site with AI from the dialog box.
- Enter a natural language prompt, such as: "Create a communication site for the Q3 Marketing Campaign, including a document library for campaign assets and a news feed".3
- The AI will respond with follow-up questions to refine the site's purpose, such as asking to clarify specific project tracking needs.
Reviewing and Refining the Build Plan
Copilot does not generate the site blindly based on a single prompt. It first creates a visual outline and a structured markdown file named SitePlan.md. This file acts as the explicit architectural blueprint for the provisioning engine.
- Click View build plan to inspect the proposed pages, navigation elements, lists, and libraries.
- Use the chat interface to issue adjustment commands, such as: "Remove the Team overview page" or "Add a column for time estimates on the Tasks list".3
- The visual outline will update in real-time as the chat progresses, providing recommendations to strengthen the solution.
- Once the outline perfectly aligns with operational requirements, select Build it.
- Confirm the Site Name and apply the appropriate Sensitivity Label for data governance.
Provisioning and Post-Creation Setup
The actual provisioning process relies entirely on the generated SitePlan.md file. It configures settings, navigation, lists, libraries, and pages populated with relevant sample data.
- Provisioning can take up to 30 minutes for complex architectures.
- Users are strictly advised not to close the browser while this progress indicator is active.
- Upon completion, a Finish site setup panel will appear on the new homepage.
- This panel provides a summary of created components and highlights unsupported automated tasks that require manual intervention, such as complex Power Automate flows or specific permission setups.
- The original SitePlan.md is preserved for reference under Site contents > Agent Assets > Plans.
Connecting Sites with Hub Architecture
While team sites handle secure collaboration and communication sites handle broad broadcasting, Hub Sites organize these disparate entities. The core concept remains unchanged in 2026, but the administrative interface is more streamlined.
- To designate a parent site, a SharePoint Administrator must navigate to the Active sites list within the SharePoint Admin Center.
- Select the target site, click the Hub dropdown on the command bar, and choose Register as hub site.
- Enter a display name for the hub and explicitly specify which individual users or Entra ID security groups are permitted to associate child sites.
- To attach child sites, site owners navigate to their site's settings gear, click Site information, select the Hub site association dropdown, and choose the target hub.
- This association instantly unifies the global navigation, search scope, and corporate branding across all clustered sites.
Demo 2: Building Document Libraries and Custom Views
The session showed you building document libraries with metadata columns (e.g., choice fields for document type to prioritize metadata over folders), custom views (e.g., 'My Uploads' filtered by created date with sorting and security trimming), filtering, sorting, and versioning. Here's how you'd build that same thing today in April 2026.
Document libraries have received significant performance enhancements, specifically regarding the updated user experience for the "Edit in Grid" view. More importantly, advanced automation and personalized views are now deeply integrated into the library fabric without requiring manual view configuration.
Quick Win: Do not manually build complex filtered views for personal files. Rely entirely on the native My Library feature, which automatically segregates private uploads from shared content based on portal group permissions.
Utilizing the Native "My Library" Experience
The original session demonstrated building a 'My Uploads' view using filters based on the "Created By" column. In 2026, this manual workaround is obsolete.
- Navigate to the centralized media management or document library portal.
- Locate the native My Library interface, which automatically comprises four default tabs: Uploads, Shared with me, My Playlist, and Favorites.
- The Uploads tab provides a complete overview of media uploaded specifically by the authenticated user.
- Users can set the Default Viewing Access to Private (Only Me) during the initial upload, ensuring files drop directly into the personal library section where other users cannot access them.
- This natively handles the security trimming and personal filtering that previously required custom list view web parts.
Configuring Modern Metadata and Automation
Organizations must prioritize flat metadata structures over deep folder hierarchies to leverage AI search and Copilot summarization effectively. The modern library experience simplifies metadata application and workflow automation.
- Navigate to the target document library and click Add column to define document types or operational statuses.
- Instead of relying solely on manual tagging, deploy SharePoint Premium features (formerly Syntex) if licensed.
- SharePoint Premium allows AI to auto-tag documents, perform optical character recognition, and extract metadata fields directly from uploaded PDFs and images.
- To automate library behavior natively, locate the AI in SharePoint icon in the lower-right corner of the document library interface.
- Select Set up rules from the quick actions menu. Using natural language, users can configure workflow rules (e.g., "Notify the project manager when a contract status changes to Approved") without ever opening the Power Automate interface.
The Shift from Sync to Shortcuts
The original session highlighted the OneDrive sync client for offline access. In 2026, syncing entire SharePoint document libraries to local File Explorers is heavily discouraged due to local storage constraints and synchronization conflicts.
- Microsoft officially recommends the Add shortcut to OneDrive capability as the preferred method for cross-device access to shared libraries.
- To use this feature, navigate to the target SharePoint library and select the Add shortcut to My files button from the command bar.
- This creates a lightweight symbolic link inside the user's primary OneDrive folder.
- Unlike traditional sync, these shortcuts automatically follow the user across all devices signed into OneDrive, including laptops, tablets, and smartphones, without requiring manual configuration on each endpoint.
- Administrators can enforce this modern behavior via Intune policies or by executing the specific PowerShell command: Set-SPOTenant -DisableAddShortcutsToOneDrive $True to disable legacy syncing entirely.
Real-Time Co-Authoring Updates
Co-authoring remains a cornerstone of the document library experience, but the underlying technical mechanisms have evolved. Files are now grounded heavily in Microsoft Loop components for real-time synchronization across SharePoint Pages, Teams channels, and Microsoft Lists.
- Co-authoring is natively supported for all modern Office file formats (.docx,.pptx,.xlsx).
- To utilize advanced multi-step AI editing, users can now trigger Copilot in Excel directly on locally synced workbooks. This removes the strict cloud-only limitation that hindered complex financial modeling in previous years.
- Organizations utilizing sensitivity labels can enable co-authoring and AutoSave in desktop apps for encrypted documents natively in SharePoint and OneDrive.
- Be aware that enabling certain legacy local sync configurations via Groove.exe will break co-authoring capabilities entirely, leading to version conflicts.
Demo 3: Setting Up Microsoft Lists
The session showed you setting up SharePoint lists (noted as now Microsoft Lists) with column types like person, date, currency, lookup, and location. Here's how you'd build that same thing today in April 2026.
Microsoft Lists form the critical backbone of structured data collection within the Microsoft 365 ecosystem. The 2026 updates have drastically elevated form functionality, introducing conditional logic and rich media inputs that previously required heavy Power Apps integration.
Quick Win: Utilize the newly enhanced Location and Image column types natively. These allow frontline workers to capture device photos and Bing Maps coordinates directly from mobile browsers without custom code.
Implementing Advanced Column Types
Adding columns remains an intuitive process, but the capabilities of those specific columns have expanded significantly to support mobile workflows and geographic data.
- Within a modern list, click the Add Column header and select the Location data type.
- When users create or edit items, they can search for location data linked directly to Bing Maps or the internal Azure AD organizational directory.
- The system automatically generates secondary filtering attributes, allowing users to sort the list by specific metadata such as City, State, or Country.
- Similarly, selecting the Image column type enables immediate device camera access on mobile browsers.
- This image integration is ideal for field audits, visual surveys, or any scenario where immediate photographic evidence must be tied to a list item.
Configuring Modern Form Experiences
The most significant departure from legacy list management is the introduction of a robust native form designer. Modifying the data entry experience no longer necessitates external tools or complex JSON injections.
- Click on any existing list item to open the details pane, then select the Edit Form option located in the top-right menu.
- To reduce visual noise for end users, apply Conditional Field Visibility. Specific fields can be hidden or shown dynamically based on the current user's role or based on values entered in previous fields.
- For extensive lists with significant metadata requirements, group related fields together using Form Sections. This visually separates data into logical blocks, heavily streamlining the data entry process.
- Finally, apply custom styling to the form's Header, Footer, and Body directly through the native interface to align with corporate branding guidelines.
Integrating Actions into Lists
Modern lists go beyond data storage; they act as operational hubs. Column formatting allows for embedding actionable triggers directly in line with list content.
- Users can embed Workflow Launch Buttons within specific columns to trigger Power Automate Workflows.
- This makes automation significantly more accessible than forcing users to search through standard command bar menus.
- Formatting can also enable Inline Metadata Modification.
- By configuring a button column, contributors can update specific metadata (like a "Last Published Date" or a "Status" field) with a single click, completely removing the need to open property panels or utilize the Quick Edit mode.
Demo 4: Customizing Site Pages with Web Parts
The session showed you customizing site pages in edit mode by adding web parts such as lists, news, hero, quick links, and integrations with Planner or Power BI; adjusting properties like item limits, and republishing. Here's how you'd build that same thing today in April 2026.
The era of rigid, static page layouts has officially ended. The 2026 page authoring experience is defined by flexible grids and Copilot-driven content generation, prioritizing a polished, content-first design aesthetic.
Quick Win: Use Smart Sections (Sections with AI) to instantly build layouts. Ground the AI with a specific Word document or PowerPoint presentation, and it will automatically generate the appropriate web parts, text, and structure.
Building with Flexible Sections
Page authors now possess granular control over responsive layouts without needing to write custom CSS or rely on developer intervention. The underlying grid system has been entirely overhauled to support intuitive drag-and-drop operations.
- Navigate to a modern site page and click Edit to enter authoring mode.
- Add a new Flexible Section to the page canvas.
- Drag and drop various web parts (such as Hero, Quick Links, or Power BI integrations) directly onto the flexible grid.
- Authors can resize individual elements dynamically, group specific web parts together for alignment, or arrange layers to create engaging overlapping visual effects.
- This level of control ensures pages remain fully responsive across desktop, tablet, and mobile viewing experiences.
Generating Content with Copilot
Content creation no longer requires starting from a blank canvas. Microsoft 365 Copilot integrates deeply into the SharePoint authoring workflow, acting as an active design assistant.
- A content author can open the Microsoft 365 Chat interface and install the SharePoint page agent from the Agent Store.
- Issue a command such as: "Create a SharePoint news post summarizing my project status based on yesterday's Teams meeting transcript".30
- The AI drafts the comprehensive content, applies responsive web part layouts, and embeds relevant high-quality stock imagery automatically.
- To modify existing content, authors simply highlight text within the rich text editor. They can then deploy Copilot AI to suggest professional rewrites, adjust the tonal delivery, or expand on specific bullet points.
- Authors must review the AI-suggested alternatives and explicitly choose to accept or reject them before republishing the page.
Deploying AI-Specific Web Parts
The web part gallery has expanded to include components that actively leverage machine learning to provide dynamic user experiences.
- To quickly generate a robust list of frequently asked questions, authors can add the AI-generated FAQ web part to the page canvas.
- The content for this web part is built dynamically by grounding it with source files, which can include policy documents or even recorded Teams meeting transcripts.
- For deep intranet integration, authors can place Viva Connections features, such as specific dashboard web parts, directly onto standard SharePoint site pages.
- This ensures familiar navigation and functionality regardless of where the user accesses the portal.
Demo 5: Publishing News Articles
The session showed you publishing news articles with templates, stock images, and responsive layouts. Here's how you'd build that same thing today in April 2026.
News distribution remains a critical function for corporate communications and employee engagement. The fundamental mechanics of the News Web Part remain familiar, but audience targeting, integrations, and layout dynamics have matured significantly.
Quick Win: Implement the modern Carousel layout or Featured Story spotlight within the News Web Part to maximize employee engagement. These formats automatically combine high-quality visuals with interactive navigation, making updates highly appealing.
Configuring the Modern News Web Part
The News Web Part acts as an aggregation engine, pulling content seamlessly across the organization and distributing it into Viva Connections and Microsoft Teams.
- Navigate to the target landing page, enter Edit mode, and drag the News web part onto the flexible section grid.
- Click the Edit properties icon (the pencil) on the top left of the web part to open the configuration pane.
- Define the precise news source. Organizations can pull articles from the current site, associated hub sites, or specially designated Organization news sites to prioritize authoritative communications.
- Note that filtering options are automatically disabled if the news source is set to "Recommend for current user," as the Microsoft Graph takes over content curation.
Implementing Audience Targeting and Distribution
To prevent intranet clutter and ensure message relevance, communications must be directed to the appropriate user segments.
- Enable Audience targeting within the News web part property pane.
- This ensures that specific news posts are only visible to relevant Entra ID security groups (e.g., routing an IT outage notice only to the Engineering department).
- Utilize familiar integrations from Viva Connections, such as the "film strip" news layout, to ensure visual consistency across the enterprise.
- Once an article is published, use the native sharing features to push the news post via email or directly into a dedicated Microsoft Teams channel for broader reach.
Demo 6: Applying List and Column Formatting
The session showed you applying list and column formatting with conditional colors, alternating rows, and JSON samples from PnP GitHub. Here's how you'd build that same thing today in April 2026.
While custom JSON coding remains a powerful tool for advanced developers, the vast majority of formatting scenarios highlighted in the original session are now handled natively by SharePoint's graphical user interface.
Quick Win: Do not write JSON code for basic status indicators. Rely entirely on the default Choice Pills formatting that applies automatically when creating a standard Choice column.
Utilizing Native Formatting Frameworks
The modern Microsoft Lists formatting framework focuses heavily on scannability, visual hierarchy, and embedded actions without requiring any code execution.
- When numeric columns are added to a list, utilize the UI to apply Data bars directly from the column settings menu. This provides instant visual comparison of numbers, such as tracking project effort days.
- For broader view architectural changes, access the View options dropdown and select the native Board View. This creates an instant Kanban-style interface, allowing users to drag and drop list items between distinct columns.
- The newly introduced Action Bar Configuration tool allows site owners to hide, show, or modify the primary command bar buttons using view formatting. This dramatically simplifies the UI for specific operational roles.
- Deploy the no-code Card Designer to transform standard tabular list rows into visually appealing contact cards or product tiles, selecting exactly which metadata fields display on the card surface.
Leveraging the Modernized PnP GitHub Repository
For advanced, highly customized scenarios that exceed native capabilities, the PnP List Formatting repository remains the definitive community resource. The repository has undergone a massive reorganization to improve sample discovery.
- Navigate to the official pnp/List-Formatting GitHub repository.38Link: https://pnp.github.io/List-Formatting/.
- Browse the newly organized categories, which logically classify JSON samples by Column Type, Operator, Placeholder Token, Action, or Feature.
- Locate a desired template (e.g., an overdue date badge, boolean icons, or a multi-column workflow launch button).
- Copy the raw JSON payload. In SharePoint, click the target column header, select Column settings, choose Format this column, switch to Advanced formatting mode, and paste the code.
- The repository is continuously updated, with recent 2026 updates focusing on standardization, addressing sample inconsistencies, and utilizing the new Farrier tool for automated maintenance.
3. Licensing Quick Reference
Deploying the 2026 SharePoint architecture—specifically the heavy reliance on Copilot AI generation, intelligent agents, and premium metadata extraction—requires careful attention to licensing structures. The highly publicized introduction of the Microsoft 365 E7 tier has consolidated many advanced AI features into a single, comprehensive subscription model.
The data indicates that the Microsoft 365 E7 bundle provides a 15% cost saving compared to purchasing its constituent enterprise, security, and AI components individually. Specifically, purchasing M365 E5 ($60), M365 Copilot ($30), Entra Suite ($12), and Agent 365 ($15) totals $117 per user per month, whereas the E7 bundle is priced at $99.41
The following matrix outlines the necessary licensing paths for the recommended approaches discussed in this report.
| License Tier | Target Audience & Cost | Key SharePoint & AI Capabilities Included |
|---|---|---|
| Microsoft 365 Business Premium | SMBs up to 300 users ($22/user/mo) | Full SharePoint, Teams, 1TB OneDrive, advanced Defender security. Does not include Copilot. 4 |
| Microsoft 365 E3 | Standard Enterprise ($36/user/mo) | Full-featured SharePoint Online, Hub Sites, Lists, basic Purview compliance. Does not include Copilot. 4 |
| Microsoft 365 E5 | Advanced Security ($57/user/mo) | Everything in E3 + Premium eDiscovery, advanced Purview compliance, Power BI Pro. Does not include Copilot. 4 |
| Microsoft 365 E7 | AI Frontier Suite ($99/user/mo) | New in May 2026. Bundles E5 + Microsoft 365 Copilot + Entra Suite + Agent 365. Ideal for automated site creation and scaled AI workflows. |
| Microsoft 365 Copilot (Add-on) | E3/E5/Business Upgrade ($30/user/mo) | Required for the "Create sites with AI" wizard and natural language page authoring if not on the E7 tier. |
| SharePoint Premium (Syntex) | Content Automation (~$40/user/mo or Pay-as-you-go) | Advanced AI document processing, metadata extraction, native eSignature, and Microsoft 365 Archive. Pay-as-you-go for specific OCR tasks. |
| Microsoft 365 F1/F3 | Frontline Workers ($2.25 - $8/user/mo) | View-only SharePoint access on mobile/web. F3 adds increased OneDrive storage and Power Automate access. |
Source note
Briefing published by Collab365 Spaces. Cite as "2026 Update: An Introduction to SharePoint – Companion Guide", Collab365 Spaces. 12 sources referenced.