
1. What's Changed Since This Session
The landscape of the Microsoft Power Platform has evolved significantly since the original session was recorded in early 2024. The following table summarizes the key technological shifts, brand updates, and architectural replacements that define the ecosystem as of April 2026.
| Technology Demonstrated (2024) | Status in April 2026 | What Replaced It / Current Approach |
|---|---|---|
| Power Virtual Agents (PVA) | Converged / Rebranded | Microsoft Copilot Studio. Classic bots remain migratable, not simply deleted. |
| PVA Classic Topic Orchestration | Legacy / Deprecated | Generative Orchestration powered by Large Language Models (LLMs). |
| Power Apps Portals | Rebranded / Upgraded | Microsoft Power Pages. |
| Portals Admin Center | Deprecated (June 2023) | Power Pages Setup Workspace and Power Platform Admin Center. |
| Portals Standard Data Model | Legacy | Enhanced Data Model (solution-aware, virtual tables). |
| Portal Content Editor Tool | Deprecated (June 2026 Removal) | Power Pages Design Studio. |
| Classic Form Designer | Deprecated | Modern App Designer (recommended for model-driven apps; mandatory for new model-driven app creation as of October 2023 deprecation). |
| Classic Canvas Controls | Still supported | Modern controls (Fluent 2 design system) recommended for new canvas apps; classic controls remain available and supported. |
| Classic Theming (model-driven) | Superseded | Modern look mandatory for model-driven apps from Wave 1 2026 (April 1, 2026). |
| Manual Table Creation | Active | Copilot "Start with data" using natural language prompts. |
| Manual Bot Workflows | Active | Agentic Apps and Autonomous Event Triggers. |
| Per-User Licensing Default | Active | Pay-As-You-Go Azure Meters and Capacity Packs. |
| Azure AD B2C for Portals | Active but Legacy | Entra External ID. |
Evidence note on modern controls and model-driven look: The "New Look" (modern Fluent-based UI) became mandatory for model-driven apps from April 1, 2026 per Wave 1 release plan. Canvas apps have modern controls available and recommended but classic controls remain supported. Source: https://learn.microsoft.com/en-us/power-apps/user/modern-fluent-design and https://learn.microsoft.com/en-us/power-apps/maker/canvas-apps/controls/modern-controls/overview-modern-controls
Evidence note on PVA: Power Virtual Agents was not retired; it was rebranded and expanded into Microsoft Copilot Studio. Classic Power Virtual Agents bots can be cloned and migrated to Copilot Studio unified authoring. Source: https://learn.microsoft.com/en-us/microsoft-copilot-studio/unified-authoring-conversion
2. How to Build This Today
The original session demonstrated the assembly of four distinct business applications using the tools available in early 2024. Today, a developer must leverage the April 2026 feature set. This era introduces agentic artificial intelligence, modern designer interfaces, and stricter governance models. The following sections provide an exhaustive, step-by-step methodology for rebuilding these exact scenarios using the current toolset.
Scenario 1: Issue Reporting System in Dataverse for Teams
The session demonstrated an issue reporting system in Dataverse for Teams. The speaker built this using canvas Power Apps (for the app), Dataverse (data), Teams (hosting), Power Virtual Agents (bot), Power Automate flows, and adaptive cards in Teams.
Here is how a developer builds that same thing today in April 2026.
Phase 1: Provisioning the Teams Environment
The foundation remains Microsoft Dataverse for Teams. This platform provides a relational data store scoped strictly to a specific Teams group. It eliminates the need for standalone premium licenses for basic internal applications.
A developer must understand the constraints of this environment. Dataverse for Teams environments are limited to approximately 1 million rows or 2 gigabytes of storage per environment. This limit cannot be extended by purchasing additional capacity; when exceeded, the environment must be upgraded to full Dataverse. Furthermore, there is no direct API access to Dataverse for Teams outside of the Teams client. If standalone Power Apps or Power Automate usage is required later, the environment must be upgraded to a full Dataverse instance. Source: https://learn.microsoft.com/en-us/power-platform/admin/about-teams-environment
The developer must first install the Power Apps personal app within the Teams client. Navigating to the Microsoft Teams app store, the developer searches for Power Apps and selects Add. For easier access, the developer can right-click the icon in the Teams app bar and select Pin. Once the app loads, the developer selects the Build tab from the top menu. Selecting Create an app prompts the developer to choose a target Team. Selecting the Team triggers the automatic provisioning of a Dataverse for Teams environment in the background.
Quick Win: Instead of building the canvas app from absolute scratch, the developer can utilize the native "Issue reporting" sample template. Navigating to the Power Apps app in Teams, the developer selects Issue reporting from the available templates. This template automatically provisions the required Dataverse tables, standard user interfaces, and manager dashboards in a matter of seconds, providing a massive head start.
Phase 2: Customizing the Canvas App
With the template installed, the developer must adjust the application to fit the specific organizational workflow. Within the Power Apps Build tab in Teams, the developer selects Installed apps and opens the Issue reporting app. This action launches the Power Apps Studio directly within the Teams client.
To add custom data fields, the developer navigates to the Data pane. Locating the Issue table, the developer selects Edit data to open the inline Dataverse table editor. The developer can add a new column, such as an Issue Urgency choice column, directly from this interface. Returning to the canvas, the developer inserts a Drop down control from the command bar. The developer binds the Items property of this drop-down to the newly created choice column. To save progress, the developer selects the Save icon on the app actions menu, followed by Publish to Teams to make the updates live for the selected Team.
Phase 3: Building the Agent in Copilot Studio
The most significant departure from the original session involves the chatbot. Power Virtual Agents no longer exists as a standalone brand. It is now an integrated capability within Microsoft Copilot Studio.
The architectural shift from the rigid, topic-based decision trees of classic Power Virtual Agents to the dynamic, LLM-driven generative orchestration model of Microsoft Copilot Studio is the most critical learning curve for developers updating 2024 architectures. Generative orchestration replaces static dialogue trees with an LLM-driven planner. This planner autonomously selects the best tools, knowledge sources, and plugins to resolve user queries.
The developer navigates to the Teams app store and installs the Microsoft Copilot Studio application. From the Copilot Studio Home page, the developer selects Start now. The developer chooses the identical Team used for the canvas app and selects Continue. The developer names the agent "IT Issue Assistant", selects the primary language, and selects Create.
In 2026, the developer must configure Generative Orchestration to utilize the full capabilities of the platform. Navigating to the agent's Settings, the developer selects Generative AI. The developer ensures the orchestration mode is set to Generative rather than Classic.
The developer selects Knowledge from the left pane. The developer connects the agent to the organization's SharePoint intranet or specific public URLs. This knowledge integration allows the bot to dynamically answer basic IT queries without requiring any manual scripting or predefined conversational nodes.
Phase 4: Integrating Adaptive Cards via Power Automate
When an issue requires escalation, the agent must trigger a workflow to post an adaptive card to the IT support channel. Within Copilot Studio, the developer selects Topics and Plugins, then adds a new Action. The developer chooses Create a flow, launching the embedded Power Automate interface. The flow is automatically configured with the Copilot Studio (Preview) trigger. The developer adds the Post adaptive card in a chat or channel action from the Microsoft Teams connector. Once saved, the developer returns to Copilot Studio. The generative orchestrator will invoke this flow whenever it detects a user intent matching the flow's description. Finally, the developer selects Publish from the navigation menu to deploy the agent to the Team.
Scenario 2: CRM-Like Sales Solution
The session demonstrated a CRM-like sales solution. The speaker built a custom model-driven app on Dataverse with tables, forms, and views for sales pipelines, avoiding full Dynamics 365 licensing.
Here is how a developer builds that same thing today in April 2026.
Phase 1: Establishing the Developer Environment
Before architecting the data model, the developer must establish a secure sandbox. The Microsoft Power Platform Developer Plan provides a free, individual environment equipped with a 2 gigabyte Dataverse database and access to premium connectors.
The developer navigates to the official Power Apps Developer Plan website (https://learn.microsoft.com/en-us/power-platform/developer/plan). The developer signs up using a work or school email address backed by Microsoft Entra ID. Personal email accounts are not supported for this plan. The developer must be aware that developer environments remaining inactive for 30 days are automatically disabled and eventually deleted.
Phase 2: Defining the Schema with Copilot
The developer signs into the Power Apps maker portal (make.powerapps.com). From the Home screen, the developer utilizes the Start with data capability powered by Copilot. The developer types a specific prompt into the chat interface: "Create a relational data model for a sales pipeline tracking system. Include a primary table for Accounts with company details, and a related table for Opportunities featuring deal size, probability, and sales stage."
Copilot generates the proposed Dataverse schema in real-time. The developer reviews the AI-generated schema on the screen, adjusts data types as needed, and selects Create app.
Phase 3: Assembling the Model-Driven App
The Copilot action automatically generates a foundational model-driven app. Navigating to Solutions on the left navigation pane, the developer creates a new solution to ensure proper dependency tracking. Inside the empty solution, the developer adds the AI-generated model-driven app and the Dataverse tables.
Opening the app launches the Modern App Designer. The classic form designer was deprecated in October 2023, with the Switch to classic option removed by default. To organize the application, the developer selects the Navigation pane and adds new groups and areas, then adds Dataverse tables as pages within these navigation groups.
Quick Win: For model-driven apps, the modern look became mandatory for all users from April 1, 2026 per the 2026 Wave 1 release. Ensure any customizations are compatible with the modern Fluent-based interface rather than relying on classic themes. Source: https://learn.microsoft.com/en-us/power-apps/user/modern-fluent-design
Phase 4: Configuring Business Logic and Pipelines
To enforce sales methodologies, the developer implements Business Process Flows. From the solution view, the developer selects New > Automation > Process > Business Process Flow. The process is bound to the Opportunity table. The developer defines specific stages within the visual designer: Qualify, Develop, Propose, and Close. Each stage is configured with required data steps.
Finally, the developer selects Save on the command bar, followed by Publish to make the CRM solution active for testing.
Scenario 3: Customer and Partner Portals
The session demonstrated customer and partner portals. The speaker demonstrated Power Apps Portals linked to Dataverse for external access.
Here is how a developer builds that same thing today in April 2026.
Phase 1: Provisioning the Power Pages Site
This product has been entirely overhauled and rebranded as Microsoft Power Pages. The legacy Power Apps portals admin center was retired in June 2023, and the legacy portal content editor tool is scheduled for complete removal by June 2026.
The developer begins in the dedicated Power Pages maker portal (make.powerpages.microsoft.com). Selecting Create a site launches the modern site creation wizard. As of 2026, all new sites utilize the Enhanced Data Model by default. This modernized framework relies on a combination of system tables, nonconfiguration tables, and virtual tables rather than the standard custom tables used in the past. When the site is created, it is set to Private by default.
Phase 2: Designing the Interface and Data Integration
The developer utilizes the Power Pages design studio, which offers distinct workspaces for Pages, Styling, Data, and Setup. In the Data workspace, the developer connects the site to the Dataverse tables created during the CRM scenario.
The developer must configure Table Permissions to ensure external users can only view records associated with their specific profile. Moving to the Pages workspace, the developer creates a new page titled "Partner Dashboard." A List component is added to the page and bound to the Account table.
Phase 3: Configuring External Authentication
External users should not use internal organizational credentials to access the portal. The developer navigates to the Setup workspace and selects Identity providers.
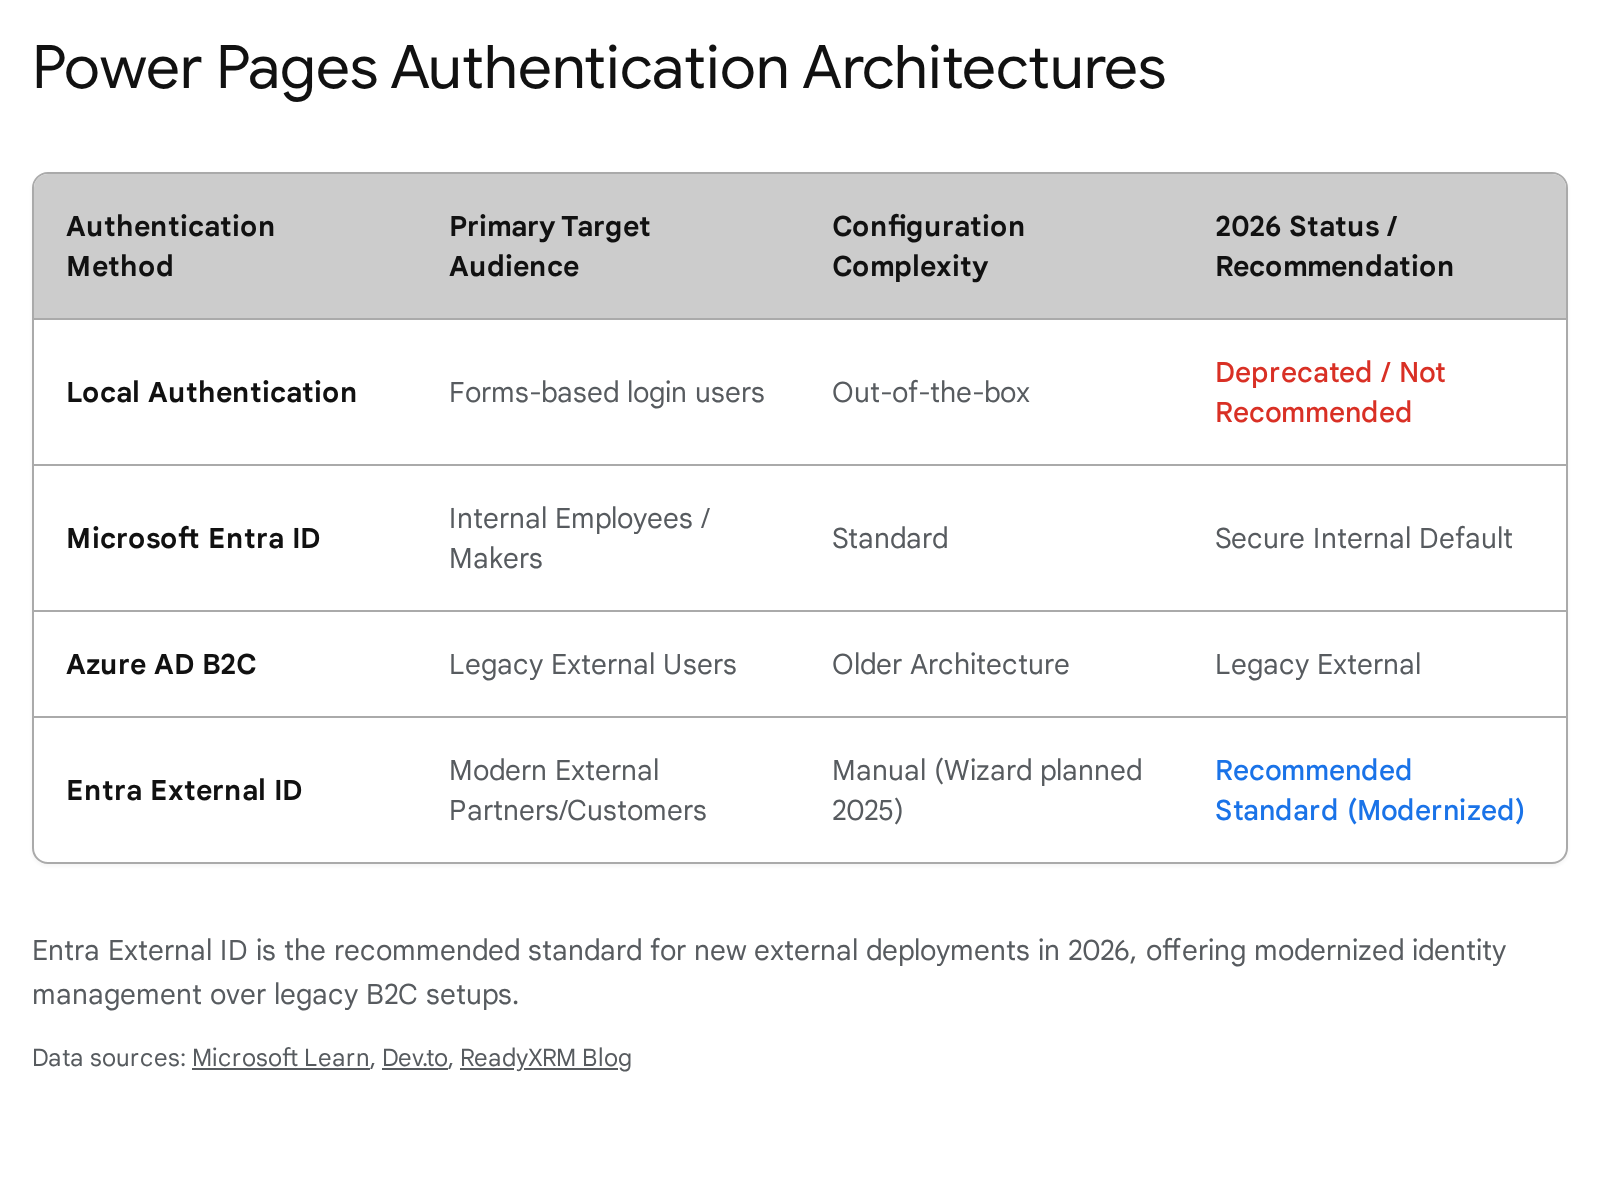
While Azure AD B2C was the historical standard, Microsoft now recommends Entra External ID for modernized, integrated external identity management. The developer selects the Entra External ID provider option from the list and configures the OpenID Connect protocol settings.
Phase 4: Integrating the Agent API and Analytics
To elevate the partner experience, the developer integrates an AI-powered agent created in Microsoft Copilot Studio. Still within the Setup workspace, the developer selects the specific Copilot Studio agent from the environment list. Agents created directly from Power Pages automatically become aware of the site context.
Quick Win: The developer should configure site analytics and server logging within the Setup workspace. This 2026 feature integrates Application Insights via a simple provider script, tracking page views, form interactions, and session details.
Scenario 4: Financial Forecasting App
The session demonstrated a financial forecasting app. The speaker extended Dynamics 365 Sales using canvas Power Apps embedded within a model-driven form.
Here is how a developer builds that same thing today in April 2026.
Phase 1: Designing the Canvas App
The developer navigates to the Power Apps Studio and creates a new Canvas app formatted for a custom tablet layout. The app connects directly to the Dataverse environment containing the Dynamics 365 Sales data. The developer utilizes the ModelDrivenFormIntegration control to allow the embedded canvas app to receive contextual data passed dynamically from the host model-driven form.
Phase 2: Preparing the Model-Driven Form
The developer must integrate the newly published canvas app into the Dynamics 365 Sales interface. Navigating to the Solutions area in the maker portal, the developer opens the solution containing the Dynamics 365 Account table. The developer selects Forms and opens the primary Account Main Form using the Modern App Designer.
Phase 3: Embedding the Component
Within the modern form designer, the developer selects the specific layout section for the forecasting tool. The developer creates a dedicated New Tab labeled "Financial Forecast." With the anchor column selected, the developer navigates to Components and selects the Canvas app control.
Phase 4: Configuring Parameters and Publishing
The developer provides the App ID to configure the canvas app control. To ensure a clean, professional user interface, the developer clears the Display label on the form checkbox. If another canvas app is already embedded on the form, the developer receives a warning that only one canvas app can be enabled per form. Finally, the developer selects Done, saves the form layout, and clicks Publish.
Quick Win: For full-page, immersive experiences that do not require tying to a specific Dataverse record, the developer can leverage Custom Pages. These allow developers to build canvas experiences that sit alongside standard model-driven views in the primary navigation menu.
3. Licensing Quick Reference
Deploying these four applications in a production environment requires strict adherence to the Microsoft Power Platform licensing model. Organizations should verify current pricing at https://www.microsoft.com/en-us/power-platform/products/power-apps/pricing before making licensing decisions, as prices can change.
| Product and License Type | Applicable Scenario | Billing Metric and Capacity Notes |
|---|---|---|
| Power Apps Premium | Scenario 2 (Custom CRM) Scenario 4 (Embedded Canvas) | Required for unlimited applications utilizing premium Dataverse connectors. Accrues 250 MB Dataverse database capacity per user. Approximately $20/user/month (verify current pricing). |
| Power Apps per app | Where applicable | End of sale on public price list January 2, 2026. Still available in CSP channel as of April 2026. Existing customers can continue to renew. New architectures should plan for Power Apps Premium. |
| Power Pages Authenticated | Scenario 3 (Partner Portals) | Sold in capacity packs per authenticated unique users per site, per month. Verify current pricing at Microsoft. |
| Power Pages Pay-As-You-Go | Scenario 3 (Variable Traffic Sites) | Billed via Azure subscription per active user, per website, per month. |
| Copilot Studio License | Scenario 1 (Teams Issue Bot) | Provides Copilot Credits per month, decremented based on generative task complexity. Verify current pricing at Microsoft. |
| Dataverse for Teams | Scenario 1 (Teams Environments) | Included with Microsoft 365. Maximum of 2 GB per Teams environment. Does not permit standalone API access outside of the Teams client. Cannot purchase additional capacity. |
Organizations must monitor their Dataverse consumption closely. Each Dataverse for Teams environment is limited to approximately 1 million rows or 2 GB. Additional storage cannot be purchased for Dataverse for Teams; if more is needed, the environment must be upgraded to full Dataverse.
Evidence Notes
Dataverse for Teams capacity limits (2 GB / ~1 million rows): https://learn.microsoft.com/en-us/power-platform/admin/about-teams-environment
Power Virtual Agents converged into Copilot Studio (not simply retired): https://learn.microsoft.com/en-us/microsoft-copilot-studio/unified-authoring-conversion
Power Apps per app end of sale on public price list January 2, 2026; CSP channel clarification: https://learn.microsoft.com/en-us/partner-center/announcements/2026-march
Modern look mandatory for model-driven apps from April 1, 2026: https://learn.microsoft.com/en-us/power-apps/user/modern-fluent-design
Modern controls recommended but not mandatory for canvas apps: https://learn.microsoft.com/en-us/power-apps/maker/canvas-apps/controls/modern-controls/overview-modern-controls
Source note
Briefing published by Collab365 Spaces, reviewed by Mark Jones on . Cite as "A 2026 Blueprint for Architecting Power Platform Solutions", Collab365 Spaces. 52 sources referenced.