The original 2021 session established a highly effective foundational understanding of Microsoft Power Automate. It focused heavily on the core mechanics of navigating the portal, constructing automated and scheduled logic, deploying flow controls, and managing workflow execution. Since that initial demonstration, the Power Platform has undergone a massive architectural and interface paradigm shift. The transition from manual logical construction to AI-assisted orchestration has fundamentally altered how cloud flows are developed today.
The classic drag-and-drop designer, familiar to those who watched the original masterclass, has been completely replaced by an AI-first, React-based New Designer. Microsoft Copilot is now deeply embedded within the authoring experience across the entire platform. This integration transforms natural language prompts into complex JSON flow definitions and utilizes advanced AI skill inferencing to streamline development. Furthermore, error resolution has evolved from manually parsing hexadecimal codes to interacting directly with specialized, natural-language debugging agents.
This comprehensive companion guide bridges the operational gap between the original session's demonstrations and the current state of the platform. It provides an exhaustive, step-by-step technical manual on how to construct the exact same scenarios demonstrated in the session using the modern March 2026 toolset. The following sections are anchored strictly to the six core demonstrations provided in the original video, updating every click, menu path, and architectural concept for the modern cloud environment.
What's Changed Since This Session
The landscape of Power Automate has been heavily optimized for developer velocity, resiliency, and AI integration. Microsoft has streamlined the user experience to reduce friction while simultaneously exposing deeper technical controls for advanced users. The following table summarizes the foundational shifts between the original 2021 session and the March 2026 environment.
| Technology | Status in 2026 | What Replaced/Enhanced It |
|---|---|---|
| Flow Authoring UI | Replaced | The New Designer is now the default canvas. It features a modern, high-performance UI with pan, zoom, and a minimap, replacing the vertically constrained Classic Designer. |
| Initial Creation Method | Enhanced | Copilot Generative AI allows makers to initiate flow creation via natural language prompts on the home screen, generating full trigger-and-action skeletons instantly. |
| Expression Writing | Enhanced | The single-line dynamic content box has been replaced by a Multi-Line Expression Editor featuring the Copilot Expression Assistant for natural language formula generation. |
| Error Debugging | Enhanced | Raw JSON error parsing is augmented by the Troubleshooting Copilot, which reads failed run histories and provides human-readable remediation steps. |
| Looping UI (Do Until) | Replaced | The visual logic of the Do Until loop was corrected in the New Designer so the condition visually follows the actions, reflecting its actual execution behavior. |
| Sharing & Security | Enhanced | The management of Run-Only Users is now tightly integrated with Microsoft Entra ID Security Groups and environment routing policies. |
How to Build This Today
The following sections provide exhaustive instructions on replicating the exact scenarios demonstrated in the original session. They utilize the current March 2026 feature set, terminology, and best practices.
1. Navigating the Environment and the Visual Flow Builder
The original session demonstrated navigating to the Power Automate portal and exploring the basic building blocks of a workflow. Today, the underlying URL remains the same, but the architecture and navigation hierarchy have been modernized to support widespread AI integration. The layout is optimized to handle complex, enterprise-scale workflows without overwhelming the browser memory.
Recapping the Demonstration:
The speaker demonstrated accessing the portal, browsing the left-hand navigation menu for templates, and entering the flow designer canvas to initiate a blank workflow. The focus was on identifying triggers and actions within the classic, single-column interface.
The March 2026 Build Process: The initiation of a workflow begins at the centralized maker portal. Authentication relies entirely on Microsoft Entra ID, ensuring secure access to your specific tenant and environment routing.
- Access the Portal: Developers must navigate to the primary endpoint at make.powerautomate.com.
- Navigate the Left Pane: Upon login, the left navigation pane presents several options: Home, Create, Templates, Learn, My flows, and Solutions.In 2026, additional AI-centric hubs exist. These include the AI Hub (for accessing AI Builder models and generative prompts) and Process mining (for analyzing business bottlenecks).
- Initiate a New Flow: To begin, makers navigate to the left menu and select My flows > New flow.From here, the platform prompts the selection of a flow type. The primary cloud options remain Automated, Instant, or Scheduled.
- Enter the New Designer Canvas: Once a flow type is selected and named, the New Designer launches. Unlike the classic interface, the 2026 designer strictly separates the visual representation of the workflow from its technical configuration.
The workspace is now divided into highly specific zones to improve developer focus and handle complex logic trees.
- The Canvas: The center screen displays the flow structure using atomic action cards and container actions. These are connected by blue dashed drop zones, indicating where new actions can be inserted.
- Configuration Pane: Selecting any action card opens a dedicated pane on the left side of the screen. This pane contains comprehensive tabs for Parameters (inputs), Settings (timeouts, run-after configurations), Code View (raw JSON definition), and Testing (static results mocking).
- Copilot Pane: A persistent panel on the right side of the screen allows developers to alter the flow via conversational prompts.
Architecture of the 2026 Power Automate New Designer
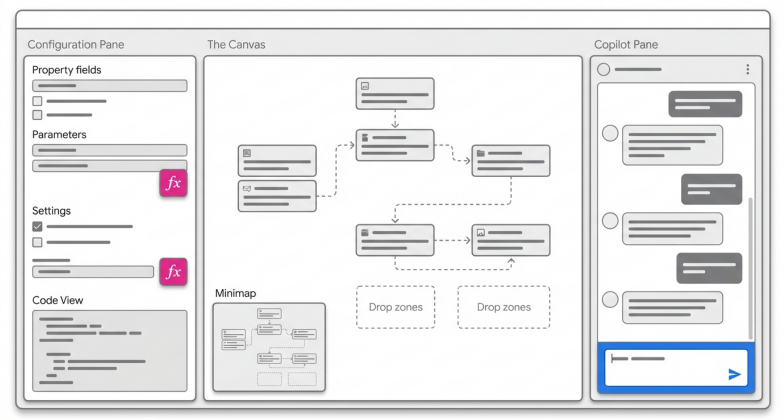
The modern authoring experience segregates the workspace into three distinct zones; the central visual canvas, the detailed configuration pane on the left, and the conversational Copilot pane on the right.
The new interface drastically improves navigation for complex flows. The command bar at the top houses essential tools like the Flow checker, Undo/Redo, and Save. Furthermore, specific tools have been added to assist with visual scaling.
Quick Win: Makers dealing with massive, complex enterprise workflows should immediately familiarize themselves with the new Minimap and Fit View buttons located in the bottom-left corner of the canvas. These tools allow rapid panning and zooming across horizontal branching logic without relying on clumsy browser scrollbars, a major improvement over the classic UI.
2. Building an Automated Cloud Flow (SharePoint / Email)
The second session module showcased how to automate actions based on external events. Specifically, it demonstrated executing logic when an email arrives or a SharePoint item changes. Automated cloud flows run entirely in the background, continuously listening for webhooks or polling specific APIs.
Recapping the Demonstration:
The speaker built a straightforward flow that triggered automatically when a new item was added to a SharePoint list. This trigger subsequently passed dynamic data to an Outlook action, which sent an automated email notification to a designated user.
The March 2026 Build Process: The integration between Power Automate and SharePoint remains a cornerstone of the platform, with over 100 dedicated templates available. However, constructing this flow from scratch now leverages the segmented configuration pane.
- Select the Trigger: Navigate to the left menu and click Create > Automated cloud flow.Provide a clear, descriptive flow name. In the trigger search bar, enter
SharePointand select the specific When an item is created - SharePoint trigger.Select Create to launch the designer. - Configure the Trigger: Click on the trigger card on the canvas. In the left-hand Configuration Pane, populate the Site Address and List Name from the provided dropdown menus.Ensure your Microsoft Entra ID account has adequate permissions to read the target list.
- Add the Action: On the central canvas, hover over the blue dashed line and select the
+icon beneath the trigger. The Add an action pane will appear on the left. Navigate to the By connector tab, search forMicrosoft 365 Outlook, and select the Send an email (V2) action. - Map Dynamic Content: In the email configuration pane, place your cursor in the Body or To field. Select the lightning bolt icon (
Insert dynamic content) or use the keyboard shortcut/to open the context menu.Select relevant columns exposed by the SharePoint trigger (e.g.,Title,Created By) to populate the email dynamically.
AI and Copilot Simplifications: Instead of manually searching for triggers, navigating through action menus, and mapping basic fields, developers can now build this entire sequence instantly using Copilot. On the make.powerautomate.com Home screen, a maker can simply type a natural language prompt.
For example, typing: "Create a flow that triggers when a new item is added to my SharePoint list and sends an email via Outlook containing the item details" will initiate the AI engine.Copilot generates the structural flow, pre-configures the necessary connector authentications, and opens the New Designer for final parameter mapping and verification.
Quick Win: Always implement Trigger Conditions for automated SharePoint flows. By default, triggers like When an item is created or modified fire on every single metadata change, rapidly consuming your daily API request limits and causing throttling. In the trigger's Settings tab, add an expression condition (e.g., @equals(triggerOutputs()?, 'Approved')). The flow will now evaluate the payload at the server level and instantly discard irrelevant changes without executing a flow run, drastically reducing capacity consumption.
3. Building an Instant Cloud Flow (Manual / Button Trigger)
The third session module demonstrated how to build an automation that executes only when a user explicitly demands it. This involves clicking a virtual button on a mobile device, or selecting a specific item within a Microsoft 365 application context.
Recapping the Demonstration:
The speaker showcased an instant flow utilizing a manual button trigger. This allowed the end-user to initiate a complex background process on-demand, passing manual input variables into the workflow at runtime.
The March 2026 Build Process:
Instant flows remain critical for processes that require human initiation but automated execution. The configuration of inputs has been streamlined in the new configuration pane.
- Select the Trigger: Navigate to Create > Instant cloud flow.For a mobile or desktop button, select Manually trigger a flow. For deep SharePoint integration, select the For a selected item trigger.
- Configure Input Parameters: Click the trigger card to open the left configuration pane. Select Add an input. Makers can force users to provide specific data before the flow executes, requiring text strings, dropdown selections, file uploads, or dates.
- Build Downstream Logic: Add actions exactly as you would in an automated flow. For instance, you might take the text input from the manual trigger and use it to create a new task in Microsoft Planner, or post an adaptive card to Microsoft Teams.
Crucial 2026 Context for SharePoint Integration: When utilizing the For a selected item trigger, the flow allows end-users to trigger automation directly from the command bar of a SharePoint list or document library. However, strict architectural governance rules apply in 2026. Flows utilizing this specific trigger will only appear in the SharePoint UI if the flow is housed within the tenant's Default Environment. If you build the flow in a dedicated production, developer, or sandbox environment, it will not render in the SharePoint command menu natively, leading to significant deployment confusion.
Quick Win: When testing complex instant flows, extensively utilize the Static Result feature in the New Designer. Located under the Testing tab of any action's configuration pane, this feature allows developers to mock the specific outputs of an action. Instead of sending real emails or updating live databases during a test run, the action is artificially marked as successful and returns a hardcoded JSON payload. This is invaluable for testing downstream exception handling without polluting production data or spamming user inboxes.
4. Building a Scheduled Cloud Flow
The session detailed how to run workflows on a strict temporal basis. This mimics traditional cron jobs or scheduled scripts to execute data synchronization tasks at specific, recurring intervals.
Recapping the Demonstration:
The speaker configured a scheduled flow to run daily. This automated a repetitive reporting task that required no human intervention or external system event triggers.
The March 2026 Build Process:
Scheduled flows in 2026 offer highly granular temporal controls. They ensure processes kick off exactly when required, regardless of the maker's local time zone.
- Initiate the Schedule: Navigate to My flows > New flow > Scheduled cloud flow.
- Define the Recurrence: A configuration window requires a Starting date and time, alongside a Repeat every interval (e.g., 1 Week, 1 Day, 1 Month). Populate these fields and select Create.
- Advanced Temporal Configuration: The designer opens with the Recurrence trigger on the canvas. Selecting it opens the left configuration pane. To ensure absolute precision, makers must specify the Time Zone dropdown. This dictates whether the start time follows local time or Coordinated Universal Time (UTC), which is critical for global deployments.
- Granular Execution Limits: Using the advanced parameters in the configuration pane, developers can select specific days of the week, and exact hours (e.g.,
08,15) and minutes (e.g.,00,30) for execution. The start time format strictly requires standard ISO 8601 formatting, such as2026-03-24T22:00:00Z.
AI and Copilot Simplifications:
Copilot handles temporal logic and cron formatting exceptionally well. A developer can bypass the manual scheduling configuration screens entirely by using a detailed natural language prompt.
From the designer, prompt Copilot: "Create a flow that runs Monday every week starting 04/14/2026 which sends an email to contoso@gmail.com that their MPR doc is due". Once the flow is generated, the developer can refine the schedule purely through chat. By typing: "Change the interval from every week to 2 weeks," Copilot will update the underlying JSON schedule configuration automatically, saving significant clicks.
Quick Win: Scheduled flows are the perfect candidate for heavy batch processing and data hygiene tasks. Instead of retrieving all records at once and risking a timeout, use Pagination in list actions (like Dataverse's 'List rows'). Set the Page Size to 2000 and utilize a SkipToken variable to process massive datasets in manageable batches during your scheduled window.
5. Adding Flow Controls (Conditions, Apply to Each, Do Until)
The original session demonstrated how to make flows intelligent by introducing branching logic, iterating over arrays of data, and executing tasks until a specific system state was achieved. This is the area where the 2026 New Designer has seen the most dramatic structural changes and usability improvements.
Recapping the Demonstration:
The speaker implemented an Apply to each loop to process a retrieved list of items. They used a Condition to evaluate values within that loop, and set up a Do until loop for iterative approval processing.
The March 2026 Build Process:
Flow controls dictate the logical path of the automation. They require a strong understanding of how arrays and boolean logic function within the Power Platform.
A. Conditions (If/Then Logic)
- Implementation: On the canvas, click the
+icon, navigate to Add an action > Built-in tools, and select Condition. - Configuration: The control visually splits the flow into two distinct vertical paths: True and False. In the left configuration pane, select a dynamic content field (e.g.,
Subject), an operator (e.g.,contains), and a required value (e.g.,meet now). - Expression Editor: For complex logic requiring data manipulation, developers must utilize the new multi-line expression editor. Selecting the
fxbutton opens an expanded text box with a 'gripper' to resize the window. - Copilot Expression Assistant: Writing complex
or(),and(), andempty()functions manually is often prone to syntax errors. By selecting Create expression with Copilot within the editor, a developer can simply type: "Grab the last four characters of Phone Number and convert it to a string." Copilot will instantly generate the exact, syntactically correct Power Automate expression formula.
B. Apply to Each (Looping Arrays)
- Implementation: Navigate to Add an action > Built-in tools > Apply to each.
- Configuration: This action strictly requires an array input. Developers map it to an array returned by a previous step (for example, the
valuearray from a 'Get emails' or 'Get items' list action). The loop will execute all nested actions sequentially for every single item in that array.
Quick Win: Sequential processing of large arrays is painfully slow. For massive datasets, makers must navigate to the Settings tab of the Apply to each action in the left pane and enable Concurrency Control. This allows the engine to run up to 50 iterations of the loop in parallel, drastically reducing the overall execution time of the workflow.
C. Do Until (Iteration)
The Do until loop has received a major architectural correction in the New Designer. Historically, in the classic UI, it visually appeared as though the condition was checked before the loop executed. In reality, a Do until loop always executes its nested actions at least once before evaluating the condition. The 2026 designer visually corrects this discrepancy, placing the condition block after the nested actions to accurately reflect the true execution flow.
- Implementation: Navigate to Add an action > Built-in tools > Do until.
- Configuration: Establish the break condition in the left pane (e.g.,
Variable Counteris equal to3). - Limit Management: A
Do untilloop will not run infinitely. By default, it operates under two strict safety limits to prevent runaway compute consumption. The Count limit caps execution at a maximum of 5,000 iterations. The Timeout limit defaults toPT1H(1 hour, following ISO 8601 duration formatting). The loop forcefully terminates if either limit is reached, regardless of whether the primary condition evaluates to true.
Architectural Correction: The 'Do Until' Loop in 2026
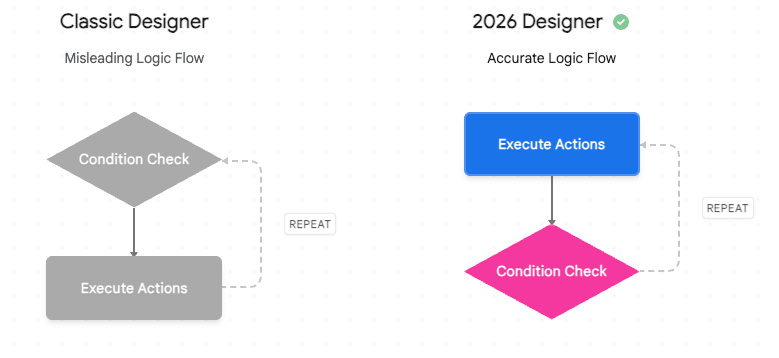
The New Designer visually resolves a longstanding logic flaw. By moving the condition check to the bottom of the structure, it accurately reflects that the enclosed actions will always execute at least once before the loop terminates.
Data sources: SharePains
6. Testing, Debugging, and Sharing Flows
The final demonstrations in the session revolved around validating the workflow, handling operational errors, and distributing the automation to the wider organization safely.
Recapping the Demonstration:
The speaker executed a manual test run, inspected the run history to trace data movement, identified a deliberate failure point, and subsequently shared the flow with another user to demonstrate collaboration.
The March 2026 Build Process:
The debugging experience has shifted from manually deciphering code to interacting with intelligent diagnostic agents.
A. Testing and Debugging
- Execution Validation: Once a flow is successfully saved (indicated by a green checkmark in the designer resiliency banner), the Test button on the top command bar becomes active. Makers can test the flow manually by performing the trigger action (e.g., sending a test email to themselves) or automatically by re-running a previously successful JSON payload.
- Run History Analysis: Flow performance is tracked via the 28-day run history dashboard. Failed runs are prominently marked with a red exclamation icon. Selecting a failed run opens the detailed execution graph, highlighting the exact node where the logic collapsed.
- Troubleshooting Copilot: Debugging in 2026 no longer requires extensive knowledge of JSON schema or HTTP status codes. When an action fails, the right-hand pane displays the Troubleshooting Copilot. This specialized AI agent analyzes the failure context—whether it's an Authentication Error 401, an Action Configuration Error 400, or a transient Error 502—and outputs a human-readable summary. For example, if an OAuth token expires, the Copilot will directly suggest: "Fix Connection," providing a one-click button to re-authenticate the specific node without leaving the canvas.
Quick Win: When auditing high-volume flow executions, developers should utilize the Edit Columns feature on the Run History page. By mapping specific trigger outputs (e.g., isHTML, hasAttachments, or a custom ID) directly to the dashboard columns, developers can identify specific data payloads at a glance. This saves you from having to open hundreds of individual run histories to locate a specific failed transaction.
B. Sharing and Permissions
Sharing cloud flows in 2026 is categorized into distinct permission models, governed strictly by Microsoft Entra ID policies to prevent data leakage.
- Co-ownership: To allow colleagues to edit the flow logic, developers add them as Owners. Owners can modify the flow, alter run-after settings, and utilize embedded connections. However, they cannot extract or modify the raw credentials of connections established by the original author.
- Run-Only Users (Instant Flows Only): For manual button flows or SharePoint selected item triggers, developers assign Run-Only Users. These users can trigger the flow but have zero visibility into the underlying architecture or code. Crucially, in 2026, administrators can dictate whether the flow executes using the embedded service account connections, or if the run-only user must authenticate and pass their own context. This prevents users from utilizing a developer's elevated privileges to access SharePoint lists they shouldn't see.
- Security Group Integration: The modern best practice for managing run-only access avoids adding individual users. Instead, developers assign a Microsoft Entra ID Security Group to the Run-Only profile. As human resources onboards or offboards employees from the group, their access to execute the flow is automatically granted or revoked. Ensure that environment routing policies allow the target security group to access the specific Dataverse environment housing the flow.
Licensing Quick Reference
Power Automate licensing remains a complex topic. Selecting the most cost-effective license requires assessing three fundamental operational factors: the necessity of Premium connectors (like Dataverse or SQL), the scale of deployment (the total number of users triggering the automation), and the need for legacy desktop application automation (RPA).
If your workflow requires standard connectors like SharePoint and Outlook, the basic M365 Seeded license is sufficient. However, if you require Premium integrations and have more than 35 users triggering the flow, the Per Flow plan becomes significantly more cost-effective than licensing each individual user. If RPA is required to scrape data from a legacy terminal, the Per User with RPA plan is mandatory.
The following matrix details the primary commercial licensing models available as of March 2026.
| License Type | Monthly Cost | Ideal Target Audience | Key Capabilities & Limits |
|---|---|---|---|
| Microsoft 365 Seeded | Included in M365 E3/E5 | Individual users needing basic personal automation. | Grants access to Standard Connectors only (e.g., SharePoint, Teams, Outlook). Does not support Premium integrations or Dataverse. |
| Power Automate Per User | $15 / user / month | Developers and IT admins building complex logic. | Unlimited cloud flows. Access to all Premium Connectors. Includes 5,000 AI Builder credits per month for AI data extraction tasks. |
| Per User with Attended RPA | $40 / user / month | Users automating legacy desktop apps lacking APIs. | Unlocks advanced desktop automation and screen scraping capabilities. Includes basic Power Automate Desktop features. |
| Power Automate Per Flow | $500 / month (5 flow min.) | Company-wide departmental workflows. | Licenses the specific flow, allowing unlimited users across the organization to interact with it without requiring individual premium licenses. |
| Pay-As-You-Go | Variable (Metered) | Unpredictable or low-volume execution flows. | Utilizes an Azure subscription for billing based purely on API run consumption. Ideal for testing phases. |
The shift from 2021 to 2026 has repositioned Power Automate from a simple logic-routing tool to a highly advanced, AI-driven automation engine. By leveraging the New Designer, optimizing loops through concurrency, implementing trigger conditions to preserve API capacity, and leaning heavily on Copilot for expression writing and debugging, developers can construct robust, enterprise-grade solutions at unprecedented speeds.
Source note
Briefing published by Collab365 Spaces. Cite as "Power Automate Masterclass for Beginners: 2026 Companion Update Guide", Collab365 Spaces. 9 sources referenced.