You saw Paul Stork deliver an exceptional masterclass on navigating the complexities of Power Automate back in 2023. His session, "Advanced Power Automate," provided critical workarounds for the platform's limitations at the time. However, the Microsoft Power Platform has undergone a monumental architectural evolution. We are now operating in the March 2026 ecosystem, where generative AI is natively embedded into the authoring experience, strict governance is enforced at the environment level, and the integration between apps, bots, and automations has been fundamentally rewired.
This companion guide is designed to bridge the gap between Paul's 2023 demonstrations and today's reality. As a senior consultant addressing a colleague, my goal is to translate those legacy patterns into modern, enterprise-grade architectures. The core engineering principles Paul taught remain absolutely valid, but the execution is vastly faster, more secure, and deeply integrated with AI. We will walk through each of his eight demonstrations, breaking down exactly how you would build those solutions using the current March 2026 tools, menus, and best practices.
What's Changed Since This Session
Before diving into the specific architectures, it is crucial to understand the high-level platform shifts that have occurred since the original recording. The Power Platform of March 2026 is characterized by native generative AI, strict Managed Environment enforcement, and consolidated agentic development. The table below provides a factual summary of the technological transitions.
| Technology / Feature (2023) | Status in March 2026 | What Replaced It / Current Standard |
|---|---|---|
| Classic Flow Designer | Legacy / Deprecated | The AI-powered New Designer with a modern canvas, native Copilot integration, and multi-line expression editors. |
| Manual Expression Writing | Supported but inefficient | Copilot Expression Assistant (Natural Language to Power Fx/Expressions). |
| Power Virtual Agents (PVA) | Rebranded & Overhauled | Microsoft Copilot Studio, utilizing Agent Flows and Generative Orchestration. |
| Standard Solutions for ALM | Enforced Governance | Managed Environments are now completely mandatory for all deployment pipeline targets. |
| HTTP Request for Child Flows | Heavily restricted via DLP | Native "Run a Child Flow" action strictly enforced within Dataverse Solutions. |
| Action Settings Menu ("...") | Redesigned UI | "Configure run after" and other advanced settings are now managed in the persistent left-hand configuration pane. |
| Manual Error Recovery (RPA) | Enhanced with AI | "Self-healing" AI agents serve as automatic fallback mechanisms for UI/Web automation failures. |
| Power Apps "Ask in PowerApps" | Replaced | Power Apps (V3) trigger with strongly typed input parameters. |
How to Build This Today
The following sections provide a comprehensive, step-by-step teardown of each scenario Paul demonstrated. For each, we will restate the historical context, outline the modern approach, and provide detailed implementation steps using the March 2026 user interface.
Demo 1: Using Expressions to Parse JSON and Access Nested Values
What you saw: Paul demonstrated how to handle complex JSON payloads where the standard dynamic content pane fails to show the specific values you need. He meticulously wrote expressions manually using the json() function, carefully counting brackets, array indexes, and property names to extract nested arrays or specific key-value pairs. It was a tedious process prone to syntax errors.
How you'd build that same thing today: Manual expression writing for JSON parsing is no longer the standard or recommended approach for developers. Today, you rely on the Copilot Expression Assistant, which uses natural language to generate, update, and fix complex expressions on your behalf.When dealing with a complex JSON response—such as a payload from an external API or a Dataverse List rows action—the new designer allows you to bypass manual syntax structuring entirely.
Furthermore, the integration of Copilot extends beyond just writing expressions; it fundamentally changes how we structure output. By default, Copilot prompts generate text, but the modern standard dictates that we enforce JSON output for structured data handling. Selecting JSON as the output format makes it infinitely easier to process responses with multiple elements in downstream cloud flows.
Step-by-Step Implementation in the 2026 Designer:
- Access the AI-Powered Designer: Open your flow in the modern designer. On the visual canvas, click the specific action card where you need to utilize the extracted JSON value (for example, a Compose action or a Dataverse Update row action).
- Open the Configuration Pane: Unlike the classic UI, clicking an action opens a persistent configuration pane on the left side of your screen.
- Trigger the Expression Editor: Click into the input field where you want the dynamic value to appear. A blue
fxicon will immediately pop up. Select thisfxbutton to open the multi-line expression editor. - Invoke Copilot: Instead of typing the expression manually, look for and select the button labeled Create expression with Copilot.The user experience will shift to the expression assistant interface.
- Prompt with Natural Language: In the provided text box, describe exactly what you want to extract using everyday language. You can seamlessly reference the dynamic content of the JSON payload by its plain text name.
- Example prompt: "Grab the 'close_notes' value from the first record in the 'result' array coming from the previous HTTP action".
- Apply the Generation: Copilot will interpret your intent, map the dynamic values, and generate the exact Power Automate expression needed (e.g.,
Index(outputs('HTTP_Request')?['body']?['result'], 0)?['close_notes']).Review the generated code and click Apply to insert it directly into the field.
Quick Win: If you inherit a legacy flow with an incredibly complex, broken manual expression, do not try to parse the brackets yourself. Open it in the new editor, highlight the broken expression, click Create expression with Copilot, and simply ask, "Fix this expression so it correctly handles empty arrays." The AI will refactor the syntax for you.
Enterprise Considerations for JSON Parsing: When building robust flows, relying solely on inline expressions for massive payloads can become difficult to maintain. Alternatively, for structured JSON parsing, the Parse JSON action now features intelligent schema generation.You no longer need to manually strip out extraneous data from your sample payloads. You can paste a sample payload directly, and the system will assist in identifying the required attributes, generating a clean schema that instantly populates the dynamic content pane for all subsequent actions.
| Task | 2023 Classic Approach | 2026 Modern Approach |
|---|---|---|
| Extracting Array Data | outputs('Get_Items')?['body/value']?['Name'] | NL Prompt: "Get the Name from the first item." |
| String Concatenation | concat(variables('FirstName'), ' ', variables('LastName')) | NL Prompt: "Concatenate first name and last name." |
| Data Type Conversion | int(triggerBody()?) | NL Prompt: "Convert Phone number from Integer to String." |
Demo 2: Converting XML to JSON (and Vice Versa)
What you saw: Paul showed how to integrate with legacy SOAP APIs or older on-premises ERP systems that stubbornly return XML payloads. He utilized the built-in xml() and json() functions to manually convert the data formats. He spent significant time explaining how to handle common translation issues, such as root node extraction and the infamous array conversion problem where single-child XML nodes convert into JSON objects instead of arrays.
How you'd build that same thing today: Despite the push for modern RESTful architectures, many enterprise, healthcare, and legacy financial systems still rely entirely on XML, making this integration pattern just as critical in 2026 as it was in 2023.However, the approach has been vastly streamlined. While the xpath, xml(), and json() functions are still the underlying engines executing the compute logic, you no longer need to memorize their syntax or string-manipulation nuances.
Step-by-Step Implementation:
- Retrieve the XML: Add an action to retrieve your XML data. This is typically an HTTP action configured to call a SOAP endpoint or an action retrieving a file from a legacy SFTP server.
- Create the Conversion Hub: Add a Compose action immediately after the retrieval step. This Compose action will serve as your dedicated data transformation hub, isolating the logic from your downstream business processes.
- Access the Assistant: Click the input field of the Compose action and select the
fxicon to open the Copilot Expression Assistant in the left configuration pane. - Draft the Prompt: Type your natural language prompt: "Convert the XML body from the HTTP action into JSON format.".
- Review the Generation: Copilot will automatically wrap the dynamic content in the nested
json(xml(...))functions. - Address the Array Issue: As Paul noted, XML does not natively understand JSON arrays. If an XML node representing "InvoiceLines" only happens to have one child element in a specific transaction, standard JSON conversion will create an object, breaking downstream loops. Today, you simply instruct Copilot: "Convert the XML to JSON, but ensure the 'InvoiceLines' node is always treated as an array." Copilot will append the necessary array-casting logic (
xpathmodifications) to the expression, ensuring structural consistency regardless of the payload size.
Warning: Do not use third-party, online "XML-to-JSON" conversion APIs or connectors for enterprise data. Sending sensitive payload data (credentials, financial records, personally identifiable information) out of the tenant boundary to a free conversion utility is a massive security and compliance risk.Always use the native xml() and json() expressions within Power Automate to keep the data processing internal.
Advanced Integration Architecture: If you are dealing with highly complex, multi-layered enterprise integrations where the XML schema requires extensive manipulation before it can be converted to JSON, a single cloud flow might become unwieldy. In these specific enterprise scenarios, the modern best practice is to utilize Liquid transforms within Azure Logic Apps. You can build a standard Power Automate cloud flow that calls an Azure Logic App via an HTTP request, offloading the heavy XML transformation to the Liquid template, and receiving the perfectly formatted JSON back into your flow. This keeps your Power Automate canvas clean and reserves complex data mapping for purpose-built Azure tools.
Secure XML to JSoN Transformation Architecture
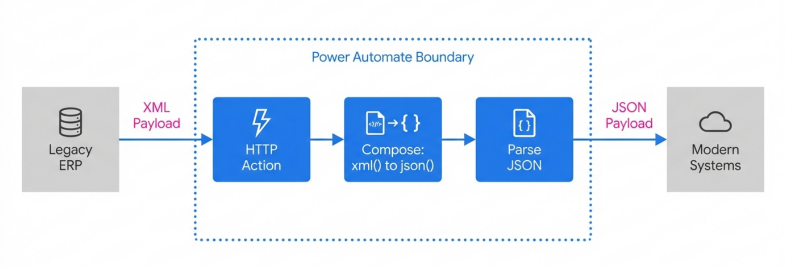
By processing XML natively within the Power Platform boundary using xpath and json() functions, developers maintain compliance while standardizing payloads for modern ApI consumption
Demo 3: Triggering Power Automate Flows from Power Apps
What you saw: Paul demonstrated a classic fusion development pattern: clicking a button in a Power Apps Canvas app to trigger a cloud flow, passing variables (parameters) to it for backend data processing, and subsequently returning data to the app for the user to view. He highlighted the quirks of the old "Ask in PowerApps" dynamic content mechanism.
How you'd build that same thing today: The core architectural concept remains identical, but the integration layer has matured significantly. In the past, makers occasionally used the generic When an HTTP request is received trigger as a workaround to avoid the buggy V1/V2 Power Apps triggers. Today, the native Power Apps (V3) trigger is the absolute enterprise standard, providing deep, secure integration between the app and the backend flow. Furthermore, connection references are now seamlessly managed, eliminating the deployment headaches of the past.
Step-by-Step Implementation:
- Initiate from the App: Open your Canvas app in the modern Power Apps Studio.
- Access the Automate Pane: On the left-hand authoring menu, select the Power Automate icon.This opens a dedicated pane for managing flow connections.
- Create In-Context: In the Power Automate pane, click Create new flow. This action automatically opens the "Create your flow" modal dialog directly within the Power Apps Studio context, maintaining your workflow state.
- Configure the V3 Trigger: Choose to build from blank. The flow will default to the robust Power Apps (V3) trigger.
- Define Explicit Inputs: The old
Ask in PowerAppsdynamic content is obsolete.You now define your inputs explicitly directly within the trigger configuration. Click Add an input, select the data type (e.g., text, boolean, number), and name them clearly (e.g.,RecordID,UserEmail). This provides strong typing and predictable schema validation. - Build the Logic: Construct your backend processing logic, such as fetching a complex record set from Dataverse, generating a PDF document, or initiating an approval routing.
- Return the Payload: At the end of the flow, add the Respond to a Power App or flow action.Define the exact outputs you want to send back to the app (e.g., a text output named
StatusMessageor a boolean namedIsSuccess). Save the flow. - Wire the App Button: Back in the Power Apps canvas, assign the newly created flow to your button's
OnSelectcustom property.- Modern Syntax:
Set(varFlowResult, YourFlowName.Run(TextInput1.Text)); - The context variable
varFlowResult.StatusMessagewill now hold the explicit data returned from the backend, ready to be bound to a label or notification control.
- Modern Syntax:
Warning: When passing parameters from Power Apps to Power Automate, network traffic observability dictates that these arguments can be intercepted or viewed in transit. Evaluate the parameters passed. To mitigate risks, always validate the parameter values passed inside the flow. For example, if you send an email address from the app, use a condition in the flow to verify it matches your expected corporate domain format (@contoso.com) before executing backend data operations.Never trust client-side input implicitly.
Demo 4: Integrating Power Automate Flows with Bots
What you saw: Paul built a standard cloud flow that was triggered by a Power Virtual Agents (PVA) bot. The bot collected input from a user, passed it to the flow for processing, and returned the result to the chat interface dynamically.
How you'd build that same thing today: The landscape for conversational AI has completely shifted. "Power Virtual Agents" no longer exists; the product has been entirely rebranded and overhauled as Microsoft Copilot Studio. While standard cloud flows can still be called from a bot, the 2026 enterprise standard is to utilize Agent flows.
Agent flows are created natively within Copilot Studio and are optimized specifically for AI agents, allowing you to orchestrate sophisticated logic with prebuilt or custom connectors. They embed deterministic automation steps with layers of reasoning and natural language comprehension.
Step-by-Step Implementation:
- Access the Studio: Navigate to Microsoft Copilot Studio and open your targeted AI agent.
- Leverage Natural Language Generation: You no longer have to build the flow manually from a blank canvas. You can use Natural Language: Describe what you need in the prompt interface. For example: "Create a flow that takes a customer ID, looks up their order status in Dataverse, and returns the shipping date".
- Review the AI Output: Copilot Studio interprets the intent and generates the entire skeleton of the Agent flow based on your description.
- Refine in the Designer: To edit the flow visually, open it in the designer. You will notice the trigger natively defaults to Run a flow from Copilot. This specialized trigger allows flows to be added as "tools" to other agents for complex automation scenarios.
- Add Integration Actions: Add your necessary actions (e.g., connecting to SharePoint, ServiceNow, or custom APIs). Agent flows natively support the exact same rich ecosystem of Power Platform connectors you are accustomed to using in standard cloud flows.
- Return the Payload: Use the Return a list of results action or define output variables to cleanly pass the extracted data back to the Copilot Studio agent topic.
Quick Win: If you have an existing, complex Power Automate cloud flow that you want your new Copilot agent to use, you absolutely do not need to rebuild it from scratch. Open the flow's detail page in the Power Automate portal, select Edit, and change the flow's plan to Copilot Studio. This one-way operation converts your cloud flow into an Agent flow. This is crucial because it allows the flow to consume Copilot Studio capacity rather than triggering standard Power Automate billing.
Architectural Note on Agent Flows vs. Cloud Flows: Agent flows execute deterministically—they follow a rule-based path where the same input consistently produces the same output, just like classic flows. However, unlike cloud flows, Agent flows reside inside a single Copilot agent. Currently, they cannot be shared, copied, have co-owners, or be given run-only permissions outside of that specific agent. Choose standard Power Automate cloud flows if you need broad enterprise application lifecycle management (ALM) and reuse across multiple teams, but choose Agent flows for contained, conversational automation.
Demo 5: Creating Solutions for Organization and Promotion
What you saw: Paul highlighted the absolute necessity of building inside Dataverse Solutions. He packaged multiple flows, apps, and bot components together to promote them smoothly from Development to Test to Production environments, establishing a baseline for application lifecycle management (ALM).
How you'd build that same thing today: In 2026, building in Solutions is no longer just a "best practice" suggested by MVPs; it is a strictly enforced governance mandate engineered into the platform. As of February 23, 2026, Microsoft ensured that any environment used as a target in Power Platform Deployment Pipelines must be a Managed Environment. If your target environment isn't managed, the system will enable it automatically during deployment, subjecting the environment to stricter administrative controls and licensing requirements.
Step-by-Step Implementation:
- Environment Preparation: Navigate to the Power Platform admin center and ensure your Dev, Test, and Prod environments are properly configured. Note that starting in June 2026, end users in Managed Environments operating Power Apps without the proper premium licenses will receive hard enforcement in-app notifications, and administrators will receive compliance alerts.
- Initialize the Solution: In Power Automate, click Solutions on the left navigation pane and select New Solution. Always define a custom Publisher with a specific prefix to easily identify your organization's custom components.
- Assemble Assets: Add your Canvas Apps, Agent Flows, Cloud Flows, and Dataverse tables into this single container.
- Abstract Configuration Data: Never hardcode URLs, email addresses, or SharePoint site lists in your flows. Create Environment Variables for these data points.Create Connection References for all connectors. Crucially, assign ownership of these connection references to a dedicated Service Account, not a personal user account, to ensure continuity if an employee leaves the organization.
- Utilize Native Pipelines: Do not export and import unmanaged ZIP files manually. That era is over. Use the native Power Platform Pipelines. In the unified deployment page, initiate a deployment from your Dev environment to your Test environment.
- Automated Wiring: The pipeline will automatically intercept the deployment and prompt the administrator to wire up the Connection References and provide values for the Environment Variables specifically for the target environment.
Warning: Avoid using the legacy "Clone a patch" and "Clone solution" methods for updating solutions. This outdated approach severely limits team development and increases complexity when storing your solution in a source control system. The modern 2026 standard dictates that you update the unmanaged solution directly and deploy the managed update via Pipelines, allowing the system's import logic to automatically detect the solution as an update and handle the versioning and roll-ups automatically.
Demo 6: Optimizing Flow Performance with Parallel Branches
What you saw: Paul shared a compelling real-world scenario where a client's flow took 9 hours to run sequentially. By implementing parallel branches and minimizing unnecessary actions, he drastically reduced the execution time to 1 hour and 15 minutes. He emphasized concurrency and minimizing API calls.
How you'd build that same thing today: Concurrency and parallel execution remain the most effective architectural patterns to optimize high-volume flows and avoid API throttling. The modern AI-powered designer makes building and managing these structures significantly easier with advanced zooming, panning controls, and a minimap for navigating massive automation architectures.
Step-by-Step Implementation:
- Access the Canvas: Open your flow in the new designer.
- Insert the Branch: Below the trigger or an initial setup action, hover over the connecting arrow and click the + icon. Instead of selecting "Add an action," specifically select Add a parallel branch.
- Scale the Concurrency: Power Automate supports up to 50 parallel branches in a single flow.Use this capability to execute independent tasks concurrently—such as sending distinct approval requests to five different departments simultaneously, rather than waiting sequentially for Department A to finish before notifying Department B. This approach optimizes the flow's performance without overwhelming the system.
- Optimize Loops: By default, an
Apply to eachloop processes items sequentially (processing item 1 completely, then moving to item 2). To optimize this, click the loop action to open the left configuration pane. Navigate to the Settings tab and enable Concurrency Control. You can explicitly increase the degree of parallelism, allowing up to 50 concurrent runs of the loop logic.
Warning: Do not enable concurrency control on an Apply to each loop if the actions inside the loop depend on variables being updated sequentially (e.g., appending string values to a single global variable). Concurrent runs will attempt to overwrite the variable unpredictably, destroying your data integrity.Ensure the logic inside the loop is entirely independent for each item.
The 2026 Resilience Update: Self-Healing Workflows
While parallel branching improves speed, true performance optimization also requires reliability. If your cloud flow relies on desktop flows (RPA) for legacy UI/Web automation, performance failures often occur when an application's UI elements change unexpectedly.
In March 2026, Microsoft introduced Self-healing agents for desktop flows in public preview.When a desktop flow fails to find a captured UI element, it typically crashes the entire process. Now, this AI-powered agentic feature acts as a lightweight fallback mechanism. The self-healing agent dynamically proposes a proper new UI element to interact with, preventing the flow from stopping and allowing the end-to-end automation to continue functioning seamlessly. This fundamentally shifts maintenance from constantly fixing broken RPA scripts to focusing on proactive optimization.
Demo 7: Implementing Child Flows
What you saw: Paul demonstrated two distinct methods for modularizing complex flows: calling a secondary flow via an HTTP Request trigger (which he framed as the advanced method) and using the "Run a Child Flow" action (the simpler method). He explained the value of breaking massive automations into manageable, reusable components.
How you'd build that same thing today: The landscape regarding child flows has consolidated. The HTTP Request method is now widely considered an architectural anti-pattern for internal flow modularization. It poses severe security risks, requires premium licensing overhead, and is frequently blocked entirely by enterprise Data Loss Prevention (DLP) policies. In 2026, the native Run a Child Flow action is the exclusive, supported best practice for nested workflows.
Step-by-Step Implementation:
- The Solution Mandate: Both the parent flow and the child flow must be built directly inside the same Dataverse Solution. If you attempt to use this pattern outside of a solution, the "Run a Child Flow" action will simply not appear in your connector list.
- Create the Child Flow: Inside your designated solution, create a new instant cloud flow. Configure the trigger as Manually trigger a flow.
- Define Parameters: Define the exact input parameters within the manual trigger card (e.g.,
ContactName,ContactEmail). These are the variables the parent flow will pass down. - Build the Logic: Construct your reusable logic (e.g., standardizing an address format, looking up a manager hierarchy, generating a standardized PDF).
- Return the Payload: Add the Respond to a Power App or flow action at the end of the child flow to securely pass the processed data back to the parent.Save the flow.
- Configure Connection Permissions: Before the parent flow can successfully call the child, you must configure the child flow's run-only settings. Navigate to the child flow's details page. Under the "Run only users" section, edit the settings to ensure that the flow utilizes the embedded connection (i.e., select "Use this connection") rather than the default "Provided by run-only user" option. This ensures the child flow executes under a consistent service account, preventing permission errors when triggered by varying users.
- Create the Parent Flow: In the same solution, build your parent flow. Add the Run a Child Flow action (located under the native Flows connector). Select your newly created child flow from the dropdown menu. The input parameters you defined in step 3 will automatically populate as fields for you to complete.
Quick Win: If your child flow executes a long-running process—such as routing a document for executive approval that might take several days—the parent flow will time out and fail after 120 seconds of waiting for a response. To resolve this, go to the child flow's Respond to a Power App or flow action, open the Settings in the left configuration pane, and toggle on Asynchronous response. The child flow will immediately return a standard 202 Accepted HTTP status to the parent flow, preventing the timeout failure while continuing its processing in the background.
Secure Parent-Child Architecture via Solutions
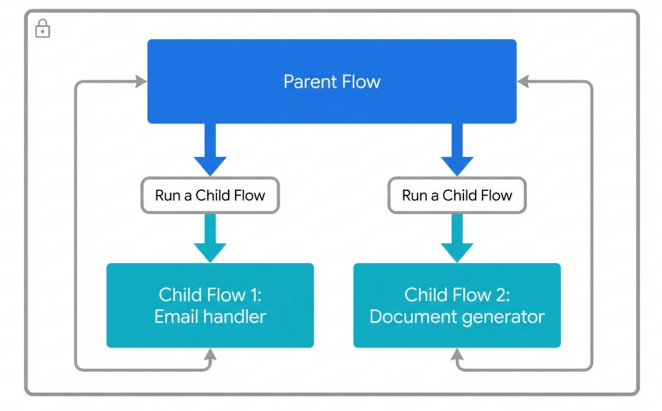
All parent and child flows must reside within the same Solution boundary. Child flows must use embedded connections to prevent permission failures when invoked by the parent.
Demo 8: Designing Flows with Error Checking using Scopes
What you saw: Paul highlighted the inherent fragility of linear flows that crash completely at the first sign of a minor error. He designed robust flows with comprehensive error checking using the Scope action and manipulating the "Configure run after" settings. This created a Try/Catch recovery logic pattern, allowing flows to fail gracefully, log the error, and automatically alert administrators.
How you'd build that same thing today: The programmatic "Try-Catch-Finally" pattern remains the absolute gold standard for enterprise error handling in Power Automate. The underlying philosophy has not changed. What has changed is the user interface. The new AI-powered designer has relocated where and how you configure these critical settings, streamlining the visual canvas.
Step-by-Step Implementation:
- Establish the Scopes: Open your flow in the designer and search for the Scope - Control action.Add three consecutive Scope actions sequentially to your canvas.
- Rename for Clarity: Immediately rename them to Scope - Try, Scope - Catch, and Scope - Finally to establish clear intent.
- The Try Block: Drag all your core, risk-prone business logic (e.g., executing an HTTP request, updating SharePoint lists, querying Dataverse) inside the "Scope - Try" container.
- The Catch Block: This block will exclusively handle the error logic. Inside the "Scope - Catch" container, add your error notification and logging actions (e.g., writing the error detail to an Application Insights log, or posting an adaptive card to an IT Teams channel containing the specific flow run URL).
- Configuring the Catch Trigger: Click the "Scope - Catch" action card to select it. Look to the left-hand configuration pane and navigate to the Settings tab. Expand the Run After menu.
- Define the Failure State: By default, actions are configured to run only if the previous action is successful. Uncheck the "Is successful" box and check both Has failed and Has timed out. Now, the entire Catch block will only execute if an action inside the preceding Try block crashes or times out.
- The Finally Block: Inside the "Scope - Finally" container, place any mandatory cleanup actions that must execute regardless of whether the flow succeeded or failed (e.g., releasing a file lock on a SharePoint document, or updating a master status variable to "Processing Complete").
- Configuring the Finally Trigger: Configure the "Scope - Finally" action's Run After settings to execute if the previous action ("Scope - Catch") is successful (meaning an error occurred, was caught, and processed successfully) OR is skipped (meaning the initial Try block succeeded perfectly, thereby skipping the Catch block entirely).
Quick Win: Do not overuse Scopes simply for visual organization. Wrapping every single trivial action in its own scope creates unnecessary computational overhead and visual complexity. Only group actions into a Try block when they are logically related parts of a critical transaction that requires explicit rollback logic or administrative notification if any single piece fails.
Troubleshooting Modern Failures: If you are debugging a flow run that failed despite your Catch blocks, the modern platform provides significantly better tools. The new designer integrates Copilot directly into the run history view. You can click on the specific failed step displaying a red exclamation icon, and Copilot will analyze the error message on the right-hand pane, often suggesting the exact configuration fix or data type correction required to resolve the issue.
Licensing Quick Reference
With the platform rapidly evolving, understanding the licensing models required to implement these advanced patterns is critical to avoid abrupt service interruptions. Notably, the legacy "Power Apps per app" plan is effectively dead as of early 2026, officially ending sales and pushing organizations toward modern Pay-As-You-Go models or comprehensive Per User subscriptions. Furthermore, Managed Environments compliance is strictly enforced starting June 2026.
The table below provides a concise reference for the licenses required to support the architectures discussed in this guide.
| Capability / Architectural Pattern | Required License / Plan | 2026 Enforcement Note |
|---|---|---|
| Standard Connectors (M365 Integration) | Power Automate / Power Apps for Microsoft 365 | Included with standard enterprise E3/E5 plans. |
| Premium Connectors / Child Flows | Power Automate Premium (Per User or Per Flow) | Explicitly required for any HTTP requests, Dataverse integration, and utilizing the "Run a Child Flow" action across environments. |
| Copilot Studio Agent Flows | Copilot Studio Capacity (Billed by usage) | Agent flows consume dedicated Studio capacity metrics, completely separate from standard Power Automate flow run entitlements. |
| Solutions & Automated Pipelines (ALM) | Managed Environments | Target pipeline environments must be Managed Environments as of February 2026. |
| End-User App/Flow Usage in Managed Env. | Premium Power Apps / Power Automate License | In-app warning notifications begin June 2026 for any unlicensed users operating in Managed Environments. |
Briefing published by Collab365 Spaces. Cite as "Advanced Power Automate: 2026 Companion Guide", Collab365 Spaces. 8 sources referenced.