1. What's Changed Since This Session
| Technology / Concept | Status in March 2026 | What Replaced It |
|---|---|---|
| Power Virtual Agents (PVA) | Fully absorbed and rebranded. | Microsoft Copilot Studio and autonomous Agents. |
| Manual Solution Export/Import | Deprecated as an enterprise ALM practice. | Automated Power Platform Pipelines. |
| Pipeline Target Environments | Standard environments no longer supported for targets. | Managed Environments (Mandatory as of Feb 23, 2026). |
| Low-Code Exclusive Solutions | Expanded to include pro-code assets natively. | Power Apps Code Apps (React/Vue/Blazor). |
| Canvas App Creation | Classic studio augmented by multi-agent generation. | Power Apps vibe (Unified plan, data, and app UI). |
| Two-Stage Holding Solutions | Discouraged due to performance bottlenecks. | Single-Stage Upgrade during managed imports. |
| Manual Dependency Debugging | Augmented with proactive AI static analysis. | Solution Checker integrated into Managed Environments. |
| Patching Solutions | Heavily discouraged for enterprise source control. | Routine Solution Upgrades via automated pipelines. |
| Dataverse for Teams | Functioning, but restricted by 2GB limits. | Administrator upgrades to full Dataverse production environments. |
| App Navigation Controls | Legacy grid controls fully deprecated this month. | Modern fluent controls and Agent Feed views. |
2. How to Build This Today
Scenario 1: Creating a New Solution and Configuring a Publisher
The session showed Paul Stork navigating the classic interface to manually create a solution container and configure a publisher to track component ownership. Here is how you'd build that same thing today in March 2026.
Today, the classic interface is gone, and the solution creation process is heavily streamlined. You still absolutely need a dedicated solution container. You also must create a custom publisher to ensure your component prefixes do not conflict with the default system-generated items.
The default publisher applies a random prefix (like cr8a3), which makes enterprise auditing a nightmare.You need a clean, identifiable prefix for your organization.
Step-by-Step Configuration (The Manual Way):
- Navigate to the modern maker portal at
make.powerapps.com. - In the left navigation pane, select Solutions. If it is not immediately visible, select ...More and pin Solutions to your navigation bar.
- On the command bar, select New solution.
- In the configuration pane, enter a Display Name for your project. The Name field will auto-generate based on your display name, automatically replacing spaces with underscores.
- Under the Publisher drop-down, never select the CDS Default Publisher. Instead, select New publisher.
- Complete the publisher details by entering a Display Name, a unique Name, and a distinct Prefix (e.g.,
contoso_). This prefix permanently attaches to all tables and columns you create, immediately identifying them as your company's intellectual property. - Select Save to create the publisher, and then select Save again to finalize the solution container.
Step-by-Step Configuration (The AI-Driven Way): In 2026, you can completely bypass manual container creation using the new Power Apps vibe experience.This represents a fundamental shift in how we begin solution architecture.
- Navigate directly to
vibe.powerapps.com. - Enter a natural language prompt in the text box detailing your business requirement.
- Multi-agent AI immediately begins working. You will watch the system concurrently generate a project plan, a Dataverse data model, and a live app preview on a single design surface.
- Your data remains in temporary in-memory draft tables while you iterate with the AI via a continuous chat interface.
- Once satisfied, select Save in the upper-right corner. The system automatically packages the app, tables, and plan together into a properly governed solution container.
Quick Win: Always set your newly created solution as your Preferred Solution in the environment settings.This ensures any stray component you or your colleagues build outside the solution interface is automatically captured in your custom solution, rather than falling into the messy default solution.
Warning: Never use the word _upgrade as part of your custom solution name. This string is strictly reserved by Microsoft for internal pipeline upgrade processes, and using it will fatally break your ALM deployment routing.
Official Microsoft Documentation:
Scenario 2: Adding Connection References to Standardize Connectors
The session showed Paul Stork adding connection references to separate specific user credentials from the flow or app logic. Here is how you'd build that same thing today in March 2026.
Connection references remain the absolute backbone of healthy Application Lifecycle Management (ALM).They act as empty pointers.Instead of your application permanently binding to "John's personal SharePoint account," it binds to an abstract reference named SharePoint_HR_Ref.
When you eventually move the solution to a Production environment, you simply wire that empty reference to an official enterprise service account.This prevents data leaks and broken apps when employees leave the company.
Step-by-Step Configuration:
- Open your custom solution in
make.powerapps.com. - On the top command bar, select New > More > Connection reference.
- Enter a Display name (e.g., "SQL Server Core DB Reference") and provide a detailed description.
- Under the Connector dropdown, search for and select your target service (e.g., SQL Server, SharePoint, or Dataverse).
- Under Connection, select an existing active connection in your current development environment.If one does not exist, select New connection to authenticate a new credential set.
- Select Create to bind this authenticated reference to your solution container.
When you subsequently build Power Automate flows within this specific solution, the flow checker will aggressively prompt you to use this established connection reference.It will warn you against creating hardcoded connections directly inside the flow logic.
Canvas Apps vs. Cloud Flows Behavior: It is critical to understand that Canvas apps and Cloud flows handle connection references very differently in 2026.
Flows universally use connection references for all types of connectors.Canvas apps, however, only use connection references for implicitly shared (non-OAuth) connections, such as basic SQL Server Authentication.Do not attempt to force standard OAuth connections into Canvas app connection references, as the system will silently ignore them.
The Pipeline Service Account Strategy: When dealing with enterprise pipelines, developers should never have access to Test or Production data.
In 2026, best practice dictates using delegated deployments via a Service Principal Name (SPN) or a non-human Service Account.You must pre-create the necessary connections using the Service Account in the target environment. When the pipeline runs, the SPN swaps the developer's development connections for the Service Account's production connections.
Quick Win: If you have an existing flow that was built outside of a solution, importing it into an unmanaged solution will automatically strip its hardcoded connections. The system will cleanly replace them with empty connection references, instantly upgrading the flow for enterprise ALM.
Official Microsoft Documentation:
Scenario 3: Adding Apps, Agents, and Flows to the Solution
The session showed Paul Stork adding standard Power Apps, Power Virtual Agents bots, and Power Automate flows to his solution. Here is how you'd build that same thing today in March 2026.
The most jarring shift since the original session is vocabulary and architecture. "Bots" no longer exist; they are now highly autonomous Agents.Power Virtual Agents has been completely absorbed, heavily upgraded with generative AI, and rebranded as Microsoft Copilot Studio.
Furthermore, Power Platform solutions in 2026 are no longer exclusively for "low code" assets. Solutions now natively support Code Apps, allowing professional developers to bypass Canvas app limitations while maintaining strict IT governance.
Modern Solution Architecture in 2026
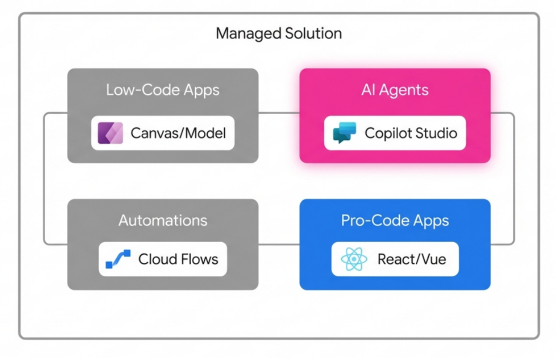
Solutions now act as enterprise containers, natively hosting Copilot Studio Agents and Pro-Code web applications alongside traditional low-code assets.
Step-by-Step Configuration for Apps and Flows:
- Navigate inside your solution at
make.powerapps.com. - To create a low-code interface, select New > App > Canvas app (or Model-driven app).Keep in mind that as of March 2026, the legacy Editable Grid and Read-Only Grid controls are entirely deprecated.You must use the modern fluent controls.
- To add an existing automation, select Add existing > Automation > Cloud flow.Ensure the flow was originally authored inside a solution so it retains its connection references.
- For pro-code developers, you can now build web applications using React, Vue, or Blazor in your IDE of choice.Using the Power Apps CLI, you deploy these directly into the solution. These Code Apps automatically become governed Power Platform assets subject to Data Loss Prevention (DLP) policies.
Step-by-Step Configuration for Agents (formerly Bots): You no longer build conversational AI in the legacy PVA maker portal. All agent development happens in Microsoft Copilot Studio.
- Navigate directly to Microsoft Copilot Studio and access the dedicated Solutions menu in the left navigation pane.
- Open your specific deployment solution, and select New > Agent.
- Configure your Agent's data sources using the new Dataverse Model Context Protocol (MCP).This gives your agent instant, secure access to your business data.
- When you publish, the Agent, its generative AI topics, and its custom plugins are automatically captured as discrete solution components.
Embedding Microsoft 365 Copilot: In 2026, you can also embed Microsoft 365 Copilot chat directly into your model-driven apps as a solution component.This powerful unified experience allows app users to reason over in‑app Dataverse data, generate insights, and take informed action without ever switching browser tabs.
Quick Win: Set your "Preferred Solution" directly inside the Microsoft Copilot Studio settings.This guarantees that every autonomous action, topic, or plugin you build is automatically tracked in your deployment package, totally eliminating forgotten dependency errors during import.
Official Microsoft Documentation:
- (https://learn.microsoft.com/en-us/power-platform/release-plan/2024wave2/microsoft-copilot-studio/solution-management-copilot-studio)
- Use Microsoft 365 Copilot chat in model-driven apps
Scenario 4: Creating Environment Variables for Configuration Management
The session showed Paul Stork using environment variables primarily to change text strings or SharePoint URLs when moving from Dev to Prod. Here is how you'd build that same thing today in March 2026.
Hardcoding any operational values directly into an app or flow is now universally considered a severe architectural anti-pattern.Today, environment variables are significantly more robust. They handle everything from basic SharePoint Site URLs to highly sensitive API keys using seamless Azure Key Vault integration.
Step-by-Step Configuration for Standard Variables:
- Within your active solution, select New > More > Environment variable.
- Enter a Display name (e.g., "Enterprise ERP System URL").The system generates the unique schema name automatically.
- Select the Data Type. Your options include Text, Decimal number, JSON, Two options, Data source, or Secret.
- If you select "Data source", you must pick a connector (like SharePoint). The system uses this connection solely to retrieve parameter values (like rendering a list of sites), but it does not store the credential itself.
- Enter a Default Value. This value becomes part of the core definition table and travels with the solution permanently.
- Optionally enter a Current Value. This overrides the default specifically for your current development environment.
Configuring Azure Key Vault Secrets: If you are dealing with passwords, tokens, or API keys, you absolutely must use the Secret data type. Storing secrets in plain text allows them to be visible in flow run histories, which is a massive security violation.
- Create a new variable and select the Data Type as Secret.
- Under Secret Store, select Azure Key Vault.Note that the Key Vault must reside in the exact same tenant as your Power Platform subscription.
- Select New Azure Key Vault value reference.
- Provide the precise Azure Subscription ID, Resource Group Name, Key Vault Name, and the specific Secret Name.
- During execution, Power Platform dynamically reads the secret directly from Azure without exposing the plain text string to the maker or the run history logs.
Quick Win: Before exporting your solution for a pipeline deployment, always remember to strip the Current Value from your environment variables.Select the variable in your solution list, click ..., and choose Remove from this solution.This intentionally breaks the configuration, forcing the target environment pipeline to halt and prompt the deployment administrator to enter the correct Production values.
Official Microsoft Documentation:
Scenario 5: Exporting and Importing Unmanaged Solutions (Dev-to-Dev)
The session showed Paul Stork manually clicking "Export," waiting for a processing screen, and downloading a zip file to move unmanaged code between developer environments. Here is how you'd build that same thing today in March 2026.
While manual exports are technically still possible in the UI, they are functionally obsolete. Power Platform Pipelines have entirely replaced this manual workflow.Pipelines democratize Application Lifecycle Management (ALM) by moving it out of complex Azure DevOps YAML scripts and placing it natively into the low-code maker portal.
Step-by-Step Configuration:
- Sign in to
make.powerapps.comwithin your designated development environment. - Navigate to Solutions and select the unmanaged solution you wish to move.
- Look to the command bar. Instead of selecting the legacy Export button, select the Pipelines icon (often represented by a deployment stage visual).
- A deployment pane appears on the right. Select your target stage (e.g., "Deploy to Peer Dev" or "Deploy to System Integration Testing").
- Select Deploy here. The pipeline engine will automatically initiate a dependency validation check in the background.
- You will be prompted to choose to deploy Now or schedule the deployment for Later. Make your selection and click Next.
Handling Unmanaged Code in Pipelines:
Can you deploy unmanaged solutions to Test or Production using Pipelines? Absolutely not.
Pipelines are strictly hardcoded to recommend deploying only managed solutions to non-development environments.Unmanaged solutions should never leave the development ring.
However, source control is still critical. Every time a pipeline runs successfully, the central pipeline host environment automatically exports and stores a pristine unmanaged copy of your solution.You can download this unmanaged zip directly from the pipeline host repository to commit to your GitHub or Azure DevOps source control branches.
Warning: If multiple developers need to collaborate on the exact same app, they must operate in isolated Dev environments. They should merge their individual unmanaged changes via source control integrations, utilizing the native Dataverse Git integration connected to Azure Repos.Do not attempt to have multiple developers working in a single shared unmanaged solution, as they will overwrite each other's active customizations.
Official Microsoft Documentation:
- Overview of pipelines in Power Platform
- (https://learn.microsoft.com/en-us/power-platform/alm/run-pipeline)
Scenario 6: Deploying Managed Solutions to Production
The session showed Paul Stork manually importing a managed solution zip file into a Production environment, carefully explaining the differences between Update, Upgrade, and Patch. Here is how you'd build that same thing today in March 2026.
The era of manual zip file uploads to Production environments is permanently over. Automated pipeline deployments are the uncompromising standard.
More importantly, as of February 23, 2026, Microsoft strictly enforces a new governance rule: all target environments in a deployment pipeline must be Managed Environments.If your Test or Production environment is not configured as a Managed Environment, the deployment pipeline will either fail or forcefully enable Managed Environment status automatically.
Step-by-Step Pipeline Deployment to Production:
- In your Development environment, open the solution and select the Pipelines menu.
- Select your pre-configured Production deployment stage.
- The pipeline interface will pause and prompt you to provide the Current Values for any environment variables you left blank (e.g., entering the official Production SQL Server connection string).
- It will simultaneously prompt you to map your development Connection References to the official service accounts that exist in the Production environment.
- Initiate the deployment. The pipeline orchestration engine handles the export, staging, and upgrading automatically in the background.
Upgrades vs. Patches in 2026:
Paul Stork detailed the concept of Patches, but modern 2026 ALM practice dictates aggressively avoiding them.
While Patches (modifying just the last two digits of a version number) seem efficient, they drastically increase architectural complexity when storing your solution in a source control system.A patched solution locks the base solution, preventing further direct edits until the patch is rolled up.
- Single-Stage Upgrade: When deploying via modern pipelines, the system defaults to a single-stage upgrade.This highly optimized process imports the new managed solution and simultaneously removes deprecated components in one motion, offering the absolute fastest import times and cleanest architecture.
- Apply Solution Upgrade: If you must use a legacy two-stage process manually, you will see your original base solution and a new solution suffixed with
_Upgrade.You must manually select the base solution and click Apply Solution Upgrade to consolidate the layers and permanently delete the old assets.
Quick Win: Always remember to systematically increment your solution version number (e.g., changing 1.0.0.1 to 1.0.0.2) in the solution settings before triggering a pipeline.The pipeline engine uses these version numbers to mathematically determine if a full Upgrade is necessary in the target environment.
Official Microsoft Documentation:
Scenario 7: Viewing and Managing Solution Layers and Dependencies
The session showed Paul Stork investigating why a specific UI change wasn't appearing by manually digging through solution layers. Here is how you'd build that same thing today in March 2026.
Microsoft Dataverse utilizes a strict "last one wins" layering methodology.At the bottom sits the System Layer, followed by stacked Managed Solutions based on their installation timestamp, all topped by a single Unmanaged active customization layer.
Diagnosing these layers manually is tedious and error-prone. Today, Microsoft has fully integrated the Solution Checker with heavy generative AI automation to proactively identify architectural conflicts before they reach Production.
Step-by-Step Layer Management:
- Navigate to Solutions in
make.powerapps.com. - Open your specific solution, and select a component that is misbehaving (such as a Dataverse Account table or a specific Canvas App).
- On the command bar, select Advanced > See solution layers.
- A dedicated diagnostic page appears. It visually stacks the System Layer at the bottom, your imported Managed Solutions in the middle, and any Unmanaged Customizations at the very top.
- If an unmanaged layer is maliciously or accidentally overriding your newly deployed managed solution, you can select that top unmanaged layer and click Remove active customizations. This action deletes the unmanaged override and immediately restores the intended managed runtime behavior.
Using Solution Checker in Managed Environments:
To prevent layer conflicts proactively, you must use the Solution Checker.
- Select your solution from the main list and click Solution checker > Run.
- The AI-assisted checker performs an exhaustive static analysis of your custom workflow activities, web resources, configurations, and Power Fx expressions.
- It generates a detailed report highlighting problematic code patterns, affected components, and provides exact documentation links to resolve each issue.
- Because your Production environment is strictly a Managed Environment (per the 2026 mandate), administrators can now flip a switch to enforce Solution Checker validations.If a deployment pipeline attempts to import a solution that fails the checker's criteria, the Managed Environment will completely reject the import.
Warning: Never, under any circumstances, edit components directly in a Production environment. Doing so creates a rogue unmanaged layer on top of your pristine managed solution. This unmanaged layer will permanently block any future updates you deploy via pipelines from taking effect, requiring tedious manual cleanup.
Official Microsoft Documentation:
- (https://learn.microsoft.com/en-us/power-apps/maker/data-platform/solution-layers)
- Use solution checker to validate your apps in Power Apps
Scenario 8: Behind-the-Scenes Solutions in Dataverse for Teams
The session showed Paul Stork poking around the hidden environments to look at the solutions that power Microsoft Teams apps. Here is how you'd build that same thing today in March 2026.
Dataverse for Teams continues to provide a built-in, low-code relational data platform directly within the Microsoft Teams client.It offers unique one-click solution deployment directly to the Teams app store, intentionally abstracting away much of the standard ALM complexity to empower citizen developers.
However, the governance around these hidden solutions has matured significantly.
Step-by-Step Management and Constraints:
- When a user clicks to create their first app or Copilot Agent inside a specific Team, the system automatically provisions a unique Dataverse for Teams environment entirely behind the scenes.
- There is a strict, unbreakable 1:1 mapping between the Microsoft 365 Group (the Team) and this Dataverse environment.If a Team owner deletes the M365 group, the associated environment and all solutions within it are instantly and permanently deleted.
- You absolutely cannot access or edit these specific solutions via the standard
make.powerapps.commaker portal.You must manage them exclusively via the embedded Power Apps studio within the Teams desktop or web client. - To view the environment diagnostics, run capacity reports, or check user access details, a Teams Owner or Tenant Admin must use the main Power Platform Admin Center.
Capacity Thresholds and Upgrading: Dataverse for Teams is strictly capped at 2 GB of combined database and file storage per environment.
When the environment reaches 80% capacity, makers receive persistent warning notifications.At 100% capacity, the system initiates enforcement actions. Existing solutions will continue to run and users can interact with the data, but makers are blocked from building new apps, agents, flows, or tables.
If a Teams solution becomes mission-critical, outgrows the 2 GB limit, or requires advanced enterprise ALM (like Power Platform Pipelines), an administrator must intervene.The administrator executes a formal upgrade to a full Dataverse production environment via the Admin Center.Once upgraded, the solution's lifecycle is permanently detached from the Microsoft Teams group, and makers must thereafter use the standard Power Apps portal to edit the resources.
Quick Win: Monitor your sprawling Teams environments proactively using the Power Platform Admin Center. Run scheduled PowerShell scripts to automatically apply strict Data Loss Prevention (DLP) OnlyEnvironments policies to these auto-generated environments.This prevents unchecked shadow IT data leakage before it happens.
Official Microsoft Documentation:
3. Licensing Quick Reference
To implement the modern ALM strategies, Managed Environments, and solution architectures described in this 2026 guide, ensure your organization has procured the correct licenses.
It is important to note that Managed Environments themselves do not require a standalone billing license to activate. However, they are an entitlement feature; any user accessing an application hosted within a Managed Environment must be properly licensed with a premium Power Apps or Power Automate plan.
| Product | 2026 License Plan | Pricing (USD) | Best For / Entitlements |
|---|---|---|---|
| Power Apps | Premium (Per User) | $20 / user / month | Unlimited custom apps, unlimited portals. The standard requirement for utilizing Managed Environments at scale. |
| Power Apps | Per App Plan | $5 / user / app / month | Occasional users needing access to one specific business scenario or single application. |
| Power Automate | Premium (Per User) | $15 / user / month | Unlimited premium cloud flows for individual users driving complex automation needs. |
| Power Automate | Per Flow Plan | $100 / flow / month (min 5) | Enterprise automation. Cross-team flows operating on backend service accounts used by many people. |
| Copilot Studio | Tenant Capacity Pack | $200 / pack / month | Includes 25,000 Copilot Credits. Required at the tenant level to build, publish, and manage custom Agents. |
| Agent 365 | Microsoft 365 E7 Suite | Varies | Advanced enterprise governance, registry, and observability for custom agents (Generally Available May 2026). |
Briefing published by Collab365 Spaces. Cite as "2026 Update : Simplify Your Power Platform App Life-Cycle with Solutions", Collab365 Spaces. 47 sources referenced.