You saw Lynzie in the original January 2023 session build a unified project management hub by manually stitching together various Microsoft 365 applications. Back then, navigating between Microsoft Planner, Project for the web, SharePoint lists, and Teams channels required a significant amount of manual configuration and architectural understanding. The leader had to meticulously create buckets, string together Power Automate flows block-by-block, and manually format risk logs.
Today, in April 2026, the landscape of Microsoft 365 project management has undergone a fundamental architectural shift. The fragmentation that previously existed between basic task management, enterprise project portfolio management, and list tracking has been consolidated. Furthermore, generative AI via Microsoft 365 Copilot and specialized AI agents now handles the foundational configuration steps that previously required tedious manual setup.
This companion guide assumes you have watched the original session. It will walk you through exactly how you would build that same project management architecture today, utilizing the current tools, AI automations, and official Microsoft documentation available in April 2026.
What's Changed Since This Session
The most significant evolution since the original workshop is the complete merger of Microsoft Project for the web into the new Microsoft Planner. This merger created a single, unified continuum from individual task management to advanced enterprise portfolio tracking. The days of deciding whether to use Planner or Project for a specific initiative are over.
You no longer have to navigate to separate URLs or download different desktop clients for web-based project management. The new Microsoft Planner brings together the simplicity of To Do, the collaborative features of the classic Planner, the power of Microsoft Project, and the intelligence of Microsoft 365 Copilot into a single solution.
| Technology (2023 Session) | Status in April 2026 | What Replaced It |
|---|---|---|
| Microsoft Planner (Classic) | Upgraded and Unified | Merged into the new Microsoft Planner, combining To Do, Planner, and Project for the web. |
| Tasks by Planner and To Do | Renamed and Expanded | The Teams app is now simply named Planner, offering a unified view across all work management levels. |
| Project for the web | Retired / Transitioned | Fully transitioned into Planner Premium; existing .mpp workflows navigate through Planner Power Apps. |
| Manual List Creation | Augmented by AI | SharePoint List Agent (via Copilot) generates full lists from natural language prompts. |
| Power Automate (Standard) | Split Architecture | Basic Planner uses standard connectors; Planner Premium now requires complex Dataverse routing. |
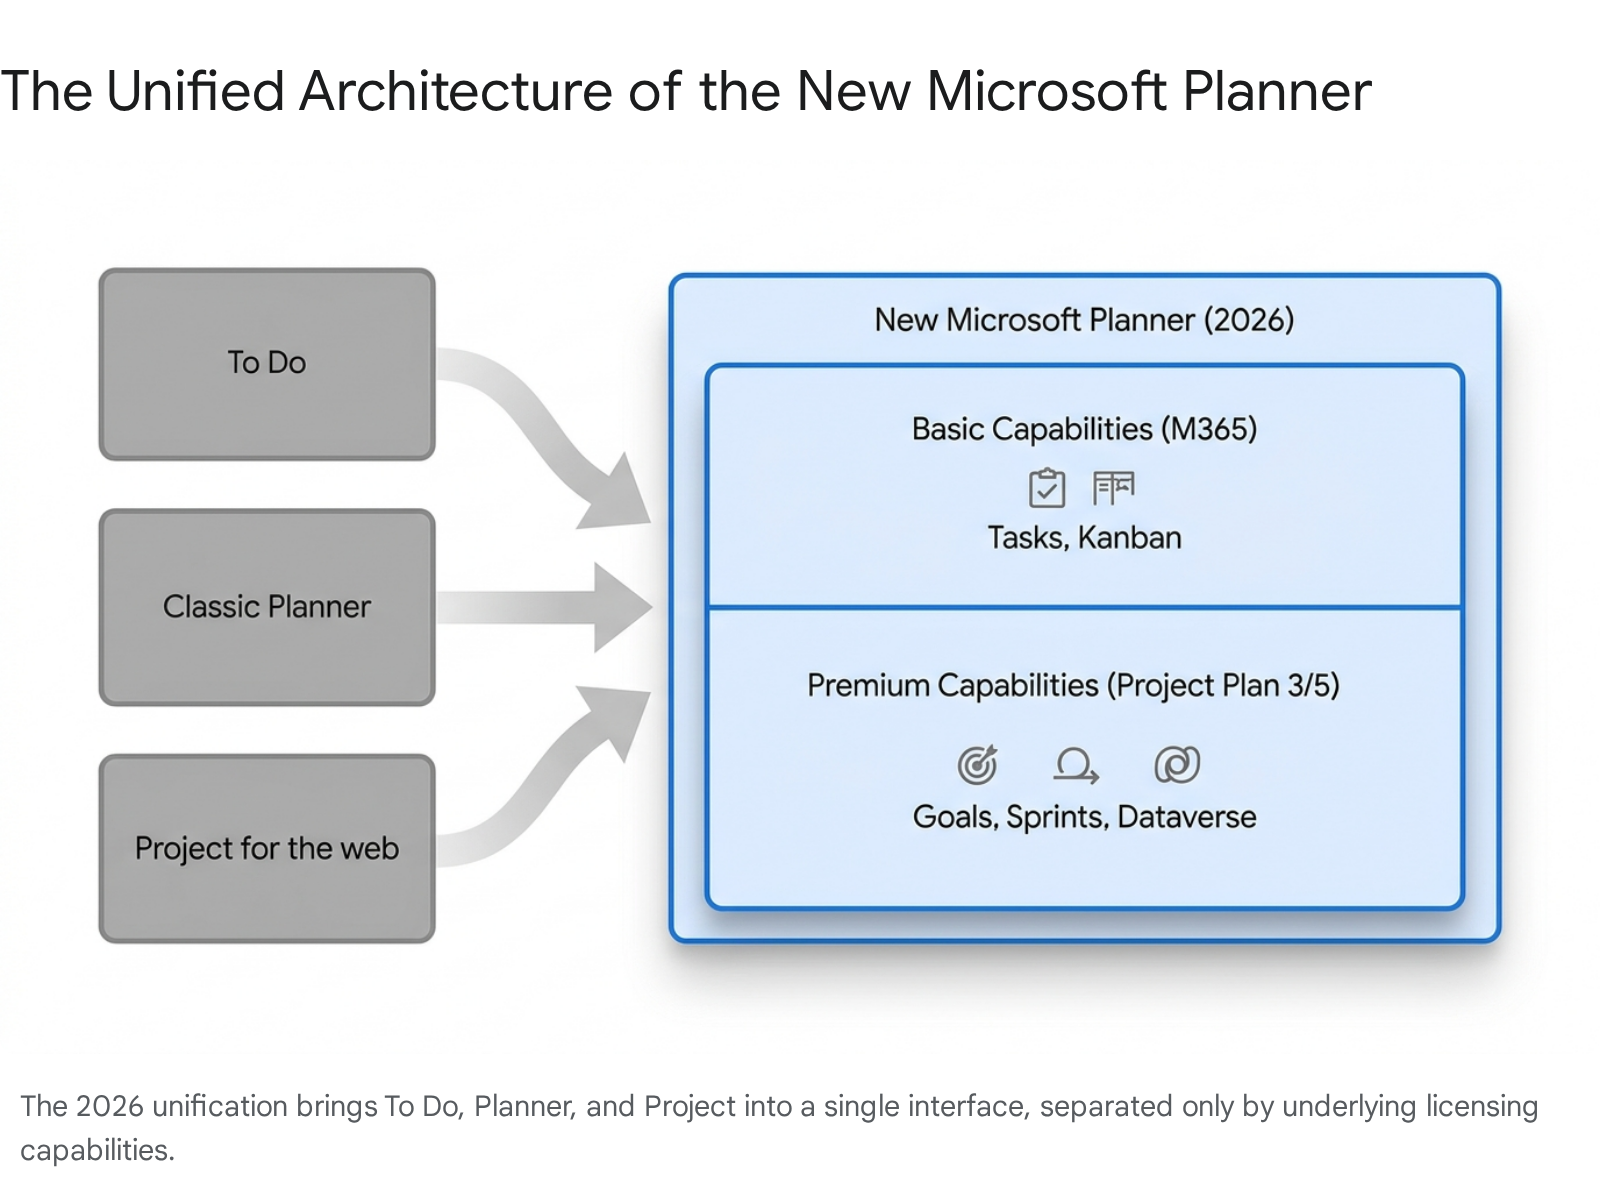
This transition is the next logical step in delivering the experience Microsoft has been building toward for years. No manual migration or immediate change in licensing was required for users moving from the classic basic Planner to the new basic Planner. All plans previously created in Project for the web are now fully accessible in both Planner for the web and Planner in Teams.
You will notice that the user interface has received a significant modernization. The updated design offers enhanced navigation, responsive layouts, and a new goals view for setting objectives. More importantly, the system now natively integrates next-generation AI-powered tools to handle the heavy lifting.
How to Build This Today
The original session focused heavily on manual configuration and manual integration between disparate Microsoft 365 services. Rebuilding this identical architecture in April 2026 relies far less on clicking through settings menus and far more on AI-assisted generation. The following sections detail the modernized implementation pathways for each of the four core scenarios demonstrated by the leader.
Demo 1: Adding a Planner Dashboard to the SharePoint Homepage
The Original Build: The session showed you navigating to a SharePoint team site homepage, entering edit mode, and adding a basic Planner web part to display a Kanban board. The goal was to create a centralized, visual dashboard for task progress directly where the team collaborates on project documents. You saw the leader manually configure the web part to pull in a previously created plan.
How to Build This Today: The fundamental mechanism for embedding a Planner dashboard remains the SharePoint web part architecture. However, the underlying data source and visual rendering capabilities have been significantly upgraded due to the Planner unification. The web part now draws from the unified Planner ecosystem, meaning it seamlessly interfaces with the modernized backend.
To embed this centralized visualization today, you must first ensure you are working within the correct type of SharePoint environment. The Planner web part remains strictly compatible only with Microsoft 365 group-connected Team sites. You cannot deploy this web part on a standalone Communication site or an older SharePoint Server deployment without a connected group.
Follow these steps based on the current official Microsoft documentation for adding the Planner web part 11:
- Navigate to the Target SharePoint Site: Access the specific group-connected Team site where your project hub resides. You can navigate here via the SharePoint app bar or directly through your browser.
- Activate Page Edit Mode: Locate and select the Edit button situated at the top right of the modern SharePoint page interface. If you do not see this button, you likely lack the necessary "Edit Items" permission level on the site.
- Deploy the Web Part: Locate the Toolbox icon on the right side of the page (or hover your mouse below the title area to reveal the circled '+' line if the content pane is hidden). Select See all web parts, locate the Planner module in the list, and drag it onto your desired page section.
- Configure the Data Source: The configuration pane will immediately prompt you for a plan selection. To connect to an existing project architecture like the leader did, choose Use an existing plan. You will then select the appropriate plan tied to the site's underlying Microsoft 365 Group from the dropdown menu. Remember, only plans tied to your site's specific Microsoft 365 Group will appear here.
- Select the Visualization Mode: Under the Display section in the configuration pane, you must choose how to render the data. Select Boards to render the classic Kanban column view, which is ideal for daily agile tracking and shuffling tasks. Alternatively, select Charts if you want to provide leadership with a visual summary of task status and resource allocation progress.
- Publish the Changes: Once configured, select Publish at the top right to make the updated dashboard visible to your team. If you are not ready to publish, select Save as draft to retain your changes privately.
AI and Copilot Simplifications: While the physical insertion of the web part onto the SharePoint page remains a manual layout choice, the data populating that dashboard is now drastically enhanced. If your organization utilizes Microsoft 365 Copilot, the charts rendered on the SharePoint page dynamically reflect task velocity and completion rates that can be further analyzed by AI.
Furthermore, the new Planner's interface allows for "My Tasks" and "My Day" rollups. This means that while the SharePoint dashboard shows the macro team view, individual users can manage their specific assignments from this board directly within their personal unified Planner views without ever visiting the SharePoint site.
Quick Win: Do not use the web part to create a new plan from scratch. The absolute fastest start method is to generate the plan entirely within the Teams Planner app first using Copilot (as detailed in Demo 2), and then simply surface that pre-existing, fully populated plan onto the SharePoint page using the "Use an existing plan" dropdown. This ensures immediate data consistency across both the Teams and SharePoint interfaces.
Demo 2: Setting up a Planner Plan with Kanban-Style Buckets
The Original Build:
The session showed you manually creating a new plan from a blank canvas. You saw the leader meticulously adding custom buckets named "To Do", "Doing", and "Done". Following that, the leader manually typed out tasks, assigned users, and picked deadlines on a calendar to populate this Kanban structure.
How to Build This Today: The manual creation of buckets and tasks block-by-block is now considered a legacy approach in modern work architecture. The modernized Microsoft Planner environment relies heavily on the Project Manager Agent and Copilot in Planner to generate structure instantly from natural language.
Copilot in Planner taps into generative AI capabilities to help generate new plans, set organizational goals, and react to changes as projects progress. This makes work management significantly faster and easier than the 2023 methodology. You simply describe what you need, and the AI constructs the architecture.
Follow these steps to construct the Kanban architecture using the modern official Microsoft documentation for Copilot in Planner 14:
- Access the Unified Planner: Launch Microsoft Teams and select the app pinned to your left navigation rail. Note that the old "Tasks by Planner and To Do" name has been retired; the app is now simply named Planner. You can also access this via the web at planner.cloud.microsoft.
- Initiate Plan Creation: Select the New Plan option. The system will present options for creating a Basic plan or a Premium plan. For a standard To Do/Doing/Done Kanban structure like the original session, a Basic plan is entirely sufficient and utilizes your standard Microsoft 365 licensing.
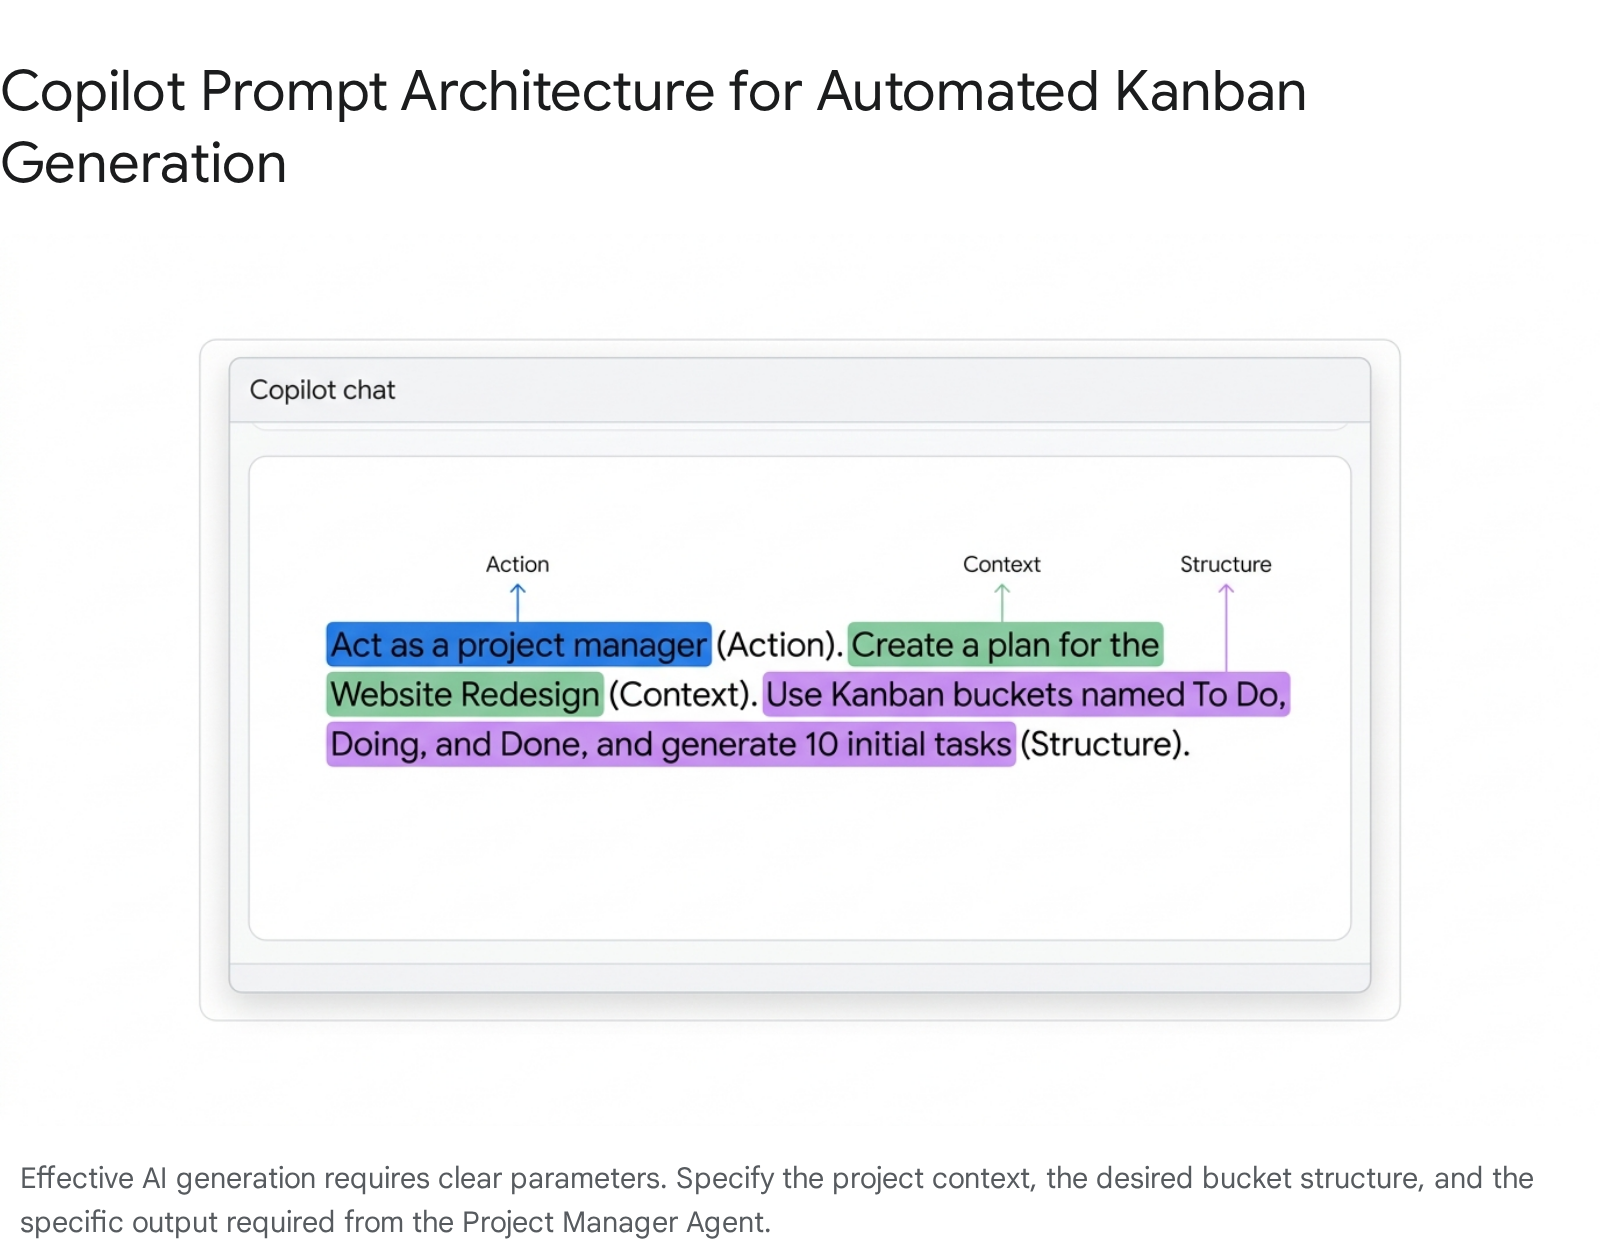
- Engage the AI Agent: Instead of manually typing bucket names, engage the Copilot chat interface or the Planner Agent. The agent works by leveraging the shared infrastructure that other Microsoft Office Copilots use across the ecosystem.
- Deploy the Generation Prompt: Use a natural language prompt to instruct the AI to generate your entire architecture. You can ask Copilot to plan for your next project, and it will start generating the work breakdown automatically. Type a prompt similar to: "Create a basic project plan for the upcoming software rollout. Set up a Kanban board with buckets titled 'To Do', 'Doing', and 'Done'. Generate ten standard tasks and distribute them.".14
- Review the Refreshed Design: Navigate to the Board view tab to review the AI's output. You will notice that the interface has undergone a design refresh as of early 2026.10 It offers cleaner, responsive layouts and significantly reduced visual clutter compared to the 2023 version. Ensure the AI correctly established your requested columns.
- Utilize Task Chat: Assign users to the generated tasks. In a major 2026 update, Microsoft introduced Task Chat with @ mentions directly into basic plans. Instead of relying on static comments, team members can now have threaded, real-time conversations within the specific task card itself. @ mentioning a team member here will trigger an instant notification in their Teams Activity feed and via email, taking them directly to the task card for context.
AI and Copilot Simplifications: Beyond the initial creation phase, the Project Manager Agent remains your ongoing assistant. When it is time to triage an issue or expand the project scope, Copilot can help track new goals or identify which tasks are falling behind schedule. You can ask basic analytical questions directly to the agent, such as "What tasks are due this week?" or "Identify which team members have the highest workload.".14 The agent synthesizes this data instantly, completely eliminating the need to manually parse the Kanban board columns to find blockers.
Quick Win: Do not start your project from a blank canvas. The absolute fastest start method is to leverage unstructured data you already have. If your project tasks are already loosely documented in an email thread, a Teams chat, or a Word document, copy that text. Instruct Copilot to parse that specific text and convert it into a fully populated Planner board.
Demo 3: Adding Basic Automations with Power Automate
The Original Build:
The session showed you adding basic automations with Power Automate. You watched the leader manually create a flow from scratch, selecting a specific trigger based on a Planner event (like a task being created) and then manually mapping dynamic content to an action that posted a message in a Teams channel.
How to Build This Today: The Power Automate ecosystem has expanded dramatically. Automating workflows between apps and services remains a core capability, connecting over 1,000 services through pre-built connectors. However, the flow creation process is now predominantly guided by AI Copilot, removing the need for manual block-by-block logic assembly.
Crucially, in 2026, you must understand the architectural distinction between Basic and Premium Planner plans before building flows. Basic plans utilize the standard Planner API connector. Premium plans are built on Dataverse and store their data in tables like msdyn_projecttask. Standard connectors will not work on Premium plans. Assuming your scenario uses a Basic plan (as generated in Demo 2), you will use the standard Planner connector.
Follow these steps based on the current official Microsoft documentation for Power Automate triggers and actions 19:
- Access Power Automate via AI: Navigate to the Power Automate cloud service. Instead of clicking "Create" and manually selecting the 'Automated cloud flow' type, direct your attention to the Copilot text input box at the center of the modern dashboard.
- Describe the Workflow to Copilot: Use natural language to describe the exact automation you want to achieve. Copilot automatically chooses the appropriate cloud flow type and trigger based on your description.
- Example Prompt: "Create a flow that triggers when a new task is created in Microsoft Planner. When triggered, send a notification message to the 'Project Updates' channel in Microsoft Teams containing the task title.".19
- Review the AI-Generated Logic: Copilot will generate a preview of the flow. It will have accurately selected the When a new task is created trigger from the Planner connector and the Post message in a chat or channel action from the Teams connector. Accept the generation to enter the flow designer.
- Configure the Standard Connector (The Group ID Nuance): Click on the Planner trigger card to finalize the connection details. You will be prompted to provide a Group Id and a Plan Id. The official 2026 documentation notes a very specific quirk here: the Group Id field is primarily required just to populate the dependent Plan Id dropdown menu. Once the correct plan is selected in the dependent dropdown, you can safely ignore any warnings the connector might throw regarding the Group Id field; the action will still execute normally.
- Map Dynamic Content: Click on the Teams action card. In the message body field, use the dynamic content menu (or type / to invoke the modern insert menu) to place the Planner 'Title' variable into the Teams message.
- Save and Test: Save the cloud flow. It is highly recommended to run a manual test by creating a dummy task in your Planner board to ensure the Teams connector has the appropriate permissions to post in the designated channel.
Architectural Warning regarding Premium Plans: If your organization utilizes Planner Premium (which replaced Project for the web), attempting to use the standard Planner connector demonstrated above will fail. You will receive Dataverse errors, specifically code 0x80040265, stating you cannot directly do an 'Update' operation to msdyn_projecttask. Automating Premium task updates requires routing through the Dataverse connector or the complex Project Scheduling Service APIs in the cloud. This requires advanced developer knowledge and is far beyond the scope of a basic citizen-developer automation flow.
Quick Win: Do not build flows from scratch in the classic designer. The absolute fastest start method is using the Copilot natural language prompt on the Power Automate homepage. Copilot accurately maps the underlying JSON parameters for the Planner to Teams connection in seconds, a process that manually takes several minutes of navigating dynamic content menus and connection authorizations.
Demo 4: Integrating into the Existing Environment
The Original Build:
The final scenario involved pulling all these disparate elements together into a cohesive working environment. You saw the leader manually create a project schedule custom list, configure a SharePoint document library, build a Microsoft Lists risk log column by column, and set up Teams channels to manage both internal team members and external guest access.
How to Build This Today: Integration in 2026 is highly centralized and heavily automated. The Teams platform serves as your primary aggregation hub, while SharePoint provides the secure, invisible backend storage. Two major technological shifts define this integration step today: the introduction of the SharePoint List Agent and strict, updated behaviors regarding Teams Guest Access.
To integrate these systems into a unified command center:
- Generate the Risk Log via SharePoint List Agent: Rather than manually creating custom columns for a Risk Log in Microsoft Lists, utilize the newly released SharePoint List Agent. This agent, which reached General Availability in late February 2026, lets you create complex lists from plain language.
- Open Copilot within Teams or SharePoint and deploy a prompt: "Create a project risk management list. Include columns for Risk Title, Probability (High/Medium/Low), Impact level, Mitigation Strategy, and Risk Owner.".7
- The Agent will instantly generate a fully functional, formatted SharePoint list based on your natural language request, saving you from navigating the list settings menus.
- Pin Resources to Teams Channels: Within your target Microsoft Teams channel, utilize the top tab navigation bar to centralize the tools.
- Select Add a tab (+).
- Search for and select the Planner app. Follow the prompts to pin the Kanban board you generated in Demo 2.26
- Select Add a tab (+) again, choose SharePoint or Lists, and link the new Risk Log list generated by the AI Agent in the previous step.
- Manage Document Integration Automatically: You do not need to manually link a document library to your Planner tasks. The underlying Microsoft 365 Group automatically provisions a connected SharePoint document library. When users attach files to Planner tasks directly within the Teams interface, those files are natively saved in the 'Documents' library of the associated SharePoint site. This ensures centralized version control and compliance without manual mapping.
- Configure Guest Access and Navigation: Managing external contractors requires understanding current Teams default behaviors. As of the February 2021 update (which remains standard policy through 2026), Guest access in Microsoft Teams is turned ON by default globally across the service.
- When you invite a guest to your Team via their email address, an account is created for them in your Microsoft Entra ID directory. They must accept the welcome email invitation to authenticate.
- Once authenticated and added to the Team, guests will have access to the pinned Planner tab.
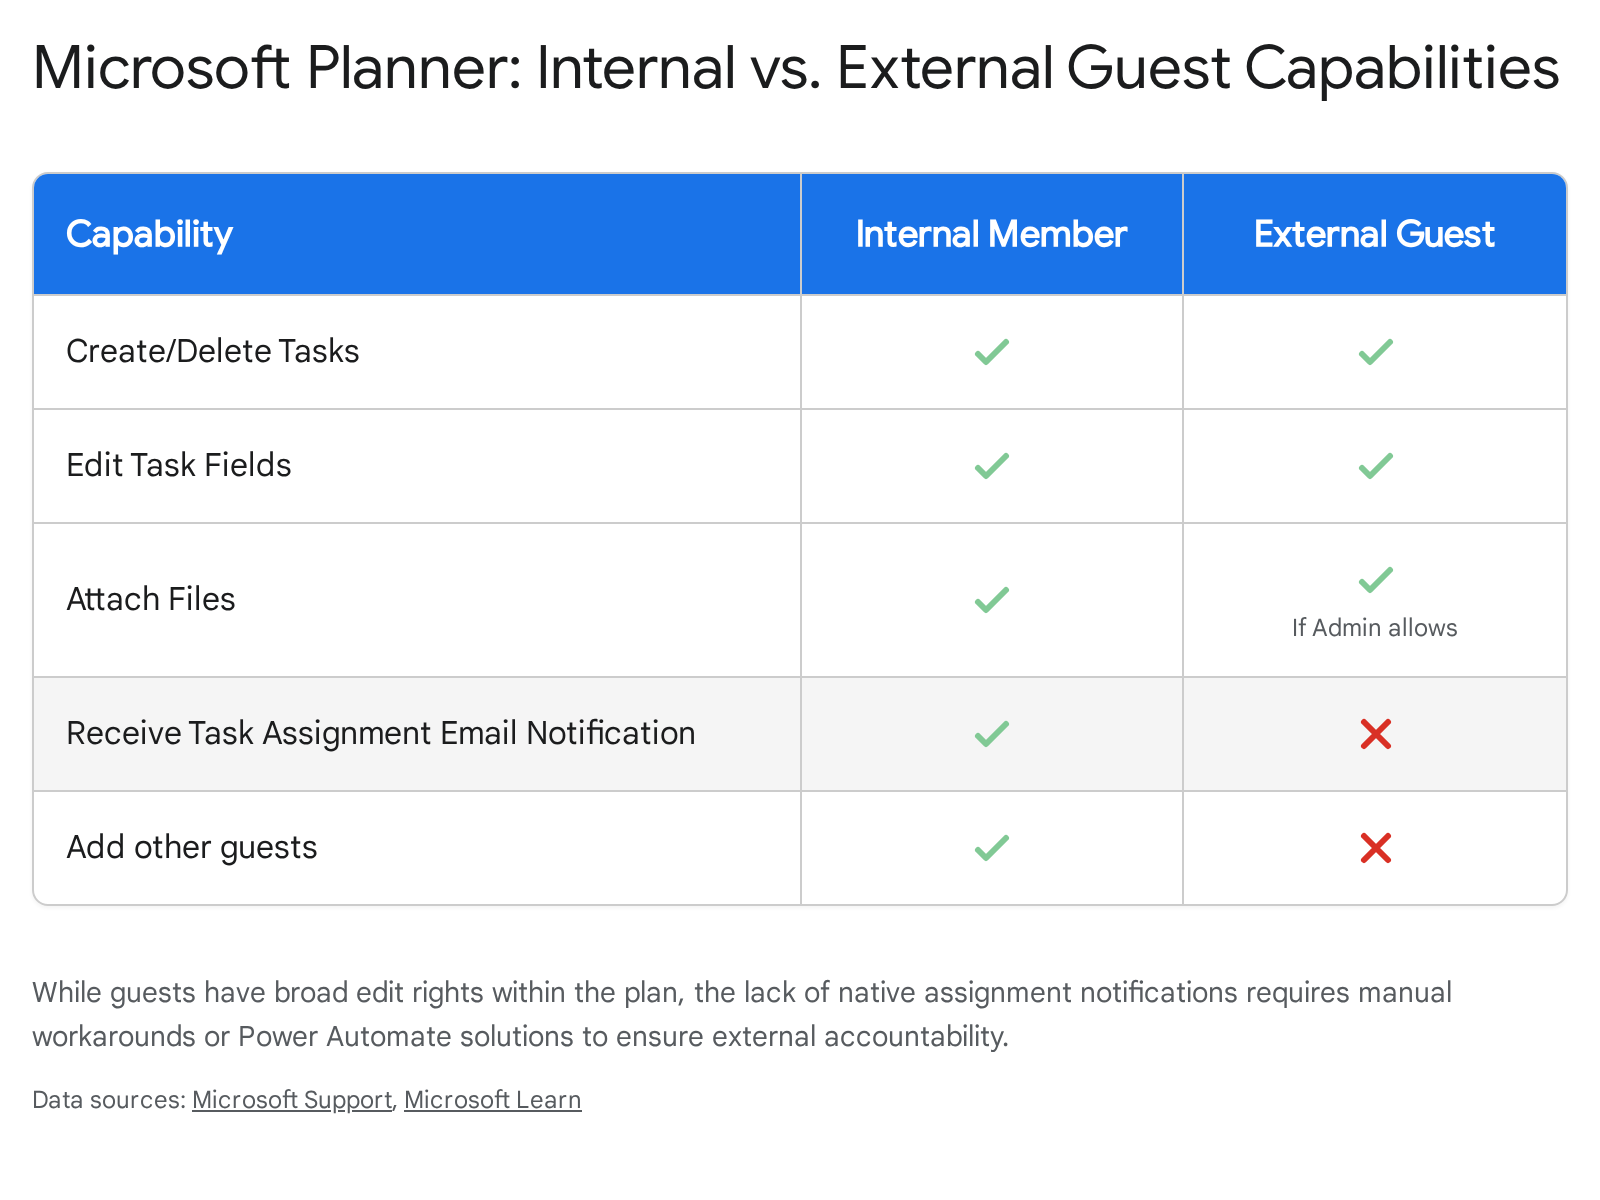
- Within Microsoft Planner, guest users possess broad permissions. They can view the plan, create tasks, delete buckets, edit task fields, and edit the plan name itself.
AI and Copilot Simplifications: The integration of Copilot Notebooks and multi-account activity feeds in Teams further streamlines this shared environment. As of early 2026, users can view and manage activity across multiple organizations simultaneously without constantly switching tenants. This drastically improves the user experience for external guests who are navigating your shared Planner boards while remaining logged into their home organization's tenant.
Consultant Warning (Guest Notification Workaround): There is a massive operational blind spot when integrating guests. While external guests can edit tasks, the native system does not support sending automated Planner email notifications to guest users when a task is assigned to them. This causes missed deadlines. To solve this, you must build a Power Automate flow (similar to Demo 3) that triggers upon task assignment. Have the flow check if the assignee's email domain is external, and if so, utilize the standard Outlook 365 connector to dispatch a custom email alert containing a direct link to the Teams Planner tab.
Licensing Quick Reference
The licensing structure for project management capabilities within Microsoft 365 dictates the architectural boundaries of your entire system. In 2026, the lines between basic task tracking and advanced enterprise portfolio management are strictly governed by the transition from standard M365 suites to dedicated Project/Planner Plan tiers.
You must also account for the global price and packaging updates announced by Microsoft, which took effect in July 2026, impacting the underlying M365 E-suite and Business Premium foundations. For example, Microsoft 365 Business Standard increased to $14.00 per user/month, and Office 365 E3 increased to $26.00 per user/month.
The following table breaks down the specific licensing requirements needed to operate the architectures discussed in this guide:
| Product Tier | Licensing Required | Key Capabilities (April 2026) |
|---|---|---|
| Planner Basic | Included in Microsoft 365 E3 / E5 / Business Standard | Kanban boards, basic buckets, My Tasks view, task chat, standard Power Automate integration. |
| Planner Plan 1 | $10 per user/month | Basic task management capabilities equivalent to the M365 included version, available as a standalone add-on. |
| Planner Premium (Plan 3) | $30 per user/month | Project desktop client access, advanced dependencies, baselines, Sprints, Dataverse backend routing, advanced Copilot features. |
| Planner Premium (Plan 5) | $55 per user/month | Full enterprise portfolio management capabilities and advanced enterprise resource allocation. |
| Power Automate | Seeded with M365 (Standard) / Per-User Premium | The seeded standard license covers basic Planner flows. Premium licensing is absolutely required to interact with Dataverse tables for Planner Premium. |
| Copilot / AI Agents | Microsoft 365 Copilot License | Required to utilize the Project Manager Agent in Planner and the SharePoint List Agent for natural language creation. |
Consultant Warning: Ensure your organization is fully aware that utilizing the advanced Planner Copilot features requires a layered licensing approach. You need both the foundational Microsoft 365 Copilot license to access the AI interfaces, and, for certain advanced portfolio queries, the underlying Planner Premium (Plan 3/5) licensing to access the deep Dataverse structure where the complex project data lives. Without the premium plan, Copilot can only assist with basic Kanban operations. Furthermore, note that as of April , 2026, the creation of new Project Web App (PWA) sites is officially blocked by Microsoft, finalizing the transition to the new architecture.
Briefing published by Collab365 Spaces. Cite as "2026 Update: Modern Work Architecture for Teams and SharePoint Project Management", Collab365 Spaces. 5 sources referenced.