What's Changed Since This Session
The technological landscape for data transformation within the Microsoft ecosystem has evolved fundamentally since the original session was recorded. As of April 2026, the foundational architectures, authoring methodologies, and enterprise governance requirements have shifted entirely.
The following brief summary table presents the factual core technology changes that analysts and engineers must understand before architecting modern data solutions.
| Technology Category | Status in 2026 | What Replaced It |
|---|---|---|
| Dataflow Framework | Dataflow Gen1 officially marked Legacy (as of April , 2026). | Dataflow Gen2 is the singular standard and future of dataflows. |
| Dataflow Creation | Dataflow Gen2 Classic (No Git/CI/CD) is deprecated for new items. | Dataflow Gen2 with CI/CD and Git Integration is the default standard. |
| Storage Architecture | Internal Azure Data Lake Storage container lock-in is obsolete. | Fabric Output Destinations (Lakehouse, Warehouse, SQL DB, Snowflake). |
| Code Authoring | Pure manual M-Code authoring remains supported but is no longer the primary method. | Copilot AI Agents (Get Data, Explain, Custom Columns) are heavily utilized. |
| Entity Linking | "Linked Entities" concept from Gen1 is conceptually shifted in Gen2 environments. | Relative References (!(Current Workspace)) and OneLake integration. |
| Parameterization | Hardcoded parameter mapping in deployment pipelines is phased out. | Fabric Variable Libraries resolve dynamically at runtime based on environment. |
| Execution Engine | Legacy Query Evaluation engine is replaced for enterprise workloads. | Modern Evaluator (GA since Feb 2026, running on.NET 8) powers executions. |
| API Automation | Limited programmatic control over dataflow lifecycles. | Public REST APIs for deployment, definition updates, and publish jobs. |
| Diagnostics | Basic refresh history logging without deep granular visibility. | Step-Level Timing Metrics and Service-level DAX dependency warnings. |
| Environment Management | Linear workspace structures without robust versioning. | Branched Workspaces with visual Git integration and Remote MCP Server agents. |
How to Build This Today
This core section breaks down the original session's demonstrations. The original presentation showcased techniques that were cutting-edge at the time, but the underlying principles of Power Query have now been wrapped in completely transformed execution, architecture, and governance models.
Demo 1 Update: Northwind Dataflow Creation
The session showed you live hands-on creation of a dataflow in the Power BI service using Northwind sample data: connect to data source, use the web-based Power Query Editor (in a workspace) for transformations, capture output as a reusable JSON-based dataflow (Gen1 style), demonstrating diagram view, schema view, timing metrics, and query folding visualization. Here's how you'd build that same thing today (April 2026):
The practitioner must first understand that Gen1 dataflows are obsolete for new development. As of April 2026, all new Dataflow Gen2 items are created with Continuous Integration/Continuous Deployment (CI/CD) and Git integration support by default.
Step 1: Workspace Prerequisites and Initialization The data engineer must operate within a Microsoft Fabric-enabled workspace. If a workspace does not exist, the tenant administrator must enable specific switches in the Fabric Admin portal, primarily the "Users can create Fabric items" configuration.
- The developer must navigate to the Microsoft Fabric portal via https://learn.microsoft.com/en-us/fabric/data-factory/create-first-dataflow-gen2.
- The user must select Workspaces from the left-hand navigation pane and choose the designated development workspace.
- To initialize the artifact, the developer selects the + New item button at the top of the workspace interface.
- The user then selects Dataflow Gen2 from the artifact menu.
- A prompt will appear requesting a name for the dataflow; the user enters the name and selects Create.
Quick Win: Because Git integration is enabled by default for all new Dataflow Gen2 items, the engineer does not need to manually configure source control for this specific artifact immediately. The system tracks changes in the background, displaying an "uncommitted" status until a formal repository push is required.
Step 2: Connecting to the Northwind OData Source via AI Agents While the engineer can manually navigate the standard "Get Data" menus exactly as shown in the original session, the 2026 standard utilizes the Copilot for Modern Get Data experience, which is now Generally Available.
- Within the dataflow editor ribbon, the developer locates the Copilot button to open the chat pane.
- The engineer prompts the AI agent with a natural language command: "Connect to the OData feed at https://services.odata.org/v4/northwind/northwind.svc/ and load the Orders and Customers tables.".19
- The Copilot agent processes the request and guides the user through a prefilled connection creation page. The developer simply verifies the URL and selects Next to complete authentication.
- If the organization policies restrict Copilot usage, the manual fallback requires the user to select Get data > More > View more > Other > OData, enter the exact Northwind URL, and select the tables manually via the navigator. Instructions for this manual path are documented at https://learn.microsoft.com/en-us/fabric/data-factory/create-first-dataflow-gen2.
Step 3: Applying AI-Powered Data Transformations The original session demonstrated manual column selection, merging, and data type modifications. The modern approach heavily leverages AI agents to accelerate these Power Query M transformations.
- The developer must first ensure that Data Profiling tools are active by navigating to Home > Options > Global Options, and selecting all profiling options.
- Instead of writing custom join logic, the engineer prompts Copilot: "Join the Orders and Customers tables on CustomerID.".20 The agent automatically generates the Power Query step and executes the table merge.
- To build computed columns, the developer utilizes the Natural Language to Custom Column feature. The prompt might be: "Create a custom column named 'OrderCategory' that categorizes Freight over $50 as 'High' and under $50 as 'Low'.".8 Copilot writes the M formula, assigns the string data type, and applies the step. Details on this feature are found at(https://blog.fabric.microsoft.com/en-US/blog/new-copilot-experience-in-dataflow-gen2-natural-language-to-custom-column/).
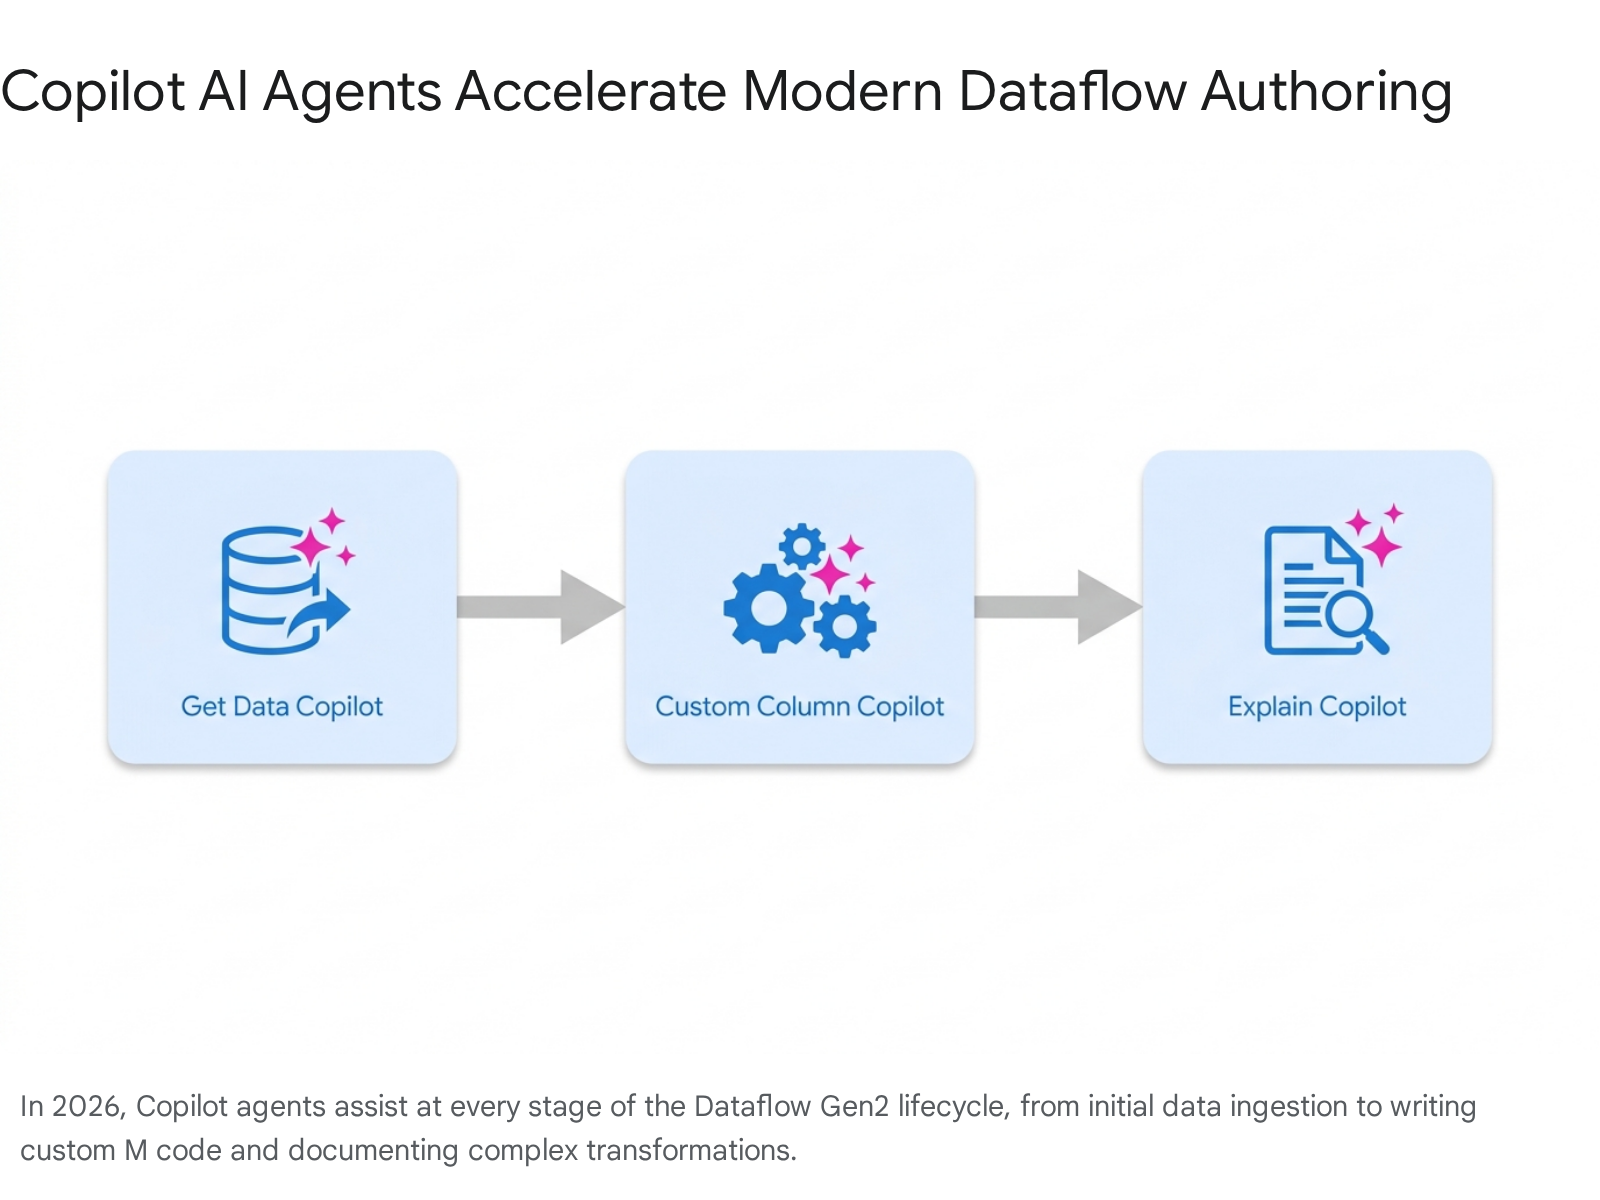
Step 4: Automated Documentation via Explain Dataflow Copilot In legacy environments, developers manually renamed steps to document the flow. The 2026 standard mandates the use of the Explain Dataflow Copilot (Generally Available) for enterprise governance.
- The engineer right-clicks any complex query or applied step in the Queries pane.
- The user selects the Explain or Describe option from the context menu.
- The AI-powered assistant analyzes the Mashup (Power Query M) code and translates the logic into plain English documentation.
- The developer must apply the Copilot summary directly into the query and step description fields, ensuring that the Power Query logic remains comprehensible for cross-functional teams. Documentation for this capability is available at https://learn.microsoft.com/en-us/fabric/data-factory/dataflow-gen2-copilot-explain.
Step 5: Utilizing Diagram View and Enterprise Schema View The visual interfaces demonstrated in the original session have matured to support structured, governed database design.
- To access the visual lineage of transformations, the engineer navigates to the top ribbon, selects View, and ensures the Diagram view toggle is activated.
- The developer must also utilize the Schema View interface. This view provides a streamlined, dense list of columns, data types, and metadata, removing the distraction of raw data previews. Schema support is critical for standardizing data architecture across teams and supporting semantic modeling for downstream Power BI assets.
Step 6: Query Folding Visualization and Engine Updates Query folding remains critical as it pushes data transformations back to the source system, drastically improving performance. However, the 2026 engine evaluating these folds is entirely new.
- Dataflow Gen2 utilizes the Modern Query Evaluation Engine (Modern Evaluator), built natively on.NET , which provides faster execution, more efficient processing, and vastly improved folding capabilities across complex dataflows.
- The developer verifies folding status by monitoring the Query Folding indicators in the Applied Steps pane. A green indicator confirms the step is successfully folding to the source system.
- The engineer must exercise caution with specific high-end sources. For instance, when connecting to Databricks catalogs using the Databricks.Query() syntax, the Power Query editor may display a green folding indicator, but validation may still fail during actual incremental refreshes. The developer must always test folding in the actual service run, as Native query folding limitations still exist for certain connectors.
Step 7: Publishing, Execution Limitations, and System Throttling
Execution parameters have been strictly defined in the modern environment to protect overall service stability.
- Once authoring is complete, the developer selects Save and run. This action replaces the legacy "Publish" workflow and leverages the modern Just-In-Time (JIT) publishing mechanism.
- The engineer must be aware of strict refresh limitations. Each dataflow is allowed up to 300 refreshes per 24-hour rolling window. Attempting rapid bursts of refreshes (e.g., triggering all 300 within 60 seconds) will trigger system-level throttling and result in rejected requests.
- For environments still operating non-CI/CD Dataflows Gen2, the limit is strictly 150 refreshes per 24-hour window.
- Total refresh time for a single execution is limited to a maximum of 24 hours, and a single evaluation of a query is capped at 8 hours.
- The system enforces strict failure rules: if a scheduled dataflow experiences a 100% failure rate over 72 hours (with a minimum of 6 refreshes), or over 168 hours (with a minimum of 5 refreshes), the schedule is automatically paused, and the owner is notified via email. Details on these limits are found at https://learn.microsoft.com/en-us/fabric/data-factory/dataflow-gen2-refresh.
Step 8: Deep Dive into Timing Metrics and Refresh History UI The refresh history interface has been completely overhauled to provide granular diagnostic visibility.
- To access step-level timing metrics, the engineer navigates to the workspace and locates the specific dataflow.
- The user opens the drop-down menu for the item and selects the Recent runs button.
- The developer selects the Start time field for a specific historical run to open the dedicated refresh details screen.
- This details screen is heavily segmented. The Tables Section lists all entities loaded into the staging area, while the Activities Section reflects specific actions like loading data to an external output destination.
- By selecting the name of any specific table or activity, the engineer opens a highly detailed statistics pane. This pane reveals the exact Start time, End time, Duration, Bytes read/written, Rows read/written, and Endpoints contacted. This level of operational transparency is critical for root-cause analysis in enterprise environments.
Demo 2 Update: Gen1 vs Gen2 Comparison (Storage, Git, Pipelines)
The session showed you a comparison of Gen1 dataflows (standard) vs. Gen2 (Fabric-enabled) with enhanced storage, Git integration, and deployment pipelines. Here's how you'd build that same thing today (April 2026):
The architectural paradigm has completely shifted. Dataflow Gen1 was officially marked as "Legacy" on April , 2026, and is actively being phased out. No new features are planned for Gen1, and future support is limited strictly to a narrow set of high-impact architectural fixes. Development teams must architect entirely in Gen2.6
The primary architectural differentiator is destination flexibility. Legacy Gen1 forced data into an internal, isolated Azure Data Lake Storage container formatted as CSV. Dataflow Gen2 separates transformation compute from storage, allowing the engineer to route data directly into modern analytical endpoints, fundamentally changing how data pipelines are built.
Step 1: Setting Up Enhanced Output Destinations Every tabular query within a Dataflow Gen2 artifact can be assigned its own specific data destination. Functions and lists are explicitly not supported for destination routing.
- In the Power Query editor, the developer selects a transformed tabular query.
- The user clicks the Add data destination icon, accessible via the top ribbon, the query settings pane, or the diagram view.
- The engineer chooses the optimal destination. Supported endpoints include Fabric Lakehouse (Tables or Files), Fabric Warehouse, Fabric KQL Database, Fabric SQL Database, Azure SQL Database, Azure Data Explorer (Kusto), Azure Data Lake Gen2, SharePoint Files, and Snowflake databases.
- If selecting a Fabric Lakehouse destination, a connection configuration window appears. The developer must ensure correct read/write permissions exist on the target source.
- The engineer navigates the workspace directory tree, selects the target Lakehouse, confirms the target table name, and selects Next. Further documentation is available at https://learn.microsoft.com/en-us/fabric/data-factory/dataflow-gen2-data-destinations-and-managed-settings.
Step 2: Configuring Managed vs. Manual Load Settings When configuring a destination, the developer must dictate how the engine handles schema evolution and data updates during subsequent refreshes.
- By default, Managed (Automatic) Settings are enabled. This framework handles column mapping automatically; if the engineer adds columns or alters data types in the query, the mapping adjusts dynamically upon republishing.
- Managed settings utilize the Replace update method by default. The destination table is physically dropped and recreated during every refresh cycle to accommodate potential schema changes.
- Quick Win: The engineer must exercise extreme caution with the Managed Replace method. Dropping a table will permanently remove any downstream relationships or DAX measures that have been constructed on top of that table in a Power BI semantic model.
- If automatic settings are disabled, the developer enters Manual Settings. Here, the engineer can elect to Append new data instead of executing full replacements. Note that Fabric KQL and Azure Data Explorer destinations strictly do not support the "Replace" method.
- Within Manual Settings, the developer must define schema options. A Dynamic Schema allows for changes upon republishing, though manual wizard mapping is required. A Fixed Schema prohibits structural changes; if the query schema deviates from the destination schema, the publish action will fail. Destinations such as Fabric Warehouse and Snowflake strictly enforce Fixed Schemas.
Step 3: Leveraging Advanced Staging Compute To facilitate high-performance processing, Dataflow Gen2 automatically provisions and utilizes advanced Fabric SQL Compute engines.
- When routing data to specific destinations like the Fabric Warehouse, the system automatically generates internal staging artifacts within the workspace, explicitly named DataflowsStagingLakehouse and DataflowsStagingWarehouse.
- The developer must ensure that staging is enabled by right-clicking the query and verifying the Enable staging option is checked. This is a mandatory requirement for performance optimization when loading into Warehouse destinations.
- Furthermore, when utilizing Lakehouse destinations, the engineer must implement a routine maintenance process known as "vacuuming." Vacuuming removes obsolete files no longer referenced by the Delta table log, which is critical for optimizing storage costs and query performance. A retention period of at least seven days is recommended by Microsoft specifications.
Step 4: Implementing Mandatory Git Integration Prerequisites The original session treated Git as an optional, highly advanced concept. As of April 2026, Git integration is mandatory for all new Dataflow Gen2 items, enforcing strict version control across data engineering operations.
- Only a designated workspace administrator can execute the initial connection to a Git provider.
- The administrator must verify that the tenant-level switches for "Users can synchronize workspace items with their Git repositories" (and specifically the GitHub switch, if applicable) are enabled in the Fabric Admin portal.
- The administrator navigates to the target workspace, opens Workspace settings, and selects the Git integration module.
- The system prompts the selection of a provider: Azure DevOps or GitHub.
- If utilizing Azure DevOps, the admin authorizes the Microsoft Entra ID user and inputs the Azure DevOps URL, Organization, Project, Git repository, and target Branch.
- If utilizing GitHub, authorization requires a Personal Access Token (PAT). Best practices dictate utilizing a fine-grained token with explicit "Contents" read and write permissions scoped to the repository.
- The administrator must strictly adhere to naming conventions. The directory name connecting to the repository cannot begin or end with a space or tab, and cannot contain characters such as " / : < > \ *? |.2 Furthermore, synchronization will fail if the Git branch exceeds the strict limit of 1,000 items.
- After configuring the provider, the administrator selects Connect and sync. The workspace interface will refresh to display source control synchronization statuses. Detailed integration instructions are hosted at https://learn.microsoft.com/en-us/fabric/cicd/git-integration/git-get-started.
Step 5: Authoring, Committing, and Version Control Logic With the repository connected, the developer must adhere to the modern commit lifecycle.
- After authoring logic in the canvas, selecting Save and run triggers an immediate schema validation evaluation. If a schema cannot be determined within 10 minutes, the evaluation fails.
- Assuming successful validation, the item publishes and initially displays an "uncommitted" status within the workspace UI.
- To push the M code and destination configurations to the repository, the engineer clicks the source control icon located in the top-right corner of the workspace.
- The developer selects the specific dataflow changes, inputs a commit message, and selects Commit.
- The system utilizes a Just-In-Time (JIT) publishing mechanism. When syncing changes down from Git into a new workspace, the system saves the updated dataflow; the subsequent scheduled or manual refresh will recognize the ApplyChangesIfNeeded parameter and automatically attempt to publish the latest version before executing the data load.
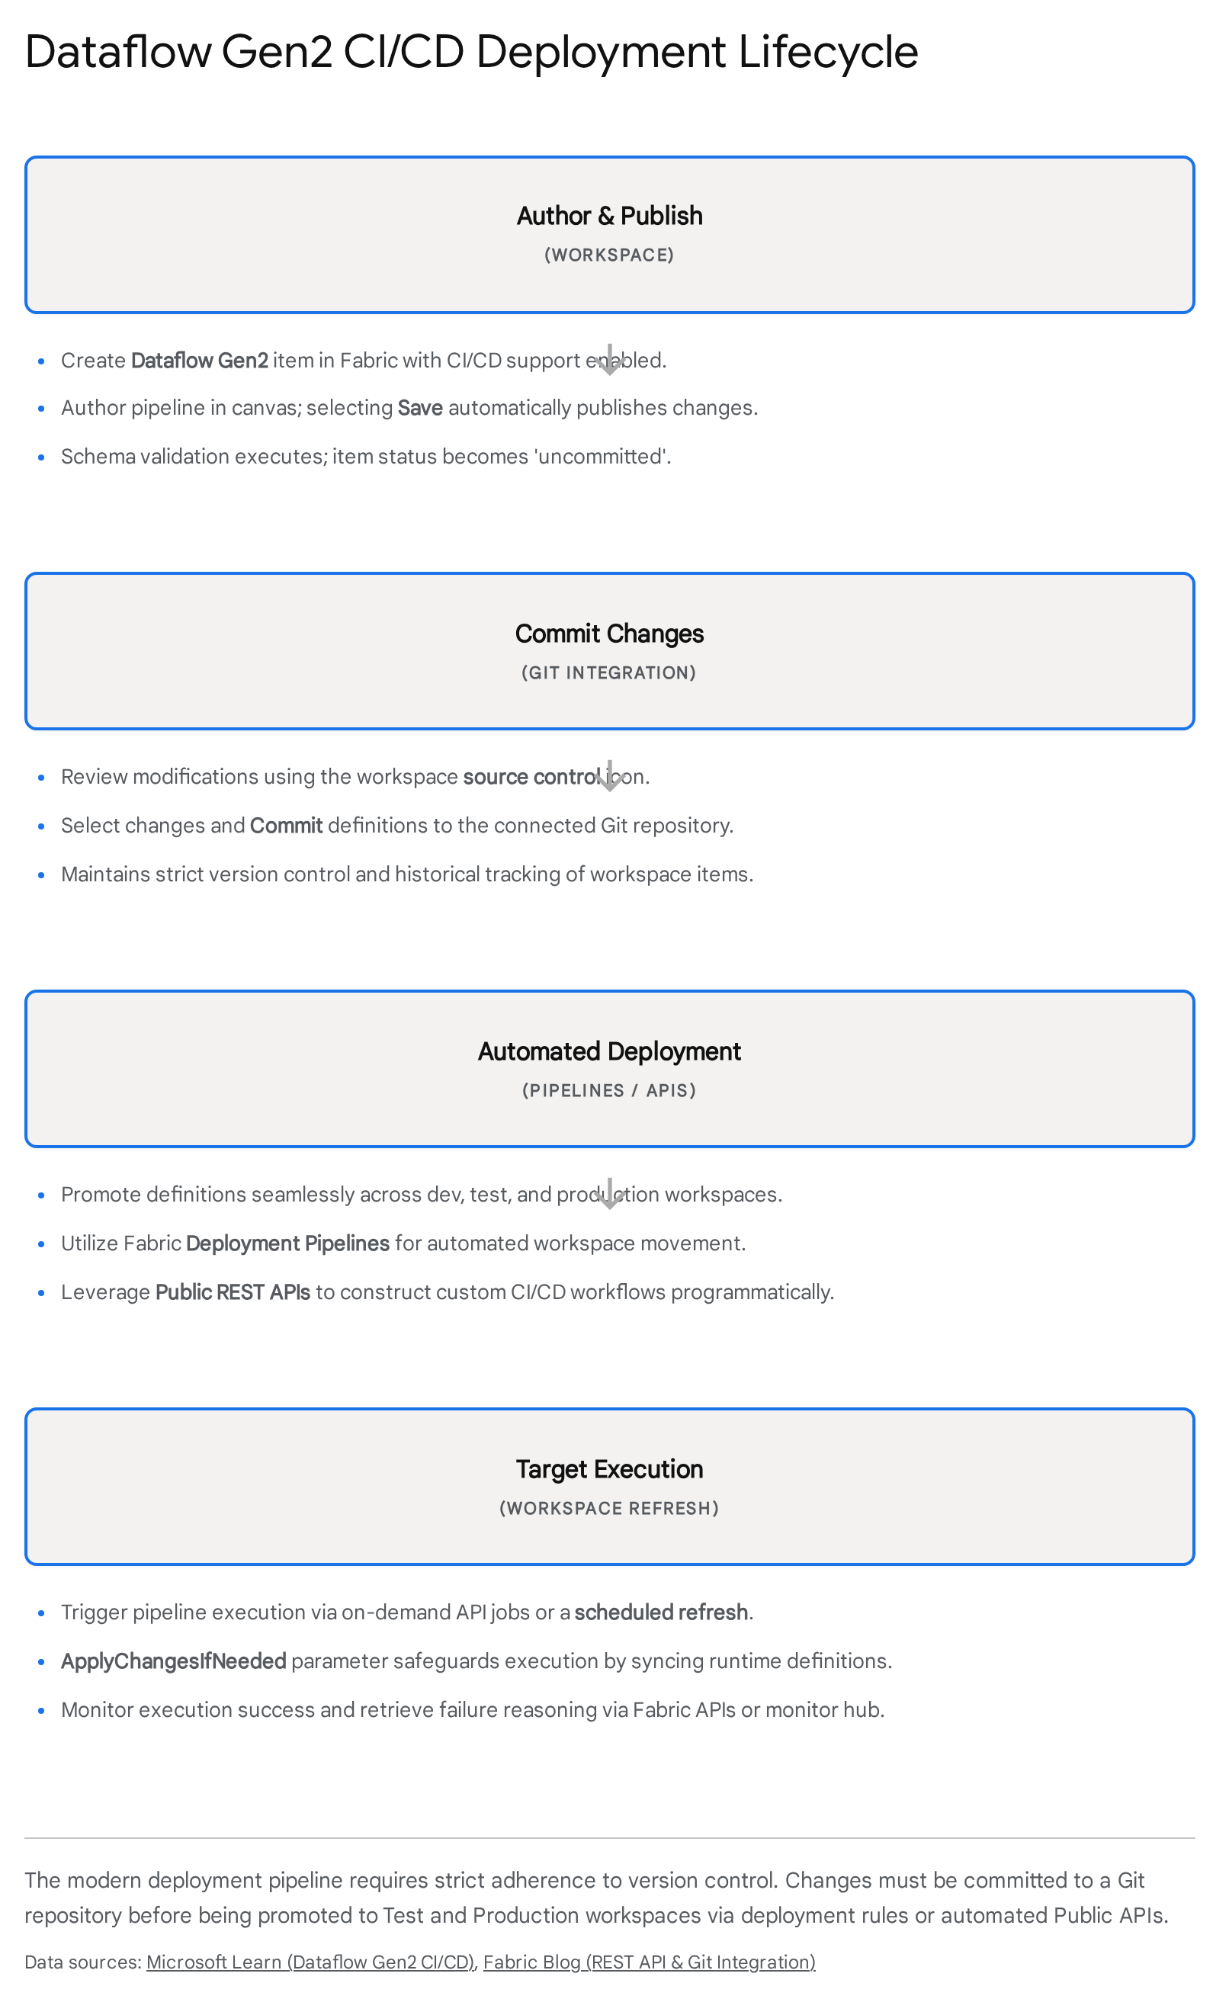
Step 6: Automated CI/CD Deployments and REST API Execution
Once committed to Git, the artifact must be promoted across distinct environments (Development, Test, Production).
- The organization can utilize native Fabric Deployment Pipelines to automate the movement of dataflows between workspaces without requiring third-party tools.
- When promoting code, hardcoded connection strings and workspace IDs will fail. The developer must implement Fabric Variable Libraries. This critical capability allows the parameterization of environment-specific endpoints, folder paths, and destination names, resolving them dynamically at runtime based on the execution workspace context. Documentation is located at(https://blog.fabric.microsoft.com/en-US/blog/a-wave-of-new-dataflow-gen2-capabilities-at-fabcon-atlanta-2026/).
- For teams requiring advanced, custom automation, the developer must interact with the Public REST APIs for Dataflow Gen2 CI/CD.
- The engineer must first acquire a bearer token using MSAL.Net for the Microsoft Entra ID, ensuring the Workspace.ReadWrite.All and Item.ReadWrite.All scopes are explicitly requested. Note: Service Principal authentication is currently not supported for these endpoints as of 2026.2
- To export a payload, the developer invokes the Get Dataflow with definition API via a POST request to https://api.fabric.microsoft.com/v1/workspaces/{workspaceId}/items/{itemId}/getDefinition. The system returns a Base64-encoded payload representing the item definition.
- To deploy this logic to the Test environment, the engineer invokes the Create a Dataflow with definition or Update Dataflow with definition API, providing the displayName, type "Dataflow", and the InlineBase64 definition. The developer must ensure the "Perform URL safe encoding" option is completely unchecked during JSON payload construction.
- Finally, deploying a definition does not automatically compile or execute it. The automation script must subsequently invoke the Run on-demand Dataflow publish job (POST.../items/{itemId}/jobs/instances?jobType=Publish) to activate the definition, followed by a separate refresh job call. API structure specifics can be found at https://learn.microsoft.com/en-us/fabric/data-factory/dataflow-gen2-public-apis#run-on-demand-dataflow-publish-job.
Demo 3 Update: Using Output in Desktop/Service or Linking Dataflows
The session showed you using the dataflow output in Power BI Desktop, service reports, or linking to other dataflows. Here's how you'd build that same thing today (April 2026):
The legacy architecture's reliance on "Linked Entities"—where one Gen1 dataflow directly queried the internal storage tables of another—has been superseded. While chaining queries is still possible, modern Fabric architecture dictates writing cleansed data to a unified OneLake destination (such as a Lakehouse) and consuming it natively downstream.
Step 1: Linking Dataflows Dynamically via Relative References If architectural requirements mandate that one Dataflow Gen2 must consume the tabular output of an upstream Dataflow Gen2, the developer must absolutely avoid hardcoding Workspace IDs or Item IDs.
- The engineer opens the downstream Dataflow Gen2 editor.
- Navigating to the "Get Data" interface, the user selects the OneLake catalog.
- The developer must utilize the Relative References feature, engineered specifically to simplify CI/CD migration paths.
- Within the navigator hierarchy, the user locates a distinct node designated as !(Current Workspace).
- By selecting items strictly under this dynamic node, the dataflow is instructed to resolve the target Lakehouse or Warehouse dynamically based on the specific workspace it is executing within at that exact moment. Therefore, when the CI/CD pipeline promotes the code from Development to the Testing workspace, the downstream dataflow automatically re-binds to the Testing Lakehouse without any manual M script modifications. Reference documentation is at https://learn.microsoft.com/en-us/fabric/data-factory/dataflow-gen2-relative-references.
Step 2: Desktop Consumption and Semantic Modeling Once the upstream Dataflow Gen2 successfully materializes cleansed data into a Fabric destination, it is primed for analytical consumption.
- The analyst opens Power BI Desktop.
- The user bypasses the legacy "Power BI Dataflows" connector entirely. Instead, the analyst selects Get Data and authenticates via the dedicated Lakehouse connector.
- If the data architecture routed the dataflow output to a Fabric Warehouse, the analyst utilizes the Azure Synapse Analytics (SQL DW) connector, utilizing the specific SQL connection string generated within the Fabric portal.
- The analyst then constructs the semantic model utilizing Direct Lake mode (assuming the underlying Fabric capacity supports it). This methodology offers exponentially superior query performance and scale compared to older Import models connecting directly to raw dataflow CSV files.
Step 3: Service-Level Diagnostics and Refresh Warning Analysis
Upon publishing the Power BI Desktop report and semantic model to the Fabric Service, the administrator assumes responsibility for monitoring health and execution integrity.
- The administrator monitors the execution logs. As of March 2026, the Power BI service engine provides substantially enhanced diagnostic visibility, frequently generating a status message stating “Refresh completed with warnings”.16
- The administrator must recognize that this is not a hard failure. This diagnostic feature exposes underlying errors that were previously masked, such as calculated columns or DAX measures attempting to reference physical tables that no longer exist. This scenario frequently occurs if an upstream Dataflow Gen2 utilized the "Managed Replace" setting, thereby dropping and recreating the destination table and severing downstream model relationships.
- To resolve the warnings, the administrator clicks the "Show" link located in the Details column of the Refresh History UI. This surfaces the exact DAX measure or calculated table generating the error, allowing for targeted remediation. Specifics on this behavior are documented at https://blog.crossjoin.co.uk/2026/04/19/power-bi-semantic-model-refresh-warnings/.
Quick Win: Do not restrict business logic inside chained, sequential dataflows. Current best practices dictate that Lakehouses or Warehouses serve as the optimal permanent storage layer. By constructing a master semantic model directly on top of the Lakehouse output, developers unlock Direct Lake mode, establish centralized governance, and eliminate the redundant duplication of compute capacity when processing common dimensions like Date or Management hierarchies across multiple reports.
Step 4: Orchestration via Fabric Pipelines and Workload Management
To achieve enterprise-grade scale, a Dataflow Gen2 artifact should never operate in isolated isolation.
- The data engineer integrates the dataflow as a discrete node within a Fabric Pipeline. A pipeline functions as a master workflow orchestrator used to sequence activities.
- By triggering the Dataflow Gen2 strictly as a pipeline activity, the engineer ensures the dataflow executes only after preceding raw data ingestion tasks or Python notebook processes complete successfully, ensuring data integrity.
- At the tenant level, IT administrators oversee these complex orchestrations using the Workload admin portal (Generally Available as of April , 2026). This centralized console governs pipeline workloads at scale, delivering unified visibility into compute consumption and item execution across the entire organization.
Step 5: Future-Proofing with CLI and Remote AI Agents
The most advanced deployment architectures in 2026 rely on external automation and AI-driven command line interfaces.
- Developers interact with the Fabric CLI, which is engineered to function flawlessly with external AI Assistants (like GitHub Copilot or Claude).
- Rather than writing complex REST API JSON payloads manually, the engineer instructs an AI agent via natural language. The agent utilizes the Fabric Remote MCP Server—a cloud-hosted protocol server that authenticates via Entra ID—to issue precise CLI commands that create workspaces, manage permissions, and deploy dataflow definitions within strict Role-Based Access Control (RBAC) boundaries. This methodology encapsulates the complexity of token management and endpoint routing, making AI-driven Fabric automation highly reliable.
Licensing Quick Reference
The licensing paradigm supporting data transformation has undergone a massive restructuring. The previous era, characterized by self-service data engineering running exclusively on standard Power BI Pro licenses, is effectively over. Because Dataflow Gen2 relies heavily on advanced Fabric SQL compute engines to process staging data and load modern destinations, it fundamentally requires a dedicated Fabric capacity.
For organizations currently operating legacy Gen1 dataflows purely on Pro licenses, the mandated migration path requires the procurement of a Fabric capacity, as Microsoft provides no lightweight Gen2-on-Pro alternative. Furthermore, leveraging the advanced Copilot AI features detailed extensively throughout this guide requires the organization to meet specific premium capacity thresholds.
The following table provides a strict factual alignment of technical features and their minimum licensing prerequisites as of April 2026.
| Feature / Artifact | Minimum License Needed |
|---|---|
| Dataflow Gen1 Execution (Legacy) | Power BI Pro (Basic features) or Premium (for Enhanced Compute). |
| Dataflow Gen2 Creation & Refresh | Fabric Capacity (Minimum F2 SKU) or Power BI Premium. |
| Output Routing to Lakehouse/Warehouse | Fabric Capacity (Minimum F2 SKU). |
| Git Integration & CI/CD Deployment | Fabric Capacity (Minimum F2 SKU). |
| Copilot in Dataflow Gen2 (Authoring) | Paid Fabric Capacity (F2 or higher) or Power BI Premium (P1 or higher). Note: Trial capacities and free SKUs are strictly unsupported..33 |
| Fabric Remote MCP Server (AI Agents) | Paid Fabric Capacity (F2 or higher) + Explicit Azure OpenAI admin opt-in. |
Administrators must verify pre-flight configurations before users attempt to invoke AI features. The tenant administrator must actively enable the "Users can use Copilot and other features powered by Azure OpenAI" toggle within the Fabric Admin portal, and must verify that the underlying capacity is physically located within a supported geographical region. Detailed prerequisites for Copilot activation can be reviewed at https://learn.microsoft.com/en-us/power-bi/create-reports/copilot-introduction.
Source note
Briefing published by Collab365 Spaces. Cite as "2026 Update: Master Dataflows in Power BI", Collab365 Spaces. 12 sources referenced.