The landscape of Microsoft 365 work management has shifted dramatically since the foundational paradigms established circa 2022 and discussed in Mark Kashmans original session. The fundamental transition has moved from manual, maker-driven configurations to an AI-native, agentic architecture powered by generative models and robust organizational data grounding. The introduction of Microsoft 365 Copilot, the Agent 365 control plane, the Power Apps "Vibe" experience, and in-context lightweight automation has fundamentally rewritten the procedural playbook for enterprise work management.
This comprehensive technical report serves as a definitive companion guide, translating legacy demonstrations into current, optimized procedures. The analysis relies strictly on the current ecosystem capabilities, licensing models, and official documentation available as of April 2026.
What's Changed Since This Session
The technological underpinnings of the Microsoft Lists and Power Platform ecosystem have undergone significant rationalization and enhancement. Below is a factual summary of the architectural changes, deprecations, and replacements that dictate modern deployment strategies.
| Technology / Feature | Status in April 2026 | What Replaced It |
|---|---|---|
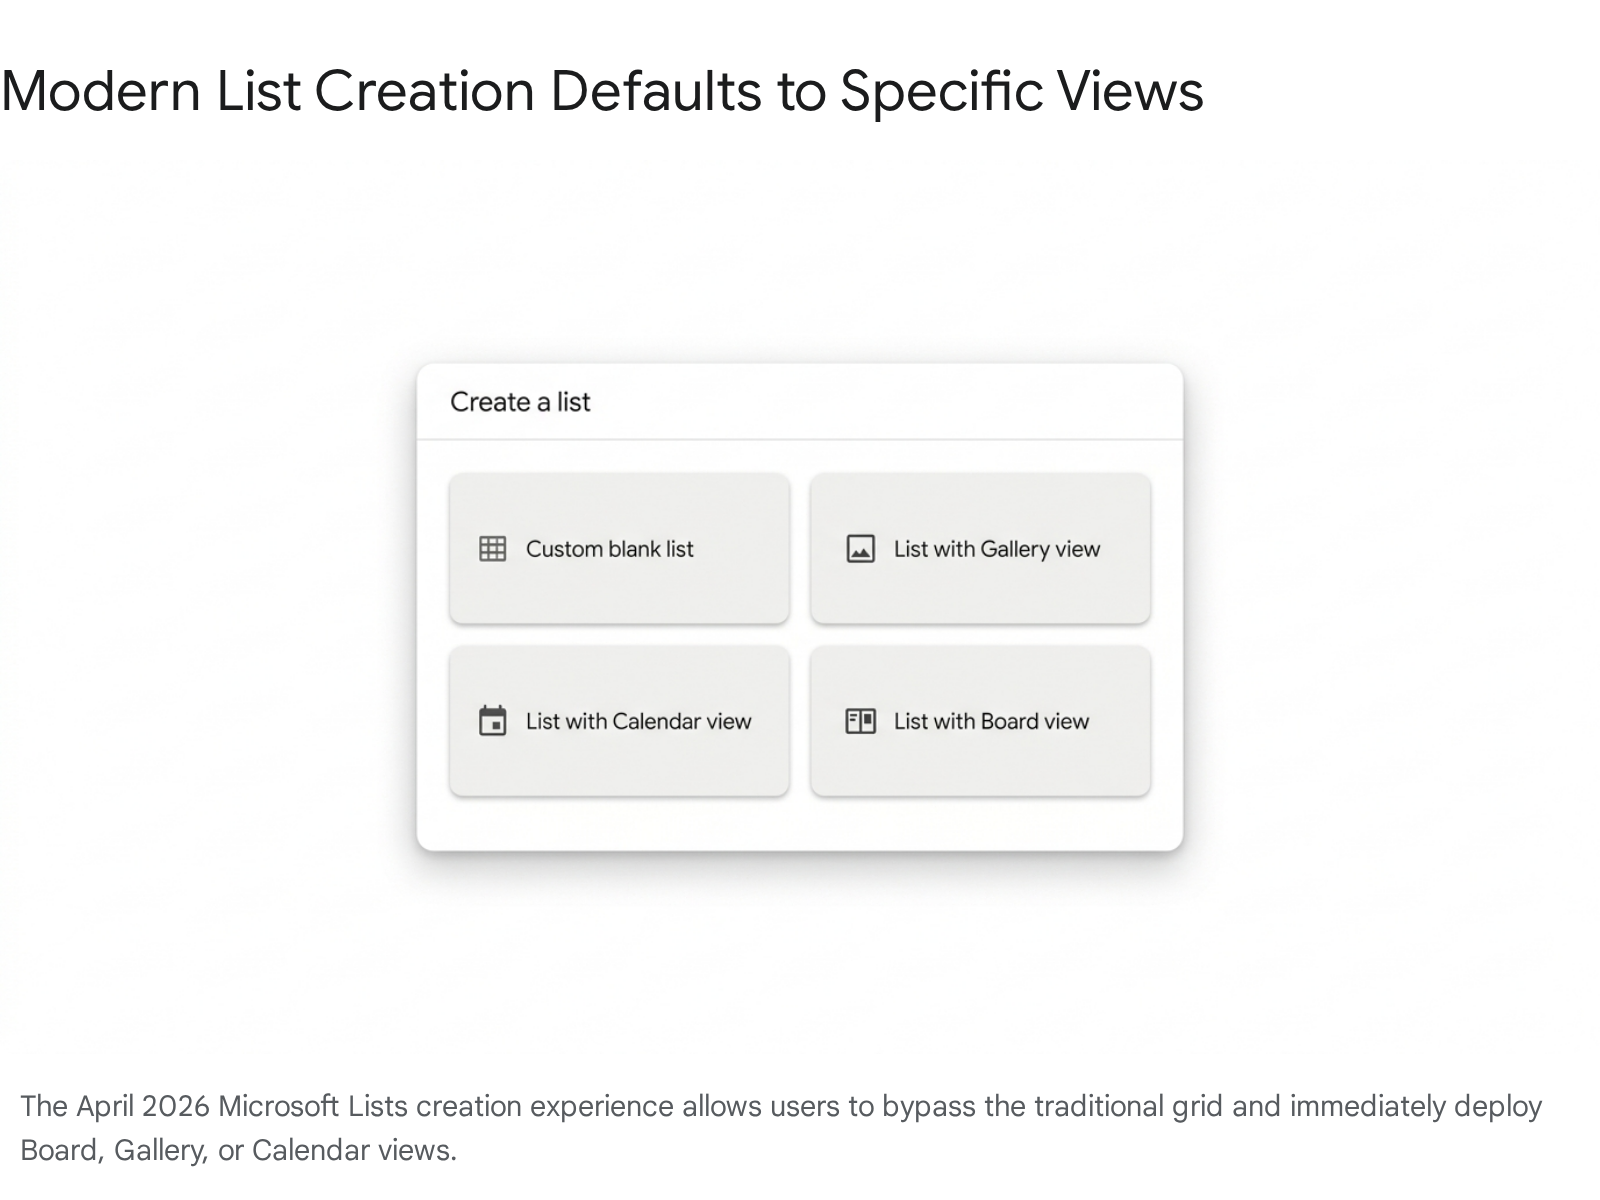
| List Creation User Interface | UI Overhauled | The new Start Page requires selecting a default view (Calendar, Board, Gallery, Form) immediately upon creation, bypassing the traditional grid-first approach. |
| Manual Schema Configuration | Deprioritized | Copilot Chat "Help me create a list" natural language generative capabilities. |
| SharePoint List Automation | Upgraded | Natively integrated Workflows experience within lists, featuring zero-code "Quick Steps" and one-click Approvals. |
| Legacy SharePoint Alerts | Retiring July 2026 | Replaced entirely by the modern native Rules engine and structured Power Automate flows. |
| Power Apps Studio (Classic) | Legacy / Integrated | The AI-native Power Apps "Vibe" experience (vibe.powerapps.com) for multi-agent, generative application architecture. |
| Power Apps Per App License | End of Sale (Jan 2026) / Restored (Apr 2026) | Existing agreements true-up normally; CSP availability was restored in early April 2026 at a list price of $5/app/month. |
| Standalone Bot Creation | Upgraded to Agents | Microsoft Copilot Studio, governed centrally via the Agent 365 control plane. |
| Microsoft 365 E5 Licensing | Upgraded | The Microsoft 365 E7 Frontier Suite bundles E5, Copilot, Entra Suite, and Agent 365 into a unified tier. |
| [Me] Filter Implementation | UI Updated | The modern filter pane now natively supports @Me dynamic tokens, reducing reliance on the classic view editor. |
How to Build This Today
The original session established critical work management principles that remain highly relevant. However, the execution methodology is significantly faster today, heavily augmented by artificial intelligence, and more deeply integrated into the overarching Microsoft 365 ecosystem. The following sections detail exactly how you execute those original six core scenarios using modern tooling.
Demo 1: Creating a basic Microsoft List in the web app and in Teams
The session showed you creating a basic Microsoft List in the web app and in Teams, including the liberal use of emoji for visual cues (e.g., in Teams tabs). Here's how you'd create that same thing today in April 2026.
The list creation workflow has been fundamentally streamlined to reduce the time-to-value for end-users. Previously, users were required to instantiate a blank grid and subsequently build out specialized views. The April 2026 update to the Microsoft Lists interface fundamentally altered this sequence. You are now prompted to define the architectural view of the data at the moment of inception. This shifts the focus from database management to immediate data visualization.
Deploying via the Modern Web User Interface
To initiate this process, you must navigate to the dedicated Microsoft Lists application. This is accessible via the Microsoft 365 app launcher or directly through the SharePoint app bar. The modern infrastructure unifies lists stored in personal OneDrive environments with those attached to shared SharePoint collaborative spaces.
- Within the Lists application, select the prominent + New list button located in the primary command bar.
- The updated List Creation Page will render. Instead of defaulting to a blank grid, you must select your foundational layout. Choose List with Board view, List with Gallery view, or List with Calendar view based on your specific project management requirements.
- Apply standard metadata, including a descriptive name and purpose.
- Select a corresponding color scheme and icon. This metadata translates directly into the SharePoint site navigation and the Lists app dashboard for rapid visual identification.
- Select Create. The infrastructure will automatically provision the underlying SharePoint list and deploy your selected view as the default interface.
Deploying via the Microsoft Teams Integration
Microsoft Teams continues to act as the primary collaborative hub, and integrating lists directly into channels remains a best practice for visibility. The multi-tenant, multi-account experience rolled out in March 2026 ensures that cross-organizational collaboration on these embedded lists is seamless.
- Navigate to your target Microsoft Teams channel. Ensure your environment supports the latest Teams desktop application.
- Locate the tab bar adjacent to the channel name and select the + Add a tab icon.
- Utilize the search function to locate the Lists application, or select it if it appears in the suggested applications gallery.
- Select Save to finalize the addition of the Lists tab to your channel infrastructure.
- You will be prompted to either Create a new list or Add an existing list. Selecting the creation route mirrors the web UI experience within the Teams wrapper.
- To replicate the visual cue methodology previously demonstrated, right-click the newly provisioned tab and select Rename.
- Insert an emoji directly into the tab name string. On Windows, utilize the Win +. keyboard shortcut; on macOS, utilize Cmd + Ctrl + Space. This allows your colleagues to instantly identify the list tab amidst standard document libraries and Planner instances. Furthermore, links to these list items shared in the channel chat will now automatically expand into rich app cards, providing immediate context.
Quick Win: You can bypass manual schema definition entirely by leveraging generative AI. Open the Microsoft 365 Copilot Chat pane and input the following prompt: "Help me create a list for tracking marketing event sessions, including columns for Speaker, Time, Room, and Status." Copilot will instantly generate the appropriate schema based on your natural language request and allow you to deploy it to your environment with a single click.
Demo 2: Customizing list columns with JSON formatting
The session showed you customizing list columns with JSON formatting, specifically demoing the 'Date a Day Calendar' column sample. Here's how you'd create that same thing today in April 2026.
JSON (JavaScript Object Notation) formatting remains the absolute, foundational standard for advanced column customization in SharePoint and Microsoft Lists. While Microsoft has continuously added native, out-of-the-box formatting options via the user interface, complex visual transformations—such as converting a standard date string into a graphical representation of a physical desk calendar—still require JSON payloads. The underlying technology parsing this JSON has not been replaced, but the community-driven repository providing these templates has matured significantly into a highly organized library.
Column formatting does not alter the underlying data stored in the SQL database; it strictly dictates the Document Object Model (DOM) rendering of that data within the browser. This ensures data integrity while allowing for radical visual flexibility.
Navigating the GitHub PnP Repository
The Microsoft Patterns and Practices (PnP) repository on GitHub is the central clearinghouse for these formatting payloads. You do not need to write this code from scratch; you simply need to know how to deploy it.
- Ensure your target Microsoft List contains a standard column configured with the Date and Time data type.
- Navigate your browser to the official(https://pnp.github.io/List-Formatting/). This repository is divided into structural sections including column-samples, view-samples, and form-samples.
- Browse to the column-samples directory and locate the specific sample titled Page-a-day Calendar ((https://github.com/pnp/List-Formatting/tree/master/column-samples/date-page-a-day-calendar)).
- Within the sample folder, locate and open the sample.json or date-page-a-day-calendar.json file.
- Copy the raw JSON payload in its entirety to your clipboard.
Deploying the Payload in Microsoft Lists
With the payload secured, you must apply it to the specific column in your environment.
- Return to your Microsoft List interface. Select the column header of your target Date column to reveal the context menu.
- Navigate through the menu path: Column settings > Format this column.
- The column formatting pane will slide out on the right side of the screen. By default, this shows basic design toggles.
- At the bottom of this pane, select the Advanced mode link to expose the raw JSON editor.
- Delete any existing JSON code within the editor block.
- Paste the copied PnP JSON payload directly into the editor.
- Select Save to apply the configuration. The column will immediately re-render to display the physical calendar visualization.
Architectural Mechanics of the JSON Payload
Understanding how this specific JSON payload operates provides a foundation for further customization. The 2026 iteration of this PnP JSON relies heavily on dynamic formatting operators and structural Abstract Syntax Tree (AST) logic parsed by the SharePoint framework.
The code utilizes the @now token, which dynamically evaluates to the current date and time at the exact moment the user's browser loads the list view. It isolates specific temporal components by applying the getDate, getMonth, and getYear operators to the underlying column data.
To achieve the specific visual styling, the JSON applies predefined Microsoft Fluent UI CSS classes directly to the generated HTML elements (div and span tags). For example, it calls the ms-bgColor-themePrimary class to generate the distinct colored header of the calendar block, ensuring that the visual perfectly matches the overarching theme applied to your specific SharePoint site. Text contrast is managed via the ms-fontColor-white class. By relying on these theme-aware classes rather than hardcoded hex values, the visual remains accessible and visually consistent regardless of future tenant-level branding changes.
Quick Win: Manual code retrieval is no longer strictly necessary. Open your Microsoft Copilot Chat interface (or utilize an equivalent advanced generative model) and input the following prompt: "Generate the SharePoint JSON column formatting code for a 'Page-a-day Calendar' using the standard ms-bgColor and ms-fontColor Fluent UI classes." Modern AI models trained on current GitHub repositories are highly adept at generating flawless, ready-to-deploy SharePoint JSON payloads instantly.
Demo 3: Customizing list forms with JSON formatting
The session showed you customizing list forms with JSON formatting, specifically demoing the 'Event Itinerary Header' form sample. Here's how you'd create that same thing today in April 2026.
Mark's transition from customizing individual columns to customizing the entire item detail form represents a critical step in user experience design. By utilizing the "Event Itinerary Header" sample, the standard, rigid out-of-the-box SharePoint form is transformed to look like a bespoke application interface. Crucially, this is achieved without the overhead, licensing requirements, or performance penalties associated with deploying a full Power Apps canvas application.
Today, native SharePoint list forms have received substantial feature upgrades. Users can now natively configure conditional branching, establish multi-column layouts, and dictate read-only field states directly through the user interface. However, for deep stylistic overrides—specifically regarding the structural Header, Body sections, and Footer—JSON formatting remains the mandated approach.
Configuring the Form Layout
The process for deploying a custom form header requires accessing the list form configuration pane.
- Open your Microsoft List and select the + New button in the command bar. This action opens the default item creation form panel on the right side of the screen.
- In the top right corner of the form header, locate and select the Edit form icon (represented by a pencil overlaid on a form graphic).
- From the resulting dropdown menu, select Configure layout.
- A secondary formatting pane will appear. Ensure the Apply formatting to dropdown menu is explicitly set to Header. Setting this incorrectly will cause the payload to break the body of the form.
Retrieving and Applying the Header Payload
You must retrieve the specific JSON payload designed for form headers.
- Navigate to the PnP GitHub repository's dedicated Form Samples section ((https://pnp.github.io/List-Formatting/formsamples/)).
- Scroll through the alphabetical list and locate the Event Itinerary Header sample.
- Copy the raw JSON code provided by the community repository.
- Return to your Microsoft List form configuration pane and paste the copied JSON into the editor window.
- Select Save. The form header will instantly update to display the styled, colored banner containing dynamic text relating to the event item.
Understanding Form Configuration Governance
Form configuration logic operates similarly to column formatting; it does not alter the underlying list item data, but rather intercepts the rendering process to change how the form is displayed to users browsing the library. The Event Itinerary Header payload specifically utilizes Fluent UI typography classes, such as ms-fontWeight-bold, to create a visual hierarchy emphasizing the event title. It leverages sp-css-backgroundColor-* classes to establish the distinct colored banner background.
From an administrative perspective, it is critical to understand the governance implications of form formatting. The custom JSON payload is permanently stored on the list's Content Type definition. If your organization utilizes a centralized Content Type Hub to syndicate standard content types across the tenant, local modifications to a list form will not push upstream. Conversely, updates published down from the Content Type Hub may overwrite and obliterate your local JSON form formatting. Administrators must document these customizations to prevent accidental data presentation loss during routine tenant maintenance.
Quick Win: The complexity of JSON form formatting can be daunting when adjusting variables. Leverage Claude AI or Copilot to assist in generating and refining the JSON code for form formatting. Providing the AI with a screenshot of the desired layout and requesting the corresponding SharePoint form JSON dramatically accelerates development and allows for rapid experimentation with different structural designs.
Demo 4: Creating filtered views
The session showed you creating filtered views, specifically a dynamic [Me] filtered view showing items created/modified by the current user. Here's how you'd create that same thing today in April 2026.
Creating a dynamic [Me] view is a fundamental technique for ensuring a clean user experience. It allows a single URL and a single view architecture to securely filter items dynamically, ensuring that the person opening the list only sees the data explicitly assigned to, or created by, themselves. This eliminates the need to create dozens of distinct views for individual team members.
Today, the underlying filtering logic remains identical to 2022, but the user interface required to achieve it has been significantly modernized. The recent March/April 2026 updates to SharePoint Document Libraries and Lists completely overhauled the filter pane. This update addressed legacy performance issues and provided a much more intuitive interface for data discovery, allowing users to apply dynamic tokens directly without writing pseudo-code.
Applying Dynamic Filters via the Modern UI
The modern interface allows for rapid deployment of personalized views.
- Navigate to your populated Microsoft List.
- Locate and click the Filter icon (represented by a funnel) located in the top right command toolbar. This expands the newly updated modern filter pane.
- Scroll through the pane to locate your target Person-type column (e.g., a column named "Assigned To", "Owner", or "Reviewer").
- In the legacy interface, users were forced to type [Me] into a text box. In the 2026 modern UI, you simply select the dynamic token @Me from the available checkboxes generated under that specific Person column. The list grid will instantly filter to match the criteria.
- To persist this filter for future use, click the view dropdown menu in the command bar (e.g., where it displays "All Items" appended with an asterisk indicating unsaved changes).
- Select Save view as.
- Provide a descriptive nomenclature, such as "My Sessions" or "My Assigned Tasks", ensure the visibility is set appropriately (public or private), and select Save.
Utilizing the Classic View Editor for Complex Logic
While the modern pane handles basic @Me assignments effortlessly, complex boolean logic (e.g., "Assigned to Me AND Status is Pending") still requires the classic view editor framework.
- Click the view dropdown menu at the top right of the list and select Edit current view.
- Scroll down the settings page until you locate the Filter section.
- Ensure the radio button is set to Show items only when the following is true.
- In the primary configuration row, set the column dropdown to your target field (e.g., "Assigned To").
- Set the operator dropdown to is equal to.
- In the value text box, type the precise string [Me]. Note that the classic editor requires the bracketed syntax, whereas the modern pane uses the @ prefix.
- Scroll to the extreme bottom of the configuration page and click OK to commit the changes.
Architectural Considerations: The List View Threshold
When engineering filtered views in 2026, enterprise architects must remain acutely aware of the 5,000 item List View Threshold (LVT). This threshold is a hard limit imposed by the underlying SQL Server database architecture to prevent lock escalation from degrading tenant performance.
If your Microsoft List exceeds 5,000 items, simply applying a [Me] filter is insufficient; the query will be throttled and fail to render. To mitigate this, the column you are filtering against (e.g., "Assigned To") must be indexed within the list settings.
Furthermore, the first indexed column utilized in your filter expression must successfully reduce the overall dataset to below 5,000 items before any subsequent filters are applied. For instance, if an organization has 15,000 items, and the [Me] filter returns 6,000 items for a specific manager, the view will break even if it is indexed. You must utilize an AND operator with another indexed column (such as "Status" = "Active") to ensure the initial data payload returned from the SQL database falls under the critical 5,000 item limit. Using an OR operator across massive datasets forces the database to scan the complete list, invariably resulting in throttling blocks.
| List Scenario | Column Indexed? | Operator Logic | Query Result Status |
|---|---|---|---|
| < 5,000 total items | No | Assigned To = [Me] | Success |
| > 5,000 total items | No | Assigned To = [Me] | Throttled (Fails) |
| > 5,000 total items | Yes (Assigned To) | Assigned To = [Me] (Returns < 5,000 items) | Success |
| > 5,000 total items | Yes (Status, Assigned To) | Status = Active OR Assigned To = [Me] | Throttled (Fails) |
| > 5,000 total items | Yes (Status, Assigned To) | Status = Active AND Assigned To = [Me] | Success |
Demo 5: Integrating Power Apps to create custom forms for lists
The session showed you integrating Power Apps to create custom forms for lists. Here's how you'd create that same thing today in April 2026.
Mark demonstrated how developers can escape the rigid boundaries of standard SharePoint forms by initiating a Power Apps integration. This technique provisions a customized Canvas app that overrides the native list's new, edit, and view screens, allowing for advanced relational data lookups, complex validation logic, and pixel-perfect corporate branding.
Today, this paradigm has undergone a seismic shift. While the classic integration pathway remains fully functional, Microsoft has introduced the Power Apps Vibe experience (vibe.powerapps.com) as the modern, definitive standard for application generation. Vibe represents an AI-native platform that generates full React applications from natural language prompts, connecting them directly to underlying SharePoint lists seamlessly.
Deploying the Classic Customized Form
If your objective is strictly to override the native side-panel form within the standard SharePoint interface, the classic integration method is required.
- Open your target list, select the Integrate dropdown located in the command bar, hover over Power Apps, and select Customize forms.
- Power Apps Studio will load within your browser. The architectural core of this integration is the SharePointIntegration control.
- To understand how the app synchronizes with the list, examine the Item property of the primary form (usually named SharePointForm1). It utilizes the formula: `If( IsBlank(SharePointIntegration.Selected) |
| IsEmpty(SharePointIntegration.Selected), First('YourListName'), SharePointIntegration.Selected ). This formula ensures that Power Apps reads the exact row the user clicked within the SharePoint UI. 4. From here, you can add custom controls, apply corporate branding, and inject business logic. 5. Once complete, navigate to **File** > **Save**, and critically, select **Publish to SharePoint**.[45] This publishes the custom canvas over the native form. 6. The SharePointIntegrationcontrol manages the transition states via itsOnNew, OnEdit, OnView, and OnSaveproperties, utilizing commands likeSubmitForm(SharePointForm1)andRequestHide()` to manage data submission and panel closure.
Deploying via the Modern Vibe Experience (Recommended Approach)
If your objective is to build a robust, standalone modern application utilizing the list purely as a backend database, the Vibe experience is vastly superior.
- Navigate your browser directly to vibe.powerapps.com.
- Utilize the central natural language prompt interface. Describe your application comprehensively: "Build a comprehensive event management portal. Use my existing SharePoint list named 'Event Sessions' as the primary data source."
- The multi-agent Vibe infrastructure will autonomously draft application requirements, generate a supporting data model if necessary, and render the complete user interface.
- Vibe now features native Direct SharePoint List Integration. The system will prompt you to select your target SharePoint site and the specific list through a secure authorization connection.
- Once the connection is established, the Vibe AI automatically wires up the necessary CRUD (Create, Read, Update, Delete) operations directly to the list architecture without requiring manual formula construction.
- Apply custom theming using the newly mandated Microsoft Fluent 2 design system. Organizations can apply a cohesive color scheme, overriding fonts and headers via the modern theming panel to instantly align with corporate branding.
Governance Warning: As of January , 2026, the traditional Power Apps "per app" SKU reached its End of Sale date for new enterprise customers. However, due to market demand, it was restored to the Cloud Solution Provider (CSP) price list in early April 2026 at a list price of $5/user/app/month. Ensure your user base is properly licensed before deploying complex standalone Power Apps. Standard Microsoft 365 licenses only cover applications that utilize standard connectors operating strictly within the context of Microsoft 365.47
Demo 6: Applying rules (automation) to lists and Power Platform integrations
The session showed you applying rules (automation) to lists and Power Platform integrations for work management scenarios like event planning (tracking sessions, speakers, keynotes). Here's how you'd create that same thing today in April 2026.
Mark concluded his session by demonstrating how to orchestrate active work management using native list rules (e.g., configuring simple notifications when a column changes) and leveraging Power Automate flows for heavier, multi-step event planning scenarios.
Today, automation within the Microsoft Lists ecosystem represents the area of largest architectural investment. The ecosystem no longer treats automation as a binary choice. Instead, automation spans three distinct, purpose-built tiers: Quick Steps (immediate UI actions where button clicks execute instant column updates), Power Automate (structured system routing where triggers initiate complex multi-app integrations), and Copilot Agents (unstructured, intent-driven interactions where natural language prompts yield dynamically grounded responses).
Tier 1: Quick Steps (The Modern Native Rules)
The legacy "Rules" menu and the outdated SharePoint Alerts system (which fully retires in July 2026) have been superseded. In February 2026, Microsoft launched "Quick Steps", providing lightweight, button-based automation rendered directly inside the grid view.
- Navigate to your list. On the command bar, select Integrate > Quick steps > Create a quick step.
- Quick Steps empower users to generate custom, reusable action buttons with absolutely zero code.
- You can select specific outcomes, such as "Set a column value", "Start a Teams chat", or "Move a file".49
- Configure the underlying logic utilizing existing list metadata. For example, you can provision a "Finalize Session" button that automatically updates a status column to "Completed" and dynamically disappears from the UI based on conditional visibility rules.
Tier 2: Power Automate (Structured Process Orchestration)
For rigorous business processes requiring complex approvals, auditing, or cross-system data synchronization, Power Automate remains the standard.
- The native approvals engine within lists has been massively overhauled. You no longer need to navigate to the Power Automate studio to build a custom flow for simple approvals. Click Integrate > Power Automate > Configure flows.
- You can enable built-in approvals with a single configuration toggle. Administrators can dictate default approvers that end-users cannot bypass, and establish multi-stage, ordered approval sequences natively within the list settings.
- For custom enterprise flows, utilize the newly updated inline cloud flow designer. Ensure your organization's Data Loss Prevention (DLP) policies are configured to allow your SharePoint connector to interact safely with external target services.
Tier 3: Agent 365 and Copilot (Unstructured AI Workflows)
If your objective is to allow users to dynamically "chat" with your list data—for instance, asking a bot when the next keynote session begins based on the event itinerary—you must deploy an Agent.
- Navigate to Microsoft Copilot Studio (or utilize the Agent Builder interface directly within the M365 application wrapper).
- Initiate the creation of a new Custom Agent.
- Access the Knowledge configuration tab. Here, you must explicitly add your specific SharePoint List as a designated knowledge source. This process "grounds" the agent's large language model strictly in your proprietary event data, preventing hallucination.
- Publish the Agent. End-users can now query your list utilizing natural language prompts via the Copilot Chat interface.
- Administrative Note: The deployment of these agents is now strictly governed by Agent 365, the unified control plane released May , 2026. This critical infrastructure allows IT administrators to track agent inventory, enforce rigorous access controls, and automatically quarantine unauthorized "shadow agents" built by citizen developers.
Licensing Quick Reference
The rapid introduction of generative AI agents and advanced automation capabilities has forced significant adjustments to Microsoft 365 licensing structures as of early 2026. If you are architecting and deploying the solutions detailed in this report, you must ensure your tenant holds the appropriate SKUs to maintain compliance.
Effective July , 2026, Microsoft is executing a global price and packaging update across all commercial channels. The table below outlines the core licensing requirements based on the newly established pricing models.
| Implementation Scenario | Required License Designation | 2026 Context & Financial Notes |
|---|---|---|
| Standard Lists & Quick Steps | Microsoft 365 E3 or E5 | Features are native to the core platform. Note that M365 E3 list pricing will increase to $39.00/user/mo, and E5 will increase to $60.00/user/mo in July 2026.54 |
| Custom Power Apps (Lists as Source) | Standard M365 License | No premium or add-on license is required provided the application utilizes the standard SharePoint connector strictly within the Microsoft 365 context. |
| Power Apps (Premium Connectors) | Power Apps Premium / Per App | The "per app" SKU, previously retired, was officially restored to the CSP price list in early April 2026 at a cost of $5/user/app/month. |
| Copilot Chat & Data Grounding | Microsoft 365 Copilot Add-on | Strictly required for natural language list generation and interactive querying of list data. Priced individually at $30/user/mo. |
| Enterprise Agent Deployment | Microsoft 365 E7 (Frontier Suite) | Launching May , 2026. This comprehensive suite bundles E5, Copilot, Entra Suite, and Agent 365 for $99/user/mo. It is functionally required for governing, securing, and scaling autonomous agents enterprise-wide. |
The most critical architectural and financial shift for enterprise architects is the introduction of Agent 365 and the overarching Microsoft 365 E7 Frontier Suite. If your organization intends to move beyond basic individual Copilot prompts and deploy custom, multi-step AI agents that autonomously execute workflows based on SharePoint List data, Agent 365 serves as the mandatory, non-negotiable control plane required to secure those agentic interactions against data loss and identity spoofing.
Always verify exact pricing matrices with your designated Microsoft account representative, as aggressive promotional discounts up to 15% are available for early enterprise adopters of the E7 suite through certified Cloud Solution Providers (CSPs) prior to the July 2026 price increases.55
Source note
Briefing published by Collab365 Spaces. Cite as "2026 Update: How To Enhance Your Work Management with Microsoft Lists", Collab365 Spaces. 8 sources referenced.