What's Changed Since The Original Session
The landscape for Microsoft Lists has evolved significantly since the original session was recorded. The introduction of pervasive artificial intelligence, the deprecation of legacy integrations, and the shift toward agentic workflows have fundamentally redefined best practices within the Microsoft 365 ecosystem. The following table summarizes the definitive shifts in the technology stack as of March 2026, providing a clear baseline for the updated methodologies.
| Technology | Status in 2026 | What Replaced It (or 'Evolved To') |
|---|---|---|
| Microsoft Lists Mobile App (iOS/Android) | Retired (Nov 2025) | Evolved To: Browser experience via office.com/launch/Lists. |
| Power BI "Visualize the List" Button | Retired (Dec 2025) | Evolved To: "Export to Power BI" / Power BI Desktop native connections. |
| Manual List Creation via Blank Canvas | Legacy | Evolved To: Microsoft 365 Copilot SharePoint List Agent (Natural Language Generation). |
| JSON-based Column Button Formatting | Legacy | Evolved To: Native "Quick Steps" Column Type (No-code buttons). |
| Static List Forms | Evolved | Evolved To: Dynamic Forms with Native Conditional Branching Logic. |
| Manual Excel Column Mapping | Legacy | Evolved To: Copilot AI-Assisted Mapping and Data Analysis. |
| Power Automate Complex Flow Creation | Evolved | Evolved To: Teams "Workflows" App / Natural Language Automation Creation. |
| Standard SharePoint Search for Lists | Evolved | Evolved To: Knowledge Agent / AI in SharePoint (Context-aware querying). |
| 32-bit Microsoft 365 Apps on Windows ARM | Retiring | Evolved To: 64-bit edition requirement for optimal performance. |
How to Build This Today
This core section maps the exact scenarios demonstrated in the original session to the optimal, AI-accelerated methodologies available in March 2026. As a senior consultant, I will guide you through the transition from manual, click-heavy configurations to streamlined, intent-driven architecture.
Scenario 1: Creating Real-World Lists Using Templates and Custom Views
You saw Sahil build real-world Lists using standard templates for issue trackers, asset inventories, and project task lists. You watched him customize these structures with specific column types, switch between grid, gallery, and calendar views, and apply complex JSON-based conditional formatting to highlight critical data.
Today, you would bypass the manual template gallery entirely for these tasks. The modern approach leverages the SharePoint List Agent, powered by Microsoft 365 Copilot, to generate the exact schema you need via natural language.Furthermore, the customization of actionable views is now natively supported by the "Quick Steps" column, eliminating the need for custom code.
The Evolution of List Creation: AI-Driven Generation
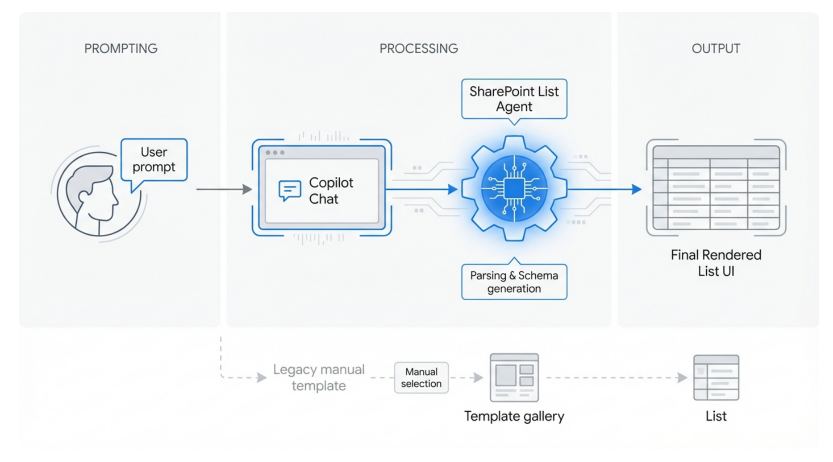
The SharePoint List agent interprets natural language prompts to automatically generate appropriate schemas, bypassing the traditional template gallery.
The rollout of the SharePoint List Agent reached general availability in February 2026. This tool fundamentally changes how we provision collaborative data spaces. Instead of forcing your business requirements to fit a predefined template, the agent creates a bespoke structure tailored to your exact phrasing.
To build an issue tracker today, you initialize the process directly within Microsoft 365 Copilot Chat. You do not need to navigate to the SharePoint site or the Lists app home page first. You simply open the Copilot pane in Teams, Outlook, or the web interface.
You instruct Copilot with a descriptive prompt. For example, you would type: "Create an issue tracker list for the upcoming Q3 software deployment, including columns for priority, affected system, reported date, and resolution status". The agent instantly analyzes the request, proposes a structured schema, and extracts the meaningful columns from your conversational text.
The agent simplifies the technical aspects of list building by recommending proper internal field names by default, ensuring backend database integrity. You review the proposed schema within the chat interface, and upon approval, select the "Convert to List" action. You then choose the destination, saving the list to a specific SharePoint site or your personal OneDrive for Business.
Quick Win: Provide Copilot with existing unstructured data to instantly generate a tracking list. Paste a summary paragraph of current project issues into Copilot Chat and instruct it to "Convert this project summary into a structured issue tracking list." The agent handles the formatting in a single step.
Once the list is generated, you will notice immediate performance enhancements. Lists in a browser and within Teams now load in half the time compared to the legacy architecture. The interface has been streamlined for rapid navigation.
Custom views, such as Grid, Gallery, and Calendar, are no longer hidden inside deep dropdown menus. These views are natively arranged as tabs horizontally across the top of the screen. This design choice allows users to switch contexts instantaneously. Real-time collaboration is also highly visible; next to standard presence icons, you will see specific icons indicating exactly who is actively filtering or grouping the data at that moment.
The next step is applying actionable formatting. In Sahil's session, you saw the painstaking process of writing JSON code to create clickable buttons within list rows. Today, Microsoft has resolved this pain point with the introduction of the Quick Steps column type. This feature will be rolled out in April 2026 and provides a no-code interface for row-level automation.
You navigate to your new list and select the "+ Add column" option. You choose "Quick Steps" from the available data types. The configuration pane appears on the right side of the screen, prompting you to define the action.
You can link this column to existing predefined Quick Steps or create a brand new one. For instance, you can configure an "Assign to Me" button that, when clicked, automatically sets the "Assigned To" column to the current user, updates the "Assigned Date" to the current timestamp, and changes the "Status" to "In Progress". You define the visual properties of the button directly in the UI, requiring zero JSON knowledge.
Crucially, you can apply conditional visibility to these Quick Steps. You can configure a "Set to Completed" button to only display if the current user viewing the list matches the user in the "Assigned To" field. This dynamic UI adaptation keeps the list clean and prevents unauthorized state changes.
Finally, to ensure your new list maximizes its value within the organization, it interacts with the Knowledge Agent. The Knowledge Agent, now fully integrated natively as "AI in SharePoint," intelligently tags and classifies your list data with auto-filled metadata. This contextualization ensures that when users ask Copilot complex questions—such as "Which assets in the inventory list are expiring in 2026?"—the agent delivers highly accurate, grounded responses.
Licensing Note: Utilizing the SharePoint List Agent via Copilot Chat requires a Microsoft 365 Copilot add-on license applied to an eligible prerequisite base plan. Standard manual list creation remains fully available for users operating without Copilot licenses.
Scenario 2: The New List Forms Experience
You saw Sahil demonstrate the List forms experience, focusing on modern interfaces for data entry, validation rules, and the vital process of implementing branching logic. He showed how guiding users dynamically based on their previous answers improves data quality, often relying on complex workarounds or Power Apps integration.
Today, you would manage this entirely within the native Microsoft Lists interface. The global rollout of Conditional Branching within modern List forms launched in January 2025. Administrators and list owners no longer need to rely on premium Power Apps licenses to build intuitive, logic-driven data intake portals.
The modern forms experience allows respondents to focus exclusively on filling out relevant details without ever seeing your full backend list. This separation of the entry interface from the data repository drastically improves user adoption and reduces accidental data corruption.
To build this today, you start by launching the modern form designer. You navigate to your target Microsoft List and select the "Forms" option located directly in the top command bar. You are presented with the choice to create a "New" form or "Update" an existing one.
Selecting either option opens the modern form builder in the right-side panel. This interface empowers you to edit the form's core aesthetic properties. You can define a custom Title, add rich-text instructions, and apply custom organizational Logos to ensure professional branding.
Before you can apply advanced logic, you must ensure that all potential data fields exist within the underlying SharePoint list schema. The form designer reads these columns and allows you to add or remove them as segments within the form. You can easily hide fields that are required for backend tracking but are irrelevant to the initial submitter.
Furthermore, you can use the designer to add user-friendly questions as labels. This overrides the default technical column names, providing a more conversational intake experience without altering the backend database structure.
The core capability demonstrated in the session—reacting dynamically to user decisions—is now configured via the "Branching" menu.You select "Branching" from the top navigation menu within the form builder. You then locate the specific question that will serve as your logical trigger.
Configure Native Conditional Branching in List Forms
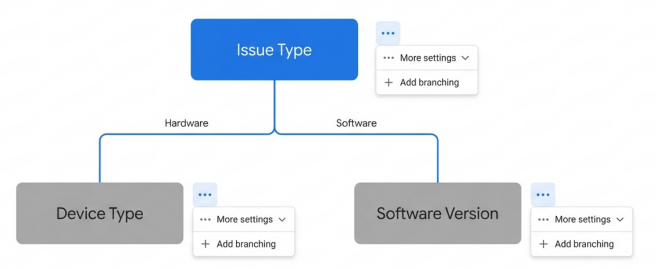
Form designers can create dynamic submission experiences by mapping choice selections to consecutive dependent fields, ensuring respondents only see relevant questions.
For example, your trigger might be a Choice column asking, "What type of issue are you reporting?" You select "More settings for question," denoted by the ellipsis icon, and choose "Add branching". On the subsequent Branching options page, you utilize the drop-down list next to your trigger question to define the precise routing rules.
You map the logic paths sequentially. If the respondent selects "Hardware," you instruct the form to branch to the "Device Type" and "Serial Number" fields. If they select "Software," you branch the form to the "Software Name" and "Version" fields. This conditional logic ensures users only see questions that are contextually relevant to them.
When building these dynamic paths, you must adhere strictly to the architectural constraints of the Microsoft Forms engine. You can only branch to a consecutive question. If your form consists of seven questions, and you apply branching logic to question four, it can only route the user forward to questions five, six, seven, or the "End of the form".
You must never attempt to branch backwards to a preceding question. Attempting to route a user from question four back to question two breaks the intended respondent experience. The system interprets this as an error state, causing it to skip all remaining questions and force the user directly to the final Submit button.
Quick Win: Utilize the branching interface to create highly efficient "End of the form" disqualification scenarios. If a user selects a choice indicating they do not meet the criteria for a specific request, route their answer directly to End of the form. This saves the user time and prevents your list from accumulating irrelevant data.
Once the logic is mapped, you finalize the aesthetic presentation. In the right-side panel, you select "Customize" to manage the background theme and define custom submission messages. You must always use the "Preview" button to rigorously test the logic paths before deployment. Verifying that selecting different trigger values correctly hides and reveals the intended dependent fields prevents logic gaps in production.
When you are satisfied, you select "Copy Link" to distribute the form URL. All submitted responses appear immediately as new list items, inherently triggering any subsequent Power Automate workflows or Quick Steps you have configured on the backend.
Licensing Note: The modern forms experience and native conditional branching are included within standard Microsoft 365 commercial environments. No premium Power Apps licensing is required unless you need advanced features like nested AND/OR logic that exceeds native capabilities.
Scenario 3: Integrating Lists into Teams Workflows
You saw Sahil integrate Lists directly into Teams workflows via Teams tabs, aiming to centralize work. He demonstrated how to trigger complex notifications and approval chains based on list activity using the standalone Power Automate portal.
Today, you would execute this integration utilizing a highly unified Microsoft Teams client. The legacy method of building complex Power Automate canvas flows from scratch has been largely superseded by the native Teams "Workflows" app, which simplifies automation deployment. Furthermore, the Teams interface provides enhanced security visibility and drastically improved data rendering speeds.
Embedding a List into the collaborative workspace remains the foundational step. You navigate to your designated Microsoft Teams channel and select the "+" icon on the top tab bar to open the extensive tab gallery. You search for the "Lists" app and select it.
The system presents you with the option to create an entirely new list or pin an existing list housed within a connected SharePoint site. Once embedded, the user experience differs significantly from the 2024 iteration. The custom views you configured—such as bespoke grids or calendar layouts—are now arranged as easily selectable tabs directly at the top of the Teams canvas.
This eliminates the friction of opening deep dropdown menus to change your data perspective. Furthermore, you can instantly toggle from the standard list view to a highly functional "grid view" by selecting the icon in the command bar. This allows team members to perform rapid bulk editing directly within the Teams window, matching the speed of a traditional spreadsheet.
When integrating these Lists into channels shared with external partners or vendors, you now benefit from vital security enhancements. You will notice "Trust Indicators" appearing throughout the interface. These visual badges display next to external users within Teams channels and chats.
The system automatically assesses the person's Entra ID relationship with your organization and assigns these labels. This allows your team members to quickly verify exactly who they are collaborating with before sharing sensitive list data. Administrators manage these external collaboration configurations through a consolidated, guided workflow in the Teams Admin Center, ensuring organizational security requirements are met.
To automate processes around your List, you bypass the external Power Automate portal. Instead, you select the "Apps" icon from the left navigation rail in Teams and launch the "Workflows" app. This application powers automation with an extensive library of pre-built templates.
You browse the selection for workflows designed specifically for Lists and Teams integration. You might select a template titled "Post a message to a channel when a new list item is created". You follow the guided prompts to authenticate the necessary connections. The entire Workflows experience is designed to enable everyday users to create robust automations in three steps or less, minimizing context switching.
Quick Win: For localized, item-specific automation, bypass the Workflows app entirely. Navigate to your embedded List in the Teams tab, select a specific item row, and click the Automate menu. Choose Quick steps to execute a flow or draft a targeted email directly from that specific row data with a single click.
The integration of Lists extends seamlessly into your synchronous communication. During Teams meetings where a List is reviewed or updated, Copilot provides powerful conversational analytics. Copilot in Teams actively analyzes the chat history, the meeting transcripts, and the shared List content simultaneously.
Post-meeting, Copilot generates smart recaps that identify action items and summarize discussions related to specific list rows. This ensures that verbal decisions regarding issue trackers or project tasks are permanently captured and trackable alongside the structured data.
Licensing Note: The Workflows app is included in standard Teams licensing. However, creating advanced custom flows that interact with premium connectors outside the Microsoft 365 ecosystem requires standalone Power Automate per-user or per-flow licensing. Copilot meeting recaps require the Microsoft 365 Copilot add-on.
Scenario 4: Migrating Simple Excel or Email-Based Tracking to Lists
You saw Sahil explain strategies for migrating simple Excel or email-based tracking systems into Microsoft Lists to foster better organizational collaboration. This process historically required meticulous manual column mapping, extensive data cleansing, and often resulted in frustrating import errors.
Today, you would execute these migrations using AI-Assisted Mapping for structured Excel files, or leverage the SharePoint List Agent to directly convert unstructured text trapped in emails. Copilot acts as an intelligent intermediary, drastically reducing the friction of legacy data migration.
The process for importing tabular data from Excel has been completely overhauled. To begin an import, you navigate to your desired environment via the Microsoft Lists app or the Power Apps maker portal. You initiate the process by selecting "New List" and choosing the "Import from Excel (Preview)" action from the primary command bar.
You upload your source .xlsx or .csv file. If your legacy Excel workbook contains multiple distinct sheets, the new unified interface allows for precise sheet selection. The system then deploys Copilot AI assisted mapping.
The AI scans the uploaded data array and provides suggested matches for existing list columns. If it detects novel data, it proposes appropriate new column types based on the recognized data patterns, such as identifying a string of text as a 'Choice' field based on recurring values.
AI-Assisted Data Mapping for Excel Imports
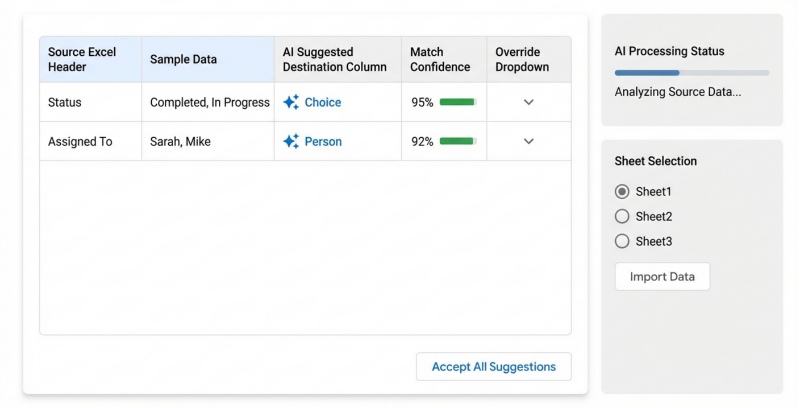
During the import process, Copilot analyzes the Excel data to suggest column types and automatically maps them to the List schema, allowing users to accept or override recommendations.
You maintain absolute control over the import. You review the AI's suggested matches within the dashboard and can accept or reject the recommendations with a click. Furthermore, if you are importing data into an existing table, the system now natively supports record updating. Existing rows are updated dynamically without creating duplicates, provided the primary key is successfully mapped.
For data currently trapped in unstructured formats, such as emails or Word documents, you no longer need to manually copy and paste that data into Excel as an intermediary step. The SharePoint List Agent acts as a direct, intelligent bridge.
Imagine you receive an email thread containing a disorganized list of project expenses. You open the Copilot Chat interface alongside the active Outlook email. You prompt Copilot to extract the data by typing: "Analyze this email thread and extract all mentioned project expenses into a structured table."
Copilot parses the natural language, identifies the requested entities, and generates the structured content directly within the chat conversation. Once this table is rendered, Copilot offers a single-step conversion action. You select the prompt to convert the content into a SharePoint list, and the agent handles the schema generation, column creation, and data ingestion automatically in the background.
Quick Win: When migrating highly rigid legacy Excel templates where AI mapping might be overkill, utilize the native Download Template feature. From the list command bar, navigate to Excel Templates > Download Template. Populate this pre-mapped .xlsx file with your legacy data to guarantee a flawless, zero-error import process.
Post-import, your data often requires minor normalization to perfectly fit the dynamic capabilities of Microsoft Lists. You navigate to your newly populated list and activate the Grid view to rapidly correct any anomalies or fill empty fields.
If the imported data represents entities that require immediate human interaction—such as unassigned tickets or pending approvals—you should immediately configure a Quick Steps column. Adding a simple "Acknowledge" or "Assign" button ensures your newly migrated data instantly integrates into your active business workflows.
Licensing Note: The advanced AI-assisted mapping preview features must be explicitly activated by a Power Platform Administrator within the Power Platform Admin Center (Settings > Product > Features). Executing direct list conversion from unstructured text via Copilot Chat requires the Microsoft 365 Copilot add-on. Note that the SharePoint List agent is not currently available directly within the Excel application interface.
Licensing Quick Reference
The deployment of these 2026 methodologies requires specific organizational licensing tiers. The following table provides a quick reference for the prerequisites needed to execute the full recommended approaches detailed in this report, ensuring your environment is properly provisioned.
| Feature / Capability | Required License / Plan | Notes |
|---|---|---|
| Microsoft Lists (Core Functionality) | Microsoft 365 E3 / E5, F1/F3, Business Premium | Included natively in standard enterprise and business suites. |
| Microsoft 365 Copilot (List Agent, Chat) | Microsoft 365 Copilot Add-on | Requires an eligible prerequisite base plan (E3, E5, etc.). |
| Native Forms Conditional Branching | Microsoft 365 E3 / E5 | Native capability; no premium licensing required. |
| Teams Workflows App (Standard Connectors) | Microsoft 365 E3 / E5 | Included in standard Teams commercial licensing. |
| Advanced Dataverse AI Import Mapping | Power Apps Premium / Power Platform Admin access | Feature must be enabled by an administrator in the admin center. |
| Knowledge Agent / AI in SharePoint | Microsoft 365 Copilot Add-on | Core experience relies entirely on the M365 Copilot license. |
Briefing published by Collab365 Spaces. Cite as "2026 Update Companion Guide: Uncover Microsoft Lists", Collab365 Spaces. 32 sources referenced.