This exhaustive research report serves as a definitive March 2026 companion guide for the Collab365 session demonstrating the creation of low-code applications within the Microsoft Power Platform. The original session provided foundational knowledge for building approvals, custom lists, and inventory applications using the methodologies available at that time.
The Microsoft Power Platform has undergone a massive architectural and feature-level transformation. The introduction of AI-native development environments, the deprecation of legacy licensing models, and the integration of native enterprise tools have fundamentally altered the best practices for citizen developers and enterprise architects.
This guide assumes the reader has watched the original session. It provides a direct translation of the legacy methodologies demonstrated in the recording into the modernized, optimized, and AI-accelerated workflows required today.
What's Changed Since This Session
The technological landscape of the Power Platform has shifted significantly over the past four years. The table below outlines the core technologies demonstrated in the original session, their current operational status as of March 2026, and the modernized replacements that developers must utilize today.
| Technology | Status in 2026 | What Replaced It |
|---|---|---|
| Dataverse for Teams | Phased out for standalone use. No direct API access without full upgrade. | Standard Microsoft Dataverse via Developer Environments or Pay-as-you-go. |
| Power Apps Per App License | End of Sale (Retired Jan 2026). Existing renewals only. | Power Apps Premium or Pay-as-you-go Azure billing. |
| Blank Canvas App Creation | Available, but no longer the recommended starting point. | Power Apps Vibe generative AI creation. |
| Manual Flow Building | Available, but highly inefficient for initial builds. | Power Automate Copilot Chat natural language generation. |
| 3rd-Party Only eSignatures | Supported, but no longer required as the baseline standard. | Native eSignature for Microsoft 365 with native drawn signatures. |
| InfoPath / Complex Canvas Forms | Canvas custom forms are available, but overkill for standard lists. | Microsoft Lists Modern Forms Experience via command bar. |
| Manual UI Code Generation | Legacy canvas control manipulation is slow and rigid. | Code Apps / Generative Pages written by AI agents under the hood. |
How to Build This Today
The original session demonstrated three distinct modules using a highly manual, step-by-step canvas and trigger configuration approach. Today, the approach to building these same solutions relies heavily on generative AI, native Microsoft 365 integrations, and centralized governance pipelines.
Before addressing the specific modules, a developer must establish a proper modern workspace. The original session utilized Dataverse for Teams as a lightweight sandbox. In 2026, Dataverse for Teams is strictly limited; it provides no direct API access outside the Teams client unless explicitly upgraded to a full Dataverse environment.
Quick Win: The Modern Sandbox Do not use Dataverse for Teams to learn or sandbox standalone apps today. Instead, create a Power Platform Developer Environment. It is free, provides full Dataverse premium capabilities, and avoids the 2GB lock-in associated with Teams environments.
Upfront Requirement: Setting Up a Modern Developer Environment
To replicate any of the demos from the session today, the developer must first configure a dedicated environment. Microsoft has vastly expanded Dataverse capacity as of December 2025, ensuring developers have the headroom to scale new scenarios without hitting immediate limits.
- Navigate directly to the Power Platform Admin Center at admin.powerplatform.microsoft.com.
- Authenticate using standard Environment Admin or System Administrator credentials.
- On the left navigation pane, select Environments.
- In the top command bar, select the + New button to open the provisioning panel.
- In the creation pane, input the primary environment details required by the system.
- For the Name field, designate a clear naming convention that indicates the environment's purpose (e.g.,
Dev_InventoryApp_2026). - For the Region field, select the geographic region closest to the operational user base to minimize data latency.
- For the Type field, select Developer. If the intent is to build a production application for immediate enterprise use, select Sandbox to allow for Application Lifecycle Management (ALM) automated pipeline routing later.
- Locate the toggle for Add a Dataverse data store and switch it to Yes. This is a mandatory step to replace the legacy Dataverse for Teams database and enable relational storage capabilities.
- Select Next to proceed to the database configuration screen.
- Configure the database settings, including the default language and the organizational URL.
- Ensure a Security Group is assigned if access needs to be restricted to specific colleagues or testing units.
- Select Save. The environment will provision in the background, making full Dataverse tables, premium connectors, and AI Builder capabilities available for the modules below.
Modernized Power Platform Development Architecture (2026)
Generative AI Workflow Pipeline
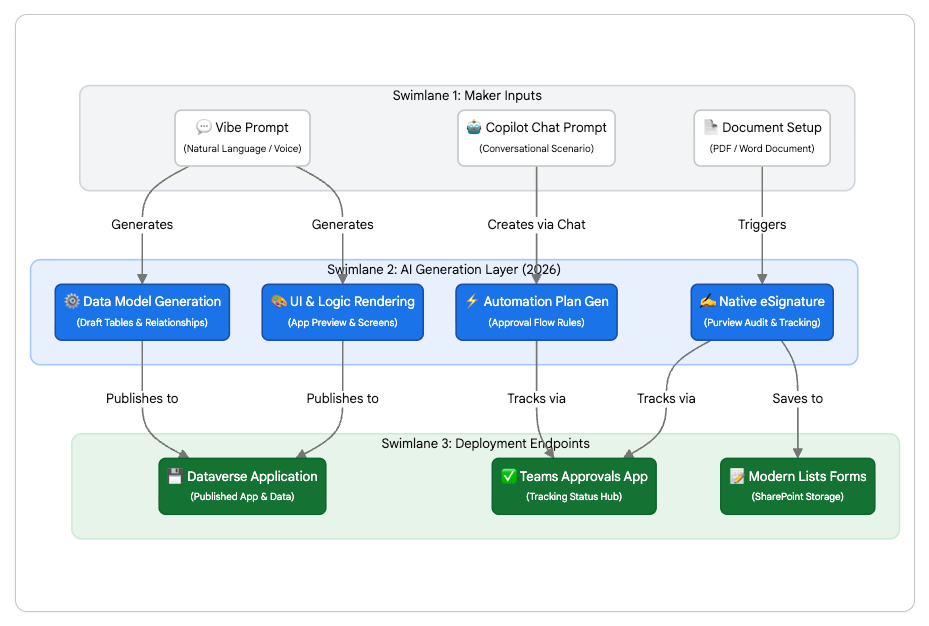
The 2026 app creation lifecycle relies on generative AI layers (Power Apps Vibe and Copilot) to handle data modeling and UI rendering, replacing the manual canvas configuration steps required in previous iterations.
Data sources: YouTube (Power Apps Vibe), Microsoft Learn (Vibe Architecture), YouTube (Power Automate Copilot), Microsoft Learn (eSignature for M365), Microsoft Learn (SharePoint Modern Forms)
Module 1: Building a Power Automate Approval Flow with e-Signatures
The session showed Geoff building a Power Automate approval flow for SharePoint documents. This original approach involved manually placing triggers, configuring complex condition controls, mapping dynamic content by hand, and integrating third-party e-signature tools like Adobe Sign or DocuSign into the automated workflows.
Today, a developer would build that same thing using the enhanced Copilot Chat experience within Power Automate to generate the foundational logic instantly. Furthermore, the developer would leverage the Native eSignature for Microsoft 365 integration directly within SharePoint, bypassing the need for complex third-party API configurations unless explicitly desired by enterprise policy.
Step 1: Configuring Native SharePoint e-Signatures
In 2026, document approval and signing are deeply integrated into the Microsoft 365 trust boundary. The native eSignature service is available worldwide for both PDF and Word documents, ensuring that highly sensitive corporate data never leaves the tenant.
- Navigate to the target SharePoint Document Library where the files requiring approval are stored.
- Ensure that the document library contains the necessary metadata columns to track the lifecycle of the document. A developer should add an
Approval Statuschoice column (Draft, Pending Approval, Approved, Rejected, Needs Revision). - Add supplementary columns such as an
Approved Datedate/time column, anApproved Byperson column, and anApprover Commentsmulti-line text column. - If the enterprise requires external parties to sign the document, the administrator must have Microsoft Entra B2B integration enabled for SharePoint and OneDrive. This allows external recipients to access the document securely via guest access managed through Microsoft Entra ID.
- To create an eSignature request, the flow creator must have both edit and sharing permissions for the document in SharePoint so that the service can generate the necessary sharing links.
- While Adobe Acrobat Sign and DocuSign remain supported as third-party providers integrated directly into this native interface , the quickest path to deployment relies on the native Microsoft signature service.
- As of March 2026, signers can utilize native drawn electronic signatures via stylus, touch, or mouse without leaving the SharePoint ecosystem. This feature is enabled by default and requires no administrative configuration.
Step 2: Generating the Flow via Copilot Chat
Instead of dragging and dropping triggers onto a blank canvas, developers now converse with Power Automate using natural language. This drastically reduces the time to deployment and prevents logic errors.
- Navigate to make.powerautomate.com and ensure the newly created Developer environment is selected in the top right corner.
- On the Power Automate home page, locate the central Copilot Chat interface. This conversation-first experience allows the developer to outline the entire business process directly.
- Enter a highly descriptive natural language prompt to generate the entire workflow architecture.
- A proper prompt should read: "Create a Manager Approval workflow. When a new file is added to my SharePoint library, change the Approval Status column to 'Pending'. Send an approval request to the department manager. If approved, change the status to 'Approved'. If rejected, change the status to 'Rejected' and send an email to the creator.".
- Copilot will analyze the prompt, ask clarifying questions if the parameters are too vague, and generate a complete visual map of the flow.
- The generated map will include the
When a file is created (properties only)trigger, the approval actions, and theConditioncontrols. - Select Next to review the proposed connections. The developer must ensure all connections (SharePoint, Approvals, Outlook) show a green checkmark indicating successful authentication.
- Select Create flow to transition from the chat interface into the familiar visual designer.
Step 3: Refining the Approval Action
Once Copilot builds the structural skeleton of the flow, the developer must refine the specific approval parameters to ensure data maps correctly between SharePoint and the Approvals service.
- Click on the generated
Start and wait for an approvalaction block in the designer to open the parameter pane on the left side of the screen. - Verify the Approval Type. For a standard contract review requiring only one manager's sign-off, select
Approve/Reject - First to respond. If a committee must review the document, selectApprove/Reject - Everyone must approve. - Map the dynamic content for the Title field. Insert the dynamic content
File name with extensionand append the text " requires your approval" to provide immediate context. - Map the Assigned To field. Input the dynamic content for the
Created By Emailmanager, or hardcode a specific reviewer group's email address. - Add contextual information into the Details field.
- The developer can insert a
Run a promptaction prior to the approval to use AI Builder to summarize the document, passing that highly concise summary directly into the details field. This prevents the manager from having to read the entire document for minor changes. - Map the Item Link field to the
Link to itemdynamic content from the SharePoint trigger so the manager can easily open the native file. - Configure the Condition block. In the
If yesbranch, Copilot should have generated anUpdate file propertiesaction. - Point the
Update file propertiesaction back to the original SharePoint site address and library name. - Update the
Approval Statusfield to the custom choice valueApproved.
Quick Win: ETag and Concurrency
When updating SharePoint file properties within a flow, always pass the ETag property from the trigger into the update action. The ETag is a special identifier that tracks the specific version of the item. This mechanism prevents severe concurrency errors if the document was modified by another user while the flow was waiting for the manager's final approval.
Step 4: Tracking and Auditing the Workflow
In 2026, enterprise tracking is native and comprehensive, requiring no custom logging tables.
- Save the flow and select Test in the top right corner. Trigger the test manually by uploading a sample PDF document to the designated SharePoint library.
- The approval request will route directly to the Approvals app in Microsoft Teams, where the manager can view the document summary and sign off seamlessly.
- Simultaneously, the new native eSignature activities are automatically logged in the Microsoft Purview Audit log.
- Compliance officers can search the Purview logs under the "eSignature" prefix to see exactly when a request was created, viewed, signed, or downloaded by a recipient, satisfying stringent enterprise compliance requirements without any additional custom telemetry configurations by the developer.
Module 2: Creating an Employee Onboarding Checklist in Microsoft Lists
The session showed Geoff creating an employee onboarding checklist in Microsoft Lists with item tracking, scheduled flows, and data validation rules. The most complex portion involved customizing the Microsoft Lists forms and views with Canvas Power Apps to improve user input and hide administrative columns.
Today, a developer would build that same thing utilizing the new native Modern Forms experience embedded directly within Microsoft Lists. Replacing the default list form with a Canvas Power App is now considered a heavy-handed, legacy approach reserved only for extreme edge cases requiring complex, multi-source data validation.
Step 1: Building the Modern List Schema
- Navigate to the Microsoft Lists web application (or directly within a modern SharePoint site) and select New list.
- Create a blank list titled "Employee Onboarding Tracker".
- Add the necessary columns using the modern interface to define the data schema.
- Create an
Employee Namecolumn using the Person or Group data type. - Create a
Start Datecolumn using the Date and Time data type. - Create a
Departmentcolumn using the Choice data type, populating it with relevant business units (e.g., Sales, Engineering, Human Resources). - Create an
Equipment Requiredcolumn using the Choice data type, ensuring the "Allow multiple selections" toggle is activated. - Create an
Onboarding Statuscolumn using the Choice data type, with default values set to Not Started, In Progress, and Completed.
Step 2: Customizing the Input Form (The 2026 Way)
Previously, making this form visually appealing or hiding administrative columns required clicking Integrate > Power Apps > Customize forms, waiting for Power Apps Studio to load, and building a bespoke Canvas app interface. As of 2026, Microsoft has released the much-requested native forms feature directly into the command bar.
- Look at the modern command bar at the top of the onboarding list interface. Click the new Forms button.
- Select New form from the dropdown menu. This action opens a dedicated, streamlined form builder utilizing the existing list schema automatically.
- In the right-hand configuration pane, the developer can instantly rename fields specifically for the form view without altering the underlying database column names.
- For example, the developer should change the display name of
Start Dateto "When is the new hire's first day?". - The developer can also add helpful text descriptions under each field to guide the user, making forms much more relevant and user-friendly.
- Hide internal fields: The
Onboarding Statuscolumn is strictly for Human Resources tracking, not for the hiring manager submitting the form. In the form builder, simply toggle the visibility of theOnboarding Statusfield to hidden. - The user submitting the form will no longer see this field, but the data will default to 'Not Started' in the backend SharePoint list automatically.
- Theming: Select a modern theme from the top configuration menu to match corporate branding. This completely avoids the need to write complex CSS or Power Apps styling formulas.
Quick Win: Shareable Link Collection The modern Forms experience generates a standalone, secure URL. A developer can copy this link and send it directly to hiring managers via Teams or email. When the manager clicks the link, they see only a clean, consumer-grade intake form, completely isolated from the backend SharePoint list view. All submitted responses appear immediately as new list items for the HR team to process.
Step 3: When to Fall Back to Power Apps
A developer today should only fall back to the legacy Power Apps customized form method if the onboarding requirements dictate complex conditional logic that the native builder cannot yet handle.
- If the form requires Conditional Visibility based on user input (e.g., the form must only show the "MacBook Pro Model" dropdown if the "Department" is explicitly selected as "Design"), the native form cannot achieve this dynamically.
- If the form requires Dynamic Field Requirements (e.g., making a justification text field mandatory only if a specific high-cost equipment item is selected), Power Apps is required.
- In these specific scenarios, navigate back to the standard list view, select Integrate > Power Apps > Customize forms from the command bar.
- Power Apps Studio will load the default form onto the canvas. Select the specific data card that requires logic (e.g., the laptop model selection card).
- In the advanced property dropdown, select the
Visibleproperty. - Write the specific Power Fx formula to dictate the logic:
If(DataCardValue_Department.Selected.Value = "Design", true, false). - Select File and publish the form back to SharePoint. The list will now override the native experience with the complex Power Apps rendering engine.
Module 3: Developing an Inventory App and Embedding it in Teams
The session showed Geoff developing a classic canvas Power App connected to Dataverse for Teams. This app was designed to manage inventory stock levels and updates. The process included setting up a sandbox environment and manually embedding the resulting application into both Microsoft Teams and SharePoint.
Today, a creator would build that same inventory solution using the revolutionary Power Apps Vibe experience to generate the entire application, database schema, and business logic via natural language. The application is hosted in a standard Developer environment, rather than the deprecated Dataverse for Teams, and embedded using modern web parts.
Step 1: Generating the App with Power Apps Vibe
In early 2026, Microsoft introduced Power Apps Vibe. This is an agent-first development experience that effectively replaces the blank canvas approach for new application builds. It translates a developer's intent into a fully functional, code-backed application with a normalized Dataverse backend automatically.
- Navigate directly to vibe.powerapps.com (or access it via the Try new experience toggle in the standard Power Apps portal interface).
- Ensure the Developer environment created in the upfront setup phase is selected in the global header.
- In the main prompt text box, describe the application requirements comprehensively using natural language.
- A highly effective prompt should read: "Build an inventory management application to track IT hardware stock levels. I need to track item names, SKU numbers, current quantity, minimum reorder thresholds, and the assigned warehouse location. Create a dashboard view to easily identify items that have fallen below the reorder threshold.".
- Select Enter to submit the prompt, or use the Start dictation feature to speak the requirements into the system.
- The AI agents will immediately begin working collaboratively, loading three distinct architectural layers simultaneously: the Plan, the Data Model, and the App Preview.
Step 2: Refining the Vibe Data Model
Unlike the legacy Dataverse for Teams visual table editor, Vibe generates a highly optimized relational model in memory before committing it to the actual database structure.
- Review the generated Dataverse tables on the screen. Vibe will likely have proposed an
Inventory Itemtable and a separateWarehouse Locationtable, establishing a one-to-many relationship automatically. - If the proposed model is incorrect or missing fields, the developer can converse with the agent directly in the right-hand panel. For example, typing "Add a column to track the last restock date" prompts the agent to update the in-memory draft table instantly.
- Alternatively, the developer can switch to the Data view workspace to manually create table relationships, adjust column data types visually, or view a complete Entity Relationship Diagram (ERD) of their data.
- Once the model is satisfactory, select Save in the upper-right corner.
- Critical Architectural Step: This initial save action is vital. It commits the previously in-memory draft tables into permanent, physical standard Dataverse tables within the selected environment solution. The data remains in draft form until this action is taken, allowing for rapid iteration without cluttering the environment.
- Select Publish to finalize the application build.
Quick Win: Vibe vs. Canvas Under the hood, applications generated by Vibe are "Code Apps" written in modern web frameworks (like React), bypassing the traditional, rigid Power Fx abstraction layers of classic Canvas apps. This architectural shift results in vastly superior rendering performance, responsive design by default, and enterprise-grade code that IT administrators can govern seamlessly through standard pipelines.
Step 3: Embedding Copilot Agents
In 2026, static inventory apps are enhanced with Copilot agents to provide contextual business understanding.
- Navigate to the published model-driven app interface generated by Vibe.
- Enable the Microsoft 365 Copilot chat feature for the application.
- This unified experience lets users ask natural language questions directly over the in-app inventory data. For example, a user can ask the embedded Copilot, "Which warehouse has the lowest stock of ThinkPad laptops?" without navigating away from the main screen.
- This agentic layer utilizes the Dataverse Model Context Protocol (MCP) Server to reason over the data schema and provide instant, accurate operational insights.
Step 4: Embedding the App into Microsoft Teams
Once the inventory app is published and enhanced with Copilot, the deployment process to end-users has been significantly streamlined compared to the legacy Dataverse for Teams methodology.
- Navigate to make.powerapps.com and select Apps from the left navigation pane.
- Locate the newly generated Vibe inventory app in the comprehensive list.
- Select the More actions (...) ellipsis icon next to the application name.
- Select the Add to Teams option from the context menu.
- A configuration panel will appear. The developer should select Advanced settings to define the app's metadata.
- Input details including a custom application Name, a Website link, Terms of Use, and a Privacy Policy. Providing these details ensures the app looks professional and compliant when it appears inside the enterprise Teams interface.
- Select Add to Teams. The system will prompt the developer to open the Microsoft Teams desktop client or continue utilizing the Teams web application.
- Within Teams, the user can choose to add the application as a personal tab for individual tracking, or pin it to a specific shared channel for the entire IT department to access the inventory tracker collaboratively.
- Note that organizational policies managed by IT in the Teams Admin Center must have the Allow interaction with custom apps setting enabled for this deployment to function correctly.
Step 5: Embedding the App into SharePoint Modern Pages
To provide true omnichannel access, the inventory application should also live on the IT department's SharePoint intranet portal.
- From the Power Apps Apps list, select the targeted inventory application and click the Details tab.
- Locate and copy the App ID, which is a unique alphanumeric GUID identifying the application across the tenant.
- Navigate to the target modern SharePoint site where the app will be hosted. The developer must ensure the site resides within the same Microsoft 365 tenant as the Power App to prevent authentication failures.
- Create a new modern page or edit an existing portal page.
- Hover over the page canvas to reveal the
+icon, open the web part gallery, and search for the Microsoft PowerApps web part. - Insert the web part onto the page. In the right-hand property configuration pane, paste the copied App ID (or the full application web link) into the designated input field.
- The application will instantly render on the SharePoint page via an iframe mechanism.
- Use the web part handles to resize the application horizontally and vertically, ensuring it fits the responsive layout of the intranet site without generating unsightly gray letterboxing around the borders.
- Publish the SharePoint page to make the application live for all intranet visitors.
Licensing Quick Reference
The licensing architecture for the Microsoft Power Platform has been heavily restructured leading up to 2026 to accommodate the integration of advanced AI features and hyperscale data storage capabilities.
Most notably, the Power Apps Per App license, which was heavily utilized in the past for single-application deployments, reached End of Sale on January 2, 2026, and is no longer available for purchase by new customers. Organizations relying on limited deployments face strategic shifts toward comprehensive user licensing or usage-based billing.
The table below outlines the specific licenses required to execute the modernized workflows detailed in this report.
| Required For | Required License Plan | Key Entitlements |
|---|---|---|
| Basic M365 Approvals & Lists | Microsoft 365 (Seeded License) | Allows building basic canvas apps and standard flows interacting exclusively with Office 365 data (SharePoint, Lists, Teams). |
| Vibe Apps & Full Dataverse | Power Apps Premium | Unlimited custom apps per user. Full access to premium connectors, standard Dataverse capacity, and advanced Copilot generation. |
| Pay-as-you-go Alternative | Azure Pay-as-you-go Plan | Active user billing via an Azure subscription for organizations avoiding upfront per-user commitments. Replaces the Per App plan. |
| Complex Flow Automation | Power Automate Premium | Required if the approval flows must connect to on-premises data, utilize premium 3rd-party API connectors, or use RPA. |
| Sandboxing & Learning | Power Apps Developer Plan | Free, individual environment. Provides full Dataverse and premium capabilities strictly for building and testing (cannot be shared). |
Warning: Managed Environments Compliance Enforcement Starting in June 2026, Microsoft enforces strict licensing compliance for Managed Environments. End users attempting to access applications routed through Managed Environments without an appropriate Premium or Pay-as-you-go license will receive blocking in-app notifications preventing usage. Administrators will begin receiving advance warnings and alerts in the Power Platform admin center and Microsoft 365 Message center starting in March 2026. Administrators must proactively review recommendations and assign licenses to prevent severe business disruption.
Briefing published by Collab365 Spaces. Cite as "2026 Update: Companion Guide to "How To Create Your First 3 Low-Code Apps"", Collab365 Spaces. 46 sources referenced.