The 2023 session 'Improve & Automate Employee Onboarding With The Power Platform' by Kelly Edinger provided a foundational blueprint for orchestrating HR processes using Microsoft 365. The architectural paradigms demonstrated in that session relied on classic SharePoint features and manual Power Automate configuration. The technological landscape has evolved significantly.
As of March 2026, Microsoft has retired or scheduled the immediate deprecation of several core legacy components, replacing them with modern, AI-integrated alternatives across the ecosystem.The current approach shifts from manual, click-heavy configuration to declarative, AI-driven generation. This document serves as the definitive 2026 companion guide, translating the original methodology into current enterprise best practices using modern tools, Copilot agents, and updated governance frameworks.
1. What's Changed Since This Session
The transition from 2023 to 2026 marks a hard cutoff for many legacy SharePoint functionalities. Organizations can no longer rely on older workflow engines or classic site structures for critical business operations like employee onboarding.
The table below summarizes the critical technological shifts relevant to the onboarding architecture.
| Technology from Session | Status in 2026 | What Replaced It |
|---|---|---|
| SharePoint Classic Task Lists | Retiring April 2026 | Microsoft Lists and Microsoft Planner |
| SharePoint 2013 Workflows | Retiring April 2026 | Power Automate Cloud Flows |
| SharePoint Alerts | Retiring July 2026 | SharePoint Rules and Power Automate |
| Manual Power Automate Canvas | Legacy Designer Deprecated | Power Automate Copilot Designer |
| Manual SharePoint List Creation | Legacy Process | Copilot List Agent via Natural Language |
| SharePoint Site Creation | Updated Interface | SharePoint Build (Preview) |
Critical 2026 SharePoint Feature Retirements
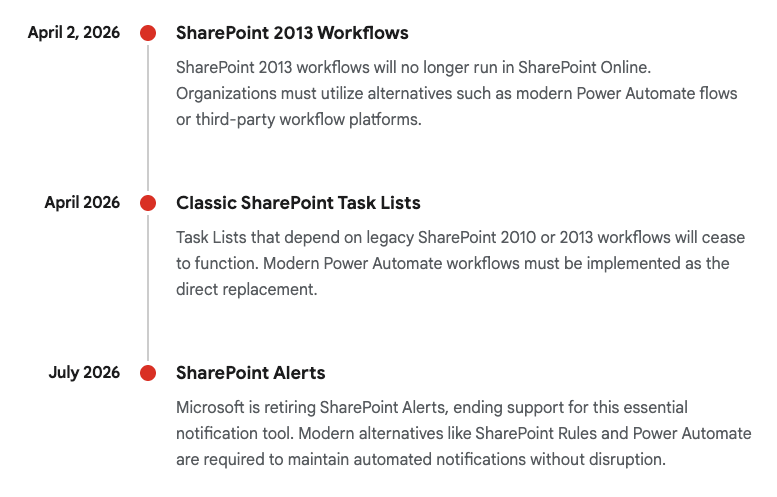
Deprecation schedule for legacy SharePoint components essential to the original 2023 onboarding architecture.
Data sources: Microsoft Community Hub, Steve Knutson Blog, VirtoSoftware
2. How to Build This Today
Create Three SharePoint Communication Sites
The session showed you Kelly create three SharePoint communication sites: a home site (register as hub site for intranet), HR site (for operations), and employee-facing site. Here's how you'd build that same thing today.
You saw Kelly create sites using the older SharePoint interface and backend administration panels. Today you'd do it using the new SharePoint Build preview experience. This modern interface dramatically streamlines collaboration and communication site provisioning, relying on unified templating rather than classic backend configuration.
The architectural choice to use Communication sites rather than Team sites remains correct for this scenario. Communication sites are optimized for broadcasting information to a broad audience without generating the underlying Microsoft 365 Group bloat associated with Team sites.The onboarding portal should act as a one-to-many communication vehicle.
Step-by-Step March 2026 Instructions:
- Access the SharePoint Build Interface: The site creator must sign in to Microsoft 365. In the top left corner, select the App Launcher (nine-dot icon) and navigate to the SharePoint tile.
- Initiate Creation: On the left-hand app bar of the modern SharePoint home page, select the Build node.This replaces the legacy "+ Create Site" dropdown.
- Start Building: Within the Start building section of the interface, click the Site card.
- Select Communication Site: The system prompts for a site type. Choose Communication site.It is highly recommended to review the detailed official documentation on this step via (https://support.microsoft.com/en-us/office/create-a-communication-site-in-sharepoint-7fb44b20-a72f-4d2c-9173-fc8f59ba50eb).
- Apply Templates: The interface presents available templates. For the HR operations site, select the "Department" template. For the employee-facing portal, select the "Topic" or "Showcase" template. Click Use template.
- Configure Identity & Compliance:
- Enter the Site Name (e.g., "Global HR Operations").
- Enter a robust Site Description to aid in Microsoft Search and Copilot indexing.
- Select the appropriate Sensitivity label (e.g., "Internal Use Only" or "Confidential"). This is a critical modern governance step that enforces Microsoft Purview compliance policies automatically, replacing legacy SharePoint information management policies.
- Finalize Initialization: Select the default language for the site and click Create site.Note that the default language cannot be altered post-creation.
- Repeat for Architecture: The administrator repeats steps 2-7 to provision the "Company Intranet Home" and the "New Employee Onboarding Portal".
Quick Win: Do not build pages from scratch. By leveraging the native SharePoint Build templates, the system instantly provisions pre-configured document libraries, news web parts, and metadata columns out-of-the-box. This reduces initial site wireframing time by over 80% and ensures mobile responsiveness by default.
Register the Home Site as a Hub Site
The session showed you Kelly register the home site as a hub site in SharePoint Admin Center for unified navigation. Here's how you'd build that same thing today.
You saw Kelly manually configure unified navigation links after setting up the hub. Today you'd do it utilizing the modernized SharePoint Admin Center, which handles the propagation of theming, search scopes, and mega-menus automatically across up to 2,000 hub sites.
The transition from deep, folder-based subsite hierarchies to flat, hub-and-spoke models is now a mandatory best practice. Hub sites connect disparate departmental sites under a single umbrella, ensuring that the HR Site and the Onboarding Portal share the same branding and navigation header as the Intranet Home site.
Step-by-Step March 2026 Instructions:
- Navigate to Admin Center: The SharePoint Administrator must access the (https://learn.microsoft.com/en-us/sharepoint/create-hub-site) via the main Microsoft 365 Admin Center interface.
- Access Active Sites: In the left navigation pane, click on Sites, then select the Active sites node.This dashboard displays the complete inventory of the tenant's flat site architecture.
- Select the Home Site: Locate the newly created "Company Intranet Home" communication site in the directory list and check the selection box next to it.
- Register the Hub: On the top command bar, locate and select the Hub dropdown menu. From the available options, select Register as hub site.
- Configure Hub Security and Settings:
- Enter a Display name for the hub site (e.g., "Contoso Global Hub").
- Specify the individual users or security groups allowed to associate other sites with this hub.
- Governance Warning: Leaving the People who can associate sites with this hub box empty permits any user in the organization to attach their sites to the hub. This creates massive governance sprawl and must be restricted to designated IT or HR administrators.
- Save the Registration: Click Save to initialize the hub capabilities.
- Associate Sub-Sites: Return to the Active sites list. Select the previously created "HR Site" and the "Employee-Facing Site". Click the Hub dropdown, choose Associate with a hub, select the newly registered "Company Intranet Home" hub, and click Save.This action instantly pushes the unified navigation header down to the associated departmental sites.
Quick Win: To ensure immediate visual consistency across the new intranet, navigate to the newly minted Hub Site's frontend. Click the Settings gear icon, select Hub site settings, and upload a corporate logo. You can choose to hide the hub site text name while displaying the logo, which provides the cleanest, most modern unified navigation bar across all connected departmental sites.
Build Configurable Onboarding Task Lists
The session showed you Kelly build SharePoint task lists to store configurable onboarding tasks, assignees (HR, operations, hiring managers, IT), email templates, and employee types (W-2 hourly, salaried, C2C, 1099). Here's how you'd build that same thing today.
You saw Kelly manually build out columns and metadata in a Classic SharePoint Task List. Today you'd do it using Microsoft Lists and the natural language capabilities of the Copilot List Agent.
This is the most critical architectural update in this guide. Microsoft officially retires Classic Task Lists and their underlying SharePoint Designer 2013 workflows in April 2026.Any onboarding solutions built on that legacy architecture will cease to function.The modern replacement relies on Microsoft Lists for the backend configuration data matrix and Microsoft Planner for frontline task execution.Furthermore, the manual creation of list schemas is obsolete; the process is now accelerated by AI.
Step-by-Step March 2026 Instructions:
- Access Microsoft Lists: The HR administrator navigates to the Microsoft Lists app, accessible via the Microsoft 365 app launcher or integrated directly within a dedicated Teams channel.
- Summon the Copilot Agent: Instead of clicking "New List" and spending hours manually adding and configuring columns, the developer utilizes the Copilot List Agent introduced to the ecosystem in Q1 2026.
- Prompt for Generation: In the Copilot chat interface, the builder uses natural language to describe the exact database schema required.The prompt must be highly specific regarding data types and choice arrays.
- Execute Prompt: "@SharePoint list agent, create an Employee Onboarding configuration list. It must include the following columns: 'Task Name' (Text), 'Assignee Department' (Choice: HR, Operations, Hiring Manager, IT), 'Email Template Link' (Hyperlink), and 'Employee Type' (Choice: W-2 Hourly, Salaried, C2C, 1099). Include a 'Status' column (Choice: Pending, In Progress, Complete)."
- Review and Refine the Schema: The Copilot Agent parses the prompt and instantly generates a visual preview of the structured list.The administrator must review the column types to ensure the 'Employee Type' field correctly captured the specific contract variations required for routing later in the workflow.
- Deploy to the HR Site: Once the schema preview is verified, the builder instructs Copilot to save the list directly to the secure "HR Site" created during the first scenario.
- Format Modern Views: To replicate the visual utility of older task lists without writing custom code, the builder configures modern View Formatting. Click the view dropdown (e.g., "All Items"), select Format current view, and apply conditional formatting rules. For instance, the UI can be set to highlight rows assigned to 'IT' with a blue background and 'HR' with a green background, enhancing scannability. Detailed instructions are available via (https://support.microsoft.com/en-us/office/introduction-to-lists-0a1c3ace-def0-44af-b225-cfa8d92c52d7).
Quick Win: The Copilot List Agent possesses implicit grounding capabilities and can read directly from uploaded documents.If the HR department already manages their complex onboarding task matrix in a legacy Word document or Excel spreadsheet, the administrator can simply upload the file and prompt: "@SharePoint list agent, convert the table in / into a new list." The agent will infer column types and choices, bypassing manual schema design entirely.
Modern task list generation architecture
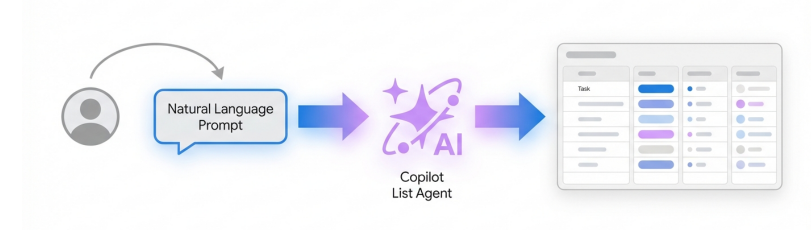
The 2026 onboarding architecture utilizes natural language prompts via the Copilot List Agent to instantly generate structured, compliant Microsoft Lists
Create Power Automate Flows Triggered by an Onboarding Form
The session showed you Kelly create Power Automate flows triggered by an onboarding form, which read SharePoint lists to dynamically assign tasks, send customized welcome emails, and handle variations by employee type without business users editing flows. Here's how you'd build that same thing today.
You saw Kelly construct this automation by dragging and dropping logical nodes across the classic Power Automate canvas. Today you'd do it utilizing the Power Automate Copilot Designer and the "Describe it to design it" methodology.
The Power Automate interface has undergone a massive modernization. The classic designer is effectively deprecated for new development. The modern environment abstracts away the manual placement of trigger loops and JSON parsing, allowing developers to orchestrate complex multi-system automations through conversational AI.
Step-by-Step March 2026 Instructions:
- Access the Copilot Designer: The workflow developer navigates to the Power Automate portal. On the Home tab, the primary interaction point is the Create your automation with Copilot natural language input field.
- Draft the Generation Prompt: The developer must structure a specific "Trigger-Action" format to instruct the AI accurately. The prompt must explicitly name the intended connectors (Microsoft Forms, SharePoint, and Outlook).
- Execute Prompt: "When a new response is submitted in Microsoft Forms, get the response details. Then, get items from the SharePoint Employee Onboarding configuration list. Add a condition to check the 'Employee Type' from the form response. Loop through the SharePoint items to find matching tasks, and send a customized welcome email to the form responder via Outlook."
- Generate and Review the Canvas: Click Generate. Copilot parses the intent and outputs a suggested flow structure. This structure will automatically include the necessary
Apply to eachloops and condition blocks required to handle the list array. - Confirm Connection References: Select Keep it and continue. The interface transitions to a connection verification screen. The developer must authenticate the connectors, ensuring green checkmarks appear next to Forms, SharePoint, and Outlook to grant the flow the necessary permissions.Click Create flow.
- Refine Logic via Copilot Pane: The generated flow opens in the new AI-powered designer canvas. Instead of clicking deeply into nested JSON arrays or writing complex manual expressions to handle the 'Employee Type' routing (e.g., differentiating between a W-2 and a 1099 contractor), the developer uses the persistent Copilot pane on the right side of the screen.
- Refinement Prompt: "Update the Condition action to route to the '1099 Email Template' link if the Employee Type equals '1099', otherwise route to the standard 'W-2 Email Template'." Copilot interprets this and applies the necessary dynamic content parameters automatically.
- Configure Target Identifiers: The developer clicks the trigger card on the visual canvas to open the left-hand configuration pane. From here, they select the specific HR Onboarding Form from the dropdown menu to bind the trigger to the correct data source. Further details are outlined in (https://learn.microsoft.com/en-us/power-automate/create-cloud-flow-using-copilot).
**Quick Win:**In the modern designer, developers no longer need to write complex OData filter queries manually to match the Form's 'Employee Type' against the massive SharePoint configuration list. Simply instruct the Copilot pane: "Filter the SharePoint 'Get Items' action to only return rows where Employee Type matches the form response." The AI agent will write the highly specific OData syntax and insert it into the action card seamlessly.
Test End-to-End Workflows and Ensure Maintainability
The session showed you Kelly testing end-to-end workflows, emphasizing maintainability with business-exposed SharePoint configs. Here's how you'd build that same thing today.
You saw Kelly establish backend configurations and rely on traditional alert mechanisms to notify HR when the reference lists were updated. Today you'd do it utilizing integrated AI troubleshooting tools and modern SharePoint Rules, completely bypassing legacy notification frameworks.
Maintaining workflows in 2026 demands adapting to the deprecation of classic notification systems. The classic "SharePoint Alerts" feature—a staple for business users tracking configuration changes—is officially retired and blocked from usage as of July 2026. Organizations must transition these notifications to modern mechanisms to ensure continuity.
Step-by-Step March 2026 Instructions:
- Execute Canvas Testing: Within the Power Automate Copilot Designer, the developer initiates a live run by clicking the Test button on the top command bar.
- Submit Live Test Data: The developer navigates to the frontend Microsoft Form, selects "C2C" as the employee type scenario, and submits a test onboarding request to trigger the automation.
- AI-Assisted Troubleshooting: If the flow run fails—for instance, due to a mapping error between the Form response array and the SharePoint list schema—the developer no longer needs to manually parse raw JSON output logs. Instead, they utilize the Troubleshoot in Copilot feature.By asking the Copilot pane "Why did this flow run fail?", the AI agent analyzes the telemetry, highlights the exact failing node on the canvas, and suggests a remediating fix in plain English.
- Replace Legacy Alerts with SharePoint Rules: Because classic SharePoint Alerts are retired, HR managers cannot use them to track unauthorized changes to the onboarding task lists. The developer must establish modern maintainability by training business users to implement SharePoint Rules.
- In the Microsoft List view, the HR manager clicks the Automate dropdown, selects Rules, and chooses Create a rule.
- They configure a declarative logic statement in the UI: "When a column changes -> Select 'Email Template Link' -> Send email to HR Operations."
This approach preserves the core philosophy of Kelly's original architecture: exposing maintainability directly to the business. HR can manage and monitor the lists via Rules without ever requiring IT intervention or needing to edit the underlying Power Automate flow logic.
Warning: Do not attempt to bypass the Alerts deprecation by building "custom scripts" or deeply embedded legacy workflows to handle list notifications. Modern SharePoint environments mandate that all file actions and queries log directly to the Microsoft Purview Unified Audit Log (UAL). Relying on classic scripts circumvents this auditable framework, which is a critical security violation for organizations operating in regulated industries (e.g., FedRAMP, ISO 27001).Stick strictly to modern SharePoint Rules or certified Power Automate cloud flows.
3. Licensing Quick Reference
Deploying this modern, Copilot-driven onboarding architecture requires careful alignment with 2026 Microsoft 365 licensing structures. The updated packaging models differentiate heavily based on AI capabilities and advanced compliance controls.
A significant architectural advantage of the solution described in this guide is that it explicitly avoids the need for standalone Premium connectors. Because the data orchestration occurs entirely within the Microsoft 365 ecosystem (Forms, SharePoint, Lists, and Outlook), the base workflow execution relies solely on Standard connectors.
The table below outlines the core enterprise licenses and how they apply to this specific Power Platform and SharePoint integration:
| License Tier | Capabilities Included for this Solution | Requirements / Limitations |
|---|---|---|
| Microsoft 365 Business Standard / Premium | Standard Power Automate use rights, Microsoft Lists access, and full SharePoint Communication Site creation. | Limits Power Automate execution to Standard Connectors only. Subject to transitionary limits (e.g., maximum 10,000 Power Platform Requests/day per flow). |
| Microsoft 365 E3 | Full access to enterprise SharePoint hub architectures, baseline Purview sensitivity labels for site governance, and Standard Power Automate rights. | The generative AI features (Copilot List Agent, Copilot in Power Automate) require a separate Microsoft 365 Copilot add-on license. Standard connector execution limits apply. |
| Microsoft 365 E5 | Everything in E3, plus advanced Purview compliance controls (automated labeling for onboarding data) and comprehensive threat protection. | The generative AI features require a separate Microsoft 365 Copilot add-on license. |
Strategic Licensing Context for 2026: The most critical takeaway for IT procurement is the distinction between workflow execution and workflow creation. The flow itself will run perfectly on the standard use rights included in an E3 or Business Premium license. No "Power Automate Premium" per-user or per-flow licenses are necessary unless the organization subsequently decides to integrate third-party premium HRIS systems (e.g., Workday, Salesforce) into the automation chain.
However, the rapid creation of this architecture—specifically utilizing the Copilot List Agent to generate schemas and the Copilot Designer to map the automation nodes via natural language—requires the developer to possess the Microsoft 365 Copilot add-on license. Organizations must ensure that the specific administrators and developers tasked with building the onboarding solution are provisioned with this add-on to utilize the AI capabilities detailed in this guide.
Briefing published by Collab365 Spaces. Cite as "2026 Update Companion Guide: Improve & Automate Employee Onboarding With The Power Platform", Collab365 Spaces. 8 sources referenced.