What's Changed Since This Session
| Technology | Status in March 2026 | What Replaced/Improved It |
|---|---|---|
| Start from Blank Canvas | Legacy Approach | Power Apps Plan Designer with collaborative AI agents. |
| Classic UI Controls | Phased Out / Legacy | Modern Controls (Fluent UI, responsive by default). |
| Adaptive Cards (in Canvas) | Replaced for most UI | Modern Card Control natively integrated into Canvas apps. |
| Component Logic Duplication | Obsolete | User Defined Functions (UDFs) and User Defined Types (UDTs). |
| String-Based Styling Properties | Deprecated | Typed Enums (e.g., Align.Center instead of "Center"). |
| TriggerOutput Property | Removed | OnChange Event now fires on 'focus out' for performance. |
| Legacy Dynamics Security UI | Retired | Modern PPAC Security Role Editor with 'Compact Grid View'. |
| Strict Record Ownership | Modernized | Matrix Data Access (Record ownership across business units). |
| Manual Dataverse Offline Setup | Automated | FetchXML Editor for offline Canvas app profiles. |
| Power Apps Per App Plan | End of Sale (Jan 2026) | Power Apps Premium or Pay-As-You-Go meter. |
How to Build This Today
Demo 1: Canvas App Connected Directly to Dataverse
Taylor demonstrated building a Canvas App connected directly to Dataverse to display and interact with product formulation data like ingredients, ratios, and test results. He started his session by opening a completely blank canvas screen. He then manually created his Dataverse tables, defined every column data type, and painstakingly mapped his forms and galleries to those backend data sources.
Today, you do not start from a blank screen. In March 2026, the standard architectural starting point is the Power Apps Plan Designer.
Plan Designer shifts application creation from manual component assembly to a solution-first, AI-driven process. You interact with specialized autonomous AI agents to generate the entire foundational architecture in minutes. This significantly reduces the time-to-value for complex enterprise solutions.
Instead of writing data schemas, you describe your business problem in natural language. The system provisions the backend and the frontend simultaneously.
Step-by-Step Instructions for March 2026:
Start your build process in the modern maker portal. Navigate to make.powerapps.com and ensure you are operating within your designated development environment.
On the Home screen, locate the primary action banner and select Start with a plan. Follow this by clicking the Create a plan button to initialize the AI-assisted workspace.
You will be presented with a prompt interface. Enter a detailed, natural language description of the formulation scenario.
Use this specific prompt structure to guide the AI: "R&D chemists need to build and review chemical formulations, adjust ingredient ratios, and log lab test results. Production managers need read-only access to approved formulas. Generate the data model, user roles, and necessary apps."
The Plan Designer workspace will open, revealing the presence of several AI assistants. The first entity to act is the Requirement Agent.
This agent analyzes your prompt and generates a structured, bulleted list of user requirements. Review these requirements directly in the interface, adding constraints such as "Formulations require manager approval before moving to production".
Next, the Data Agent takes over the architecture. It will automatically suggest a complete set of Dataverse tables required for storing your business information.
You will see recommendations for tables like Formulations, Ingredients, and Test Results. The agent automatically provisions the recommended columns, strict data types, and relational lookups between these tables.
Click directly into the suggested Formulations table within the Plan Designer UI. Verify that the Data Agent has included a status column utilizing a Choice data type (e.g., 'Draft', 'Testing', 'Approved').
If modifications are needed, you can edit the table definition inline using natural language. For example, instruct the agent to "Add a decimal column for specific gravity".
Following the data modeling phase, the Solution Agent begins its work. It evaluates the established requirements and the newly minted Dataverse schema to propose a holistic technological solution.
The agent will automatically generate a tailored Canvas app designed for your R&D chemists. Simultaneously, it will propose a Model-driven app optimized for your production managers who simply need to view approved data.
Review the proposed solution architecture. Once satisfied with the blueprint, click the Generate button.
The platform will now physically provision the Dataverse tables, build the application files, and link the data sources in the background.
Automated Solution Architecture via Plan Designer
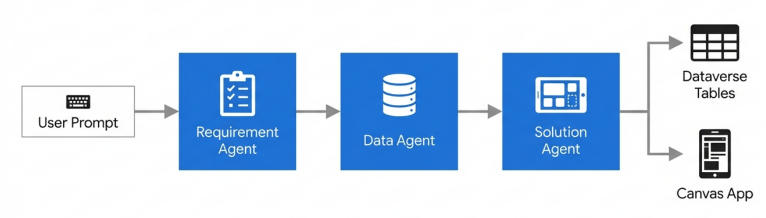
The Power App Designer utilizes three distinct AI Agents to transform a natural language description into a complex Dataverse schema and working application suite.
Once the automated generation is complete, navigate to your Solutions area and open your new Canvas app in Power Apps Studio. You will immediately find that Copilot has already wired your galleries, forms, and layout containers directly to the Dataverse tables.
This eliminates the tedious manual mapping Taylor performed in the original session. However, you will likely need to refine the data filtering logic for your specific formulation views.
Do not write complex Filter() or Search() formulas manually. In 2026, utilize the 'describe it to build it' formula generation features natively embedded within the Power Fx formula bar.
Select your formulation gallery, click on the Items property, and use a natural language comment. Type: /* filter formulations by just the ones where the status is approved and sort by date created highest first */.
Copilot understands the surrounding context of your Dataverse schema. It will instantly generate the correct nested Power Fx syntax, placing the Sort() function properly around the Filter() function.
Accept the suggestion, and the logic is applied flawlessly without hunting through documentation for syntax rules.
For the production managers using the generated Model-driven app, you must configure the new Microsoft 365 Copilot Chat feature, which reached public preview in early 2026.
This feature allows production managers to reason over in-app data using everyday language. Navigate to the app settings and explicitly enable Microsoft 365 Copilot chat for app users.
With this enabled, a manager can open a specific chemical formulation record and ask the chat pane, "Summarize the safety risks associated with these ingredients." The Copilot utilizes the latest GPT-5.2 models to analyze the specific Dataverse record and return an instant insight.
Furthermore, formulation data often needs to be accessed in environments with poor connectivity, such as factory floors or secure testing labs. You must configure real-time Dataverse access for offline-first Canvas apps.
As of the 2026 release wave 1, you can manage this efficiently. Navigate to the Power Platform admin center to create an offline profile.
Use the newly introduced FetchXML editor to strictly define which formulation columns and rows are downloaded to the mobile client. This ensures device storage is not overwhelmed by thousands of historical lab tests.
Quick Win: Testing a new formulation app is impossible without realistic data. Do not waste time manually building reference tables. Use the Data Agent in Plan Designer to automatically populate your Ingredients Dataverse table with sample chemical data. This allows you to immediately begin testing the UI layout and gallery logic without manual data entry.
For full documentation on these architectural starting points, refer to the official (https://learn.microsoft.com/en-us/power-apps/maker/plan-designer/create-plan).
Demo 2: UI Design with Intuitive Visual Elements
He showcased UI design with intuitive visual elements (charts, sliders, adaptive cards, card-based layouts) to minimize text overload and focus on dynamic formula builders for formulation reviews. Taylor spent significant time writing custom JSON code to embed Adaptive Cards into his Canvas app to achieve clean, responsive layouts.
Today, that approach is entirely obsolete. As of early 2026, Modern Controls are the mandatory foundation for Canvas apps.
The Modern Card Control natively replaces the need for Adaptive Card JSON in almost all layout scenarios.Modern controls automatically adapt to vertical or horizontal layouts and align seamlessly with Fluent UI design principles.
They include built-in responsive behaviors out of the box, eliminating the need to calculate Parent.Width or Parent.Height manually.
Furthermore, major updates in February 2026 fundamentally changed how properties are configured. You are now required to use strictly typed Enums rather than strings for styling, ensuring compile-time safety and better performance.
Step-by-Step Instructions for March 2026:
First, ensure Modern Controls are active in your environment. While they are enabled by default in new 2026 apps, you must verify this if you are modernizing an older solution.
Navigate to the upper-right corner of Power Apps Studio and click the gear icon to open Settings. Select the General tab, scroll down, and toggle on Modern controls and themes.
Identify and delete any legacy classic controls or Adaptive Card viewer components from your formulation review screen. These older controls lack the performance optimizations of the new rendering pipeline.
To build the formulation review summary, utilize the new native card architecture. From the top command bar, click Insert > Modern > Card (preview).
Bind the newly inserted Modern Card control directly to your Formulations Dataverse record. The Card control inherently understands its underlying data context.
Configure the internal sections of the card using the right-hand properties pane. Map your Dataverse Formula Name field to the Card's Title property. Map the Status field to the Badge property.
You will notice the Card automatically adapts its layout based on the screen size of the device viewing it. This responsive scaling requires zero manual configuration from the maker.
UI Evolution: Adaptive Cards vs. Modern Card Control
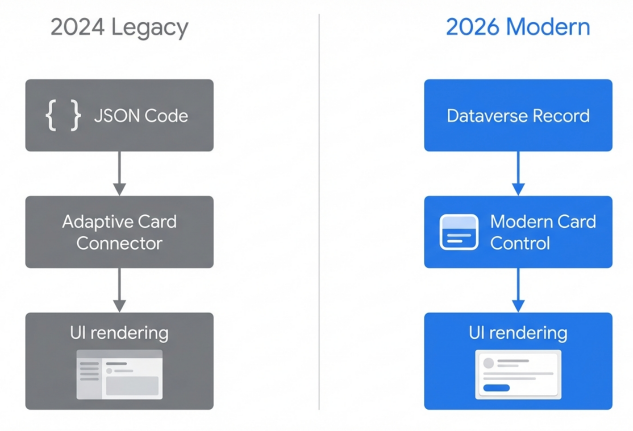
The 2026 Modern Card Control eliminates the need for masnual JSON authoring and third-party connector configurations, providing a native, drag and drop responsive layout experience.
To build the interactive dynamic formula builder—where chemists adjust exact ingredient ratios—you must implement the updated 2026 input controls.
From the command bar, click Insert > Modern > Slider for adjusting coarse ingredient percentages. Position this adjacent to your chemical list.
For precise lab measurements, click Insert > Modern > Number Input.
Critical Configuration Change: You must update your real-time data handling logic. The TriggerOutput property for the Number Input control has been entirely removed in the February 2026 update.
Furthermore, the OnChange event for these inputs now strictly fires on "focus out" (blur) rather than on every individual keystroke. This fundamentally improves app performance by reducing unnecessary parallel queries to Dataverse, but requires you to adapt any formulas relying on instant, keystroke-by-keystroke calculations.
If your chemists need to select chemical compounds from a massive Dataverse table, insert the Modern Combo Box. The early 2026 update radically improved this specific control.
The legacy version had a practical limit of around 800 items, forcing makers into complex workarounds. The updated control now natively handles several thousand items directly.
Utilize the newly exposed SearchText output property on the Combo Box to enable server-side filtering. This allows the control to scale to enterprise-level data without triggering delegation warnings.
Selections in the modern Combo Box can now be cleared simply by clicking a selected item, fully supporting proper multi-select patterns.
Finally, you must systematically update your styling formulas across the application. The 2026 framework mandates the use of Enum patterns instead of plain strings.
If you have logic setting alignment, you must now type Align.Center instead of "Center".
Change any historical references from FontColor to simply Color.Adjust weight properties from "Bold" to the typed FontWeight.Bold. Ensure all error states leverage ValidationState.Error.
Quick Win: When migrating Taylor's old app, do not manually replace every control. Look for the notification banner on older controls. Select the Learn more link on the control, identify any formulas using deprecated properties (like DisplayMode), and click the Update button to automatically upgrade the control to the February 2026 architecture.
For a complete reference of Enum properties and the updated control set, consult the official Modern Controls updates documentation.
Demo 3: Reusable Components in Canvas Apps
Taylor created reusable components in Canvas Apps for common UI patterns, such as ingredient selectors, measurement units, and compliance checkers. In the past, makers relied heavily on Component Libraries and complex custom properties to share logic across screens.
Today, you handle reusable logic primarily through User Defined Functions (UDFs) and User Defined Types (UDTs).
As of the 2508.3 version update, these features have officially reached General Availability (GA) and are fully ready for production workloads. The legacy experimental switches have been removed.
UDFs allow you to extract common mathematical, validation, or formatting logic into a single, centralized formula. This dramatically reduces code duplication across your app, ensures a single source of truth, and significantly improves Studio load times.
UDTs elevate this further by allowing you to define rigid schemas for records or tables passed into those functions, bringing enterprise-grade type safety to Power Fx.
Step-by-Step Instructions for March 2026:
First, establish the global location for your reusable logic. Navigate to the Tree view panel on the left side of Power Apps Studio.
Select the App object located at the very top of the hierarchy. In the formula bar, select the Formulas property from the dropdown menu. This specific property is where all UDFs and UDTs must be globally defined.
Before defining a function, you should create a User Defined Type (UDT). UDTs allow you to define a strict data structure for the parameters your function will accept.
For the formulation app, define an ingredient structure. In the App.Formulas bar, type the following syntax exactly: IngredientType = Type({ Name: Text, ToxicityLevel: Number, MaxAllowedRatio: Number });.
Next, define your User Defined Function (UDF). We will create a compliance checker that calculates if a specific chemical addition exceeds safety ratios.
Below your UDT definition in the App.Formulas bar, type the following declarative UDF: CheckCompliance( ingredient: IngredientType, proposedRatio: Number ): Boolean = proposedRatio <= ingredient.MaxAllowedRatio;.
You have now established a globally reusable, strongly-typed function. It isolated the compliance logic away from the UI controls.
To use this function, navigate to your dynamic formula builder screen. Select your Modern Card or Label control that acts as the compliance status indicator.
In the Text property of that label, call the UDF directly using standard Power Fx. Type: If( CheckCompliance( CurrentIngredientRecord, Slider1.Value ), "Compliant", "Safety Violation" ).
As the chemist moves the slider, the UDF automatically recalculates the compliance status in real-time.
In 2026, UDFs are no longer strictly declarative. You can now execute "side effects"—such as updating global variables, collecting data, or patching databases—by implementing Behavior UDFs.
This represents a massive architectural shift for Power Apps.
Back in the App.Formulas property, create a reusable submission function that alters backend data. You must wrap the execution logic in curly braces {} to designate it as behavioral.
Type the following syntax: SubmitFormula( formulaId: Text ) : Void = { Patch(Formulations, LookUp(Formulations, ID = formulaId), {Status: "Testing"}); Notify("Formula sent to lab for analysis."); };.
Notice the function returns a Void type, as it does not calculate a value but rather performs an action.
To trigger this action, navigate to your 'Submit for Review' modern button. Set the OnSelect property simply to: SubmitFormula( Gallery1.Selected.ID ).
This abstracts the complex Patch logic away from the button, making the app much easier to maintain and test.
Warning: Do not attempt to use behavior functions like Trace(), Patch(), or Set() inside a standard declarative UDF. You must wrap the entire formula expression inside { } to convert it into a Behavior UDF. Declarative is always better for performance, so only use the {} syntax when side effects are strictly necessary.
For extensive examples of this syntax, consult the official (https://www.microsoft.com/en-us/power-platform/blog/power-apps/power-apps-user-defined-functions-ga/).
Demo 4: Data Separation in Dataverse
He implemented data separation in Dataverse using security roles and row-level permissions so the same app serves confidential R&D formulation data privately while sharing summaries with production teams. Taylor likely navigated the legacy, clunky Dynamics 365 security interface to achieve this, relying on static organizational hierarchies.
Today, managing Row-Level Security (RLS) and complex matrix permissions is executed entirely within the modernized Power Platform Admin Center (PPAC) UI.
The legacy web client interface has been officially retired. Furthermore, you can now leverage Matrix Data Access (Record ownership across business units).
This preview-to-GA capability allows production managers to sit in an entirely different operational business unit than the R&D chemists, yet still securely access specific, approved formulation records without resorting to fragile team-sharing workarounds or complex access teams.
Step-by-Step Instructions for March 2026:
First, you must enable the modern architecture for cross-department data sharing at the environment level.
Open a new browser tab and navigate directly to admin.powerplatform.microsoft.com.
In the left-hand navigation pane, select Environments and click on the name of your specific production environment.
Locate and click Settings on the top command bar. Under the expanded menu, navigate to Product > Features.
Scroll down to locate the toggle for Record ownership across business units and ensure it is turned On. Click Save to apply this foundational change.
Next, utilize the new Security Roles interface to explicitly define your R&D and Production personas.
Still within the Environment Settings page, select Users + permissions > Security roles.
You will immediately notice the streamlined 2026 interface. Click New role to start fresh, or select an existing role (e.g., 'R&D Chemist') and click the three dots (...) to select Edit.
This action opens the new Security Role editor directly within PPAC. Toggle the Compact Grid View switch located on the top right of the screen.
This specific feature removes unnecessary whitespace, allowing you to view and manage permissions across hundreds of Dataverse tables highly efficiently.
Use the new Keyword Search bar above the grid to quickly locate your custom Formulations table.
Use the interactive drop-down menus directly within the grid cells to configure access. The confusing legacy pie-chart circles are gone.
For the 'R&D Chemist' role, set the Read, Write, and Create drop-downs to Organization (Full Access). This ensures all chemists across the company can collaborate freely on any draft.
Save the role. Now, repeat the process to create a 'Production Manager' role.
Locate the Formulations table again. Use the preset permission settings to restrict Write and Create entirely by selecting None.
Set the Read permission drop-down to Business Unit or Private, depending on how restrictive your Matrix Data Access model needs to be.
Modernized PPAC Security Role Editor
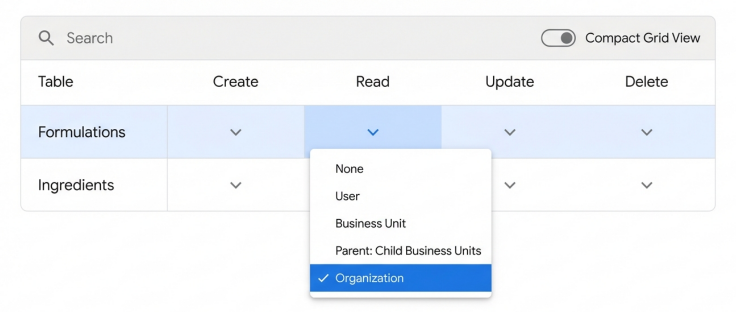
The 2026 PPAC interface introduces a searchable Compact Grid View, allowing administrators to configure table-level permissions via intuitive drop down menus rather than legacy visual indicators.
Finally, you must apply these configured roles to your actual users.
Navigate back to the main Security roles list within PPAC. Select the 'R&D Chemist' role and click Add people located in the command bar.
A side pane will appear. Search for your chemists via their Microsoft Entra ID name or email address, select them, and click Add.Repeat this process for the managers.
Because we enabled Matrix Data Access at the environment level, Dataverse will automatically enforce these Row-Level Security rules deeply across the underlying APIs.
When a Production Manager logs into the exact same Canvas app as a Chemist, the Dataverse connector will filter out unauthorized draft formulations securely at the server level. The data never reaches the device, ensuring strict compliance without writing custom filtering code in the app itself.
Warning: Always enforce the principle of least privilege. Do not grant 'Organization' level delete rights to custom tables unless absolutely critical to the business process. Rely on the pre-defined drop-down presets in the new UI to ensure consistent permission application and prevent accidental data loss.
For detailed guidance on navigating the modern interface, review the (https://learn.microsoft.com/en-us/power-platform/admin/security-roles-privileges).
Licensing Quick Reference
| License / Capability | Requirement for this Solution | Notes for 2026 |
|---|---|---|
| Power Apps Premium | Required for standard users. | Equips users to run unlimited custom apps connected directly to Dataverse. This replaces the old 'per user' naming convention. |
| Power Apps per app plan | Dead / Retired | Official end-of-sale was January 2026. Do not design application architectures assuming this specific prepaid tier still exists. |
| Pay-As-You-Go Meter | Alternative to Premium. | Best for casual or infrequent users (e.g., a manager approving a formula once a month). Billed dynamically via an Azure subscription meter. |
| Microsoft 365 Copilot Premium | Required for advanced AI features. | Necessary if you wish to expose advanced generative AI features (like GPT-5.2 chat or custom Claude agents) directly to end-users inside the model-driven app interface. |
| Power Automate Premium | Optional extension. | Only required if you implement advanced backend automation workflows extending beyond standard Dataverse actions, or require Process Mining to analyze formulation bottlenecks. |
Briefing published by Collab365 Spaces. Cite as "2026 Update: Building the 'Product Formulation' App Today", Collab365 Spaces. 10 sources referenced.