
Welcome to the 2026 update for Paul Stork’s foundational session on Microsoft Power Automate Copilot. The technological landscape has shifted dramatically since that presentation in mid-2024. Microsoft has moved Copilot from a conversational sidekick to a deeply integrated, agentic orchestrator.
You saw Paul demonstrate early AI generation and basic conversational flow editing using initial language models. Today, the Power Automate interface is entirely rebuilt around AI-first principles. We now deal with sophisticated capabilities like "Computer Use" agents, self-healing UI selectors, and a fully modular "New Designer" experience.
This document is your definitive, step-by-step guide to translating the concepts from Paul's session into the realities of March 2026. Think of this as your senior consultant's debrief on the current state of automation. We will walk through exactly how to build, edit, summarize, and automate using the tools available to you right now.
You must abandon the legacy interfaces and fragile screen-recording tools you learned previously. This guide will equip you to leverage the modern AI architecture seamlessly.
1. What's Changed Since This Session
The evolution of Power Automate over the last two years has been characterized by the deprecation of rigid legacy features. These have been replaced by resilient, AI-native architectures. The table below provides a quick orientation on what has shifted since the original session.
| Technology / Feature (2024) | Status in March 2026 | What Replaced It |
|---|---|---|
| "Record with Copilot" (PAD) | Deprecated | Copilot Studio "Computer Use" Agents |
| Classic Cloud Flow Designer | Phased Out / Legacy | The "New Designer" (AI-Powered UI) |
| Inline Action Configuration | Removed | Left-Mounted Configuration Pane |
| Strict UI Selectors (Desktop) | Upgraded | AI Self-Healing Selectors |
| Per Flow Licensing ($500/mo) | Restructured | Power Automate Process License ($150/bot) |
| Manual Error Troubleshooting | Enhanced | "Troubleshoot in Copilot" Pane |
The most disruptive change is the complete removal of the "Record with Copilot" feature within Power Automate Desktop. You can no longer rely on screen recording to generate desktop flows. This fragile methodology has been superseded by visually aware AI models executing tasks autonomously.
Furthermore, the classic cloud flow designer is no longer the standard. The "New Designer" is mandatory for accessing advanced Copilot features. This new interface separates the visual canvas from the configuration data, requiring a fundamental shift in how you navigate and build automations.
Finally, the licensing model has been overhauled to reflect the reality of enterprise-scale AI bots. You no longer purchase arbitrary "Per Flow" bundles. Instead, you must license individual automated processes based on their execution location and capacity needs.
Quick Win: Do not waste time looking for the "Record with Copilot" button in Power Automate Desktop. It is completely gone. Desktop automation has fundamentally shifted toward generative UI interaction via Microsoft Copilot Studio. We will cover this extensively in Demo 4.
2. How to Build This Today
This section comprises the core of our updated methodology. You saw Paul Stork perform four primary demonstrations during his session. We are going to break down exactly how you execute those same four scenarios using the March 2026 toolset.
Demo 1: Creating a Complete Cloud Flow from a Natural Language Description
The session showed Paul Stork describing a scenario in plain English to generate a flow, with Copilot auto-setting connections and parameters. Here is how you build that same thing today in March 2026.
The fundamental concept remains the same, but the underlying model and interface are vastly superior. We no longer rely on early-stage OpenAI Codex models for simple text translation. The 2026 system utilizes advanced Azure OpenAI multimodal models capable of complex parameter mapping and logic branching.
Initiate the "Describe it to design it" Interface
Start your build process by signing into the main Power Automate portal at make.powerautomate.com. You must ensure that you have Home selected on the left-hand navigation menu.
Look for the prominent text field labeled Create your automation with Copilot located centrally on the screen. This is your starting point for all generative builds. Do not navigate to the "Templates" section if you intend to use AI generation, as templates rely on rigid pre-configurations.
As you click into this field, Copilot will immediately begin suggesting prompt frameworks based on your historical usage. You can ignore these and type your specific requirements directly into the box.
Engineer the Prompt
You must structure your prompt effectively to get usable results. The AI thrives on the specific "When X happens, do Y" format. Do not be vague or conversational here.
Instead of typing a generic phrase like "Make an approval flow for SharePoint," you need to be highly specific regarding your data sources. Type: "When a new item is created in the 'Contoso Hardware' SharePoint list, send an approval email to the line manager, and post the outcome to the 'Operations' Teams channel". Explicitly naming the connectors (SharePoint, Teams, Approvals) drastically improves the initial structural output.
The Iterative Prompting Loop
Best practice dictates iterating on the prompt within the Copilot dialog before transitioning to the design canvas. You must review the initial structure presented by the AI immediately after you click Generate.
If the logic looks flawed, do not accept the flow and attempt to fix it manually on the canvas. Instead, enter clarifying instructions into the Add more details for Copilot to work with box and hit the right arrow to regenerate. You must repeat this cyclical loop—reviewing the structure, adding details, and regenerating—until the logic is flawless. Once accurate, select Keep it and continue.
The Connection Verification Gateway
Before you hit the canvas, you will face the connection verification screen. This is a critical governance check designed to ensure seamless execution.
Review the connected apps and services listed on your screen. You are looking for a green checkmark next to each individual connector. A red exclamation mark means the connection requires your authorization or is fundamentally broken. You must click the connection and authenticate with your current credentials before proceeding to the designer.
Enter the Designer and Save
Once your connections are verified, select Create flow. You will immediately enter the "New Designer" interface, which is the 2026 standard.
The system now features built-in Designer Resiliency. If your browser crashes or you accidentally close the tab, the designer automatically saves a copy of your progress to your local browser storage. Upon returning, a banner will prompt you to recover your unsaved work.
However, it is always best practice to manually secure your work. Look at the command bar at the top of the screen. If this is a standard flow, click the Save button.
Quick Win: Always use the Save draft button when building complex solution-aware flows. This specific button allows you to save your progress even if the flow currently contains logic errors, preventing you from losing work while troubleshooting incomplete actions.
Understanding Unsupported Triggers
While Copilot can generate most standard flows, you must be aware of its current limitations. Some specialized triggers cannot be generated or edited within the New Designer as of early 2026.
If your flow relies on Business process flows within Dataverse, Microsoft 365 Compliance triggers, or Power Pages calls, the generation will fail. You must build these specific automations manually using the classic interface.
Similarly, flows that use direct connections instead of solution-aware connection references must be exported and re-imported before Copilot can effectively edit them. Ensure your environment utilizes modern connection references for all enterprise builds.
Demo 2: Editing an Existing Flow
The session showed Paul Stork using natural language to add actions, replace actions, remove actions, or update parameters/dynamic content in the flow. Here is how you build that same thing today in March 2026.
The editing experience has been completely overhauled since Paul's session. You are now working within the "New Designer," which relies heavily on a right-hand Copilot pane and a left-hand Configuration pane. The days of large, expanding inline action cards that clutter your screen are over.
Navigating the New Canvas
When you open an existing flow, you will notice the action cards on the canvas are much more compact. This visual compression allows you to view massive enterprise flows without endless vertical scrolling.
If you prefer to build manually alongside Copilot, look for the blue dashed lines between actions. These are AI-Powered Drop Zones. You can easily drag and drop new actions into these precise locations without breaking the flow logic.
For navigation, use the tools located in the bottom-left corner. You have a Minimap for bird's-eye navigation of exceptionally large flows, alongside standard zoom and fit-to-view controls. You can also use the integrated search feature to find specific operations hidden deep within nested conditions.
The 2026 "New Designer" UI Architecture
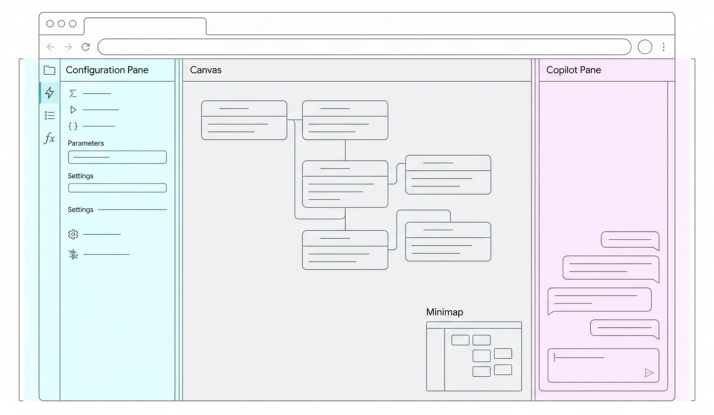
The modern interface compartmentalizes tasks: configuration lives on the left, the visual canvas in the center, and the AI assistant on the right.
Using the Right-Side Copilot Pane
To edit via natural language, you will use the Copilot pane pinned to the right side of your screen. This AI assistant stays active throughout your entire editing session.
You can issue direct commands to manipulate the structural canvas. Try typing: "Delete the 'Get items' action" or "Instead of sending an email, post a message to the Teams channel". Copilot will actively swap the connectors on the canvas.
Crucially, Copilot attempts to map the existing dynamic content into the new action automatically. If you replace an Outlook email step with a Teams message step, it will try to carry over the 'Subject' and 'Body' variables so you do not have to rebuild the parameter logic.
Mastering the Left-Side Configuration Pane
When you click on any compact action card on the canvas, the Configuration Pane slides out from the left side of your screen. This is where all manual fine-tuning happens. It is divided into four main functional tabs.
First is the Parameters tab. This is where you map your incoming data. Look for the lightning bolt icon to insert dynamic content from previous steps, and the fx icon to insert complex expressions.
Second is the Settings tab, which handles execution logic. Here you configure Action Timeouts, Retry Policies (including custom exponential or fixed intervals), and your Run After conditions. You also configure secure inputs and outputs here to hide sensitive data from the run history logs.
Third is the Code View tab. Select this to instantly see the raw JSON code behind the specific action card without having to export the entire flow.
Fourth is the Testing tab. This houses the crucial Enable Static Result feature. This allows you to mock a success or failure state for testing purposes without actually firing the action or altering production data.
Side-by-Side Comparison with Pinning
A major pain point in the classic designer was the inability to easily copy data between two similar actions. The new designer solves this workflow bottleneck entirely with the Pin action feature.
Right-click any action card on the canvas and select Pin action from the context menu. Its configuration pane will lock permanently to the left side of your screen.
Now, click a second action on the canvas. A second configuration pane will open directly to the right of the pinned one. You can now compare parameters side-by-side or seamlessly copy and paste values between them. To unpin, simply right-click the canvas card again and select Unpin action.
Updating Parameters and Expressions
Writing complex string manipulations or logical expressions manually can be tedious. You can utilize the multi-line expression editor within the Parameters tab, which now features a convenient "gripper" tool to expand it to a full-page view for complex logic.
If you are struggling with standard Workflow Definition Language syntax, leverage the Copilot pane. You can ask Copilot to explain specific workflow functions and how to format them.
For instance, you can use the specialized @workflow() function to retrieve dynamic environment tags. You can formulate an expression like workflow()['tags']['environmentName'] to automatically embed dynamic flow URLs directly into your email notifications. Copilot can guide you on formatting these inline functions using the required curly brace {} syntax to avoid JSON parsing errors.
Copying Container Actions
The 2026 designer fully supports the duplication of complex logic blocks. You can right-click to copy and paste not just atomic actions like Compose, but entire container actions like Scope or Condition.
Keyboard shortcuts (Ctrl+C and Ctrl+V) are fully supported for rapid development. This allows you to build a complex error-handling scope once and paste it across multiple branches of your workflow instantly.
Quick Win: Do not rely on your browser's standard "Back" button to exit the designer. Always use the specific Back arrow located in the top-left corner of the Power Automate title bar to safely return to the flow details page without corrupting your active session state.
Demo 3: Summarizing and Explaining Flows/Actions
The session showed Paul Stork asking Copilot to describe what an individual action or the entire flow does, primarily for documentation. Here is how you build that same thing today in March 2026.
Documentation, auditing, and debugging have transitioned from manual chores to automated outputs. Copilot now acts as a live technical writer and diagnostic engineer for your automations.
Generating Human-Readable Summaries
To understand a massive legacy flow or an automation built by a departed colleague, open the flow in the New Designer. In the right-hand Copilot pane, type the direct prompt: "What does my flow do?".
Copilot will deeply analyze the triggers, actions, and underlying JSON architecture. It will return a highly readable, bulleted summary of the flow's exact business purpose, data routing, and conditional logic. You can copy this output directly into your internal wiki, compliance documentation, or handover notes.
You can also ask Copilot to draft a standardized flow description. When editing the flow's details on the main properties page, Copilot can automatically suggest a concise description based on its structural analysis. This ensures your organization's flow inventory remains easily searchable and well-documented.
The "Troubleshoot in Copilot" Feature
Copilot's explanation capabilities extend far beyond basic documentation; they are now your primary debugging and resolution tool. If a flow fails in production, navigate to the 28-day run history panel on the flow details page and open the failed run.
You no longer have to decipher cryptic JSON error codes or comb through nested raw inputs. The Troubleshoot in Copilot feature will automatically intercept the error state. It provides a human-readable summary explaining exactly why the failure occurred in plain English.
More importantly, it proactively proposes actionable solutions. If a SharePoint column is missing, Copilot will tell you to recreate it. If an integer data type mismatched with a string input, it will identify the exact parameter causing the crash. Because this diagnostic engine relies on machine learning, its accuracy improves constantly based on tenant-wide telemetry and resolution patterns.
Warning: The troubleshoot feature relies on Copilot analyzing the active state of your data sources. If you alter an underlying data source (like adding a new column to a SharePoint list or Excel table), the flow designer will not instantly see it. You must delete the relevant "Get item" action and re-add it to force the designer to fetch the latest schema updates before troubleshooting.
Process Mining Insights
Beyond individual flow execution, Copilot now explains macro-level process performance. If you utilize the Process Mining capabilities, Copilot can analyze your entire operational workflow.
You can ask Copilot to generate process insights through natural language. Copilot will take the ingested event log data and easily summarize findings quantitatively and qualitatively. It will highlight bottlenecks, suggest where new automated flows should be deployed, and quantify the time savings delivered by your existing automations.
This elevates Copilot from a flow-building assistant to a strategic automation advisor. You can use these AI-generated insights to justify further investment in Power Automate licensing or to target specific departments for digital transformation.
Demo 4: Overview of Copilot Support in Power Automate Desktop
The session provided an overview of Copilot support in Power Automate Desktop (PAD), specifically focusing on natural language desktop recording. Here is how you build that same thing today in March 2026.
This is the area where the most aggressive architectural changes have occurred in the entire Power Platform. The "Record with Copilot" feature you saw demonstrated in 2024 is officially deprecated.
Microsoft realized that screen recording generates rigid, fragile automations that break the moment a website updates its CSS or an application alters its UI. The 2026 paradigm has shifted entirely from "recording static actions" to "instructing dynamic agents". You will now use Microsoft Copilot Studio to deploy "Computer Use" agents.
The End of "Record with Copilot"
Do not attempt to use or locate the legacy AI recorder. It has been stripped from modern builds. Desktop automation is no longer about capturing precise mouse clicks and X/Y coordinates; it is about providing a Large Language Model (LLM) with visual access to a desktop and letting it decide how to navigate.
If you find legacy documentation referencing the AI recorder, disregard it. Your focus must shift entirely to the agentic orchestration model provided by Copilot Studio.
The Evolution of Desktop Automation: 2024 vs. 2026
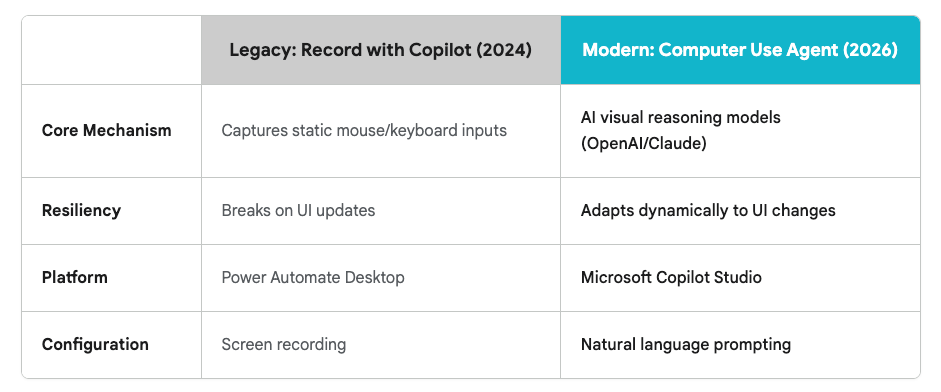
Microsoft has abandoned fragile screen recording in favor of resilient, visually-aware AI agents capable of autonomous navigation.
Data sources: Microsoft Docs (AI Recorder), Microsoft Docs (Computer Use), Microsoft Docs (Configure Computer Use Runs), Microsoft Docs (Self-Healing)
Deploying a "Computer Use" Agent
To automate a legacy desktop application or a web portal lacking an API, you must navigate away from the Power Automate client and log into Microsoft Copilot Studio. Ensure your environment region is set to the United States and that the generative orchestrator feature is enabled by your tenant admin.
Navigate to the Tools section of your agent and select Add tool. Choose New tool, and then critically, select Computer use.
You must define the visual reasoning model. You can choose between OpenAI’s Computer-Using Agent or Anthropic’s Claude Sonnet 4.5. Claude currently excels at interpreting complex, dense graphical interfaces. Ensure your administrator has enabled external models if you intend to use Anthropic's engine.
Next, draft your instructions. Provide detailed natural language instructions describing the task. For example: "Open the internal HR app, navigate to 'Pending Leave', and extract all rows into a structured JSON array." You must be highly specific regarding application names and exact URLs for the agent to succeed.
Configuring the Target Machine Infrastructure
The Copilot Studio agent needs a physical or virtual machine to actually execute these visual tasks. You have two primary deployment models to choose from.
The first is the Hosted Browser / Hosted Machine option. This is fast for testing and isolated workloads, but requires your tenant to possess Power Automate Hosted Process capacity.
The second, and more common for enterprise, is the Bring-Your-Own-Machine (BYOM) model. You can register your own managed Windows machines to the environment. You must install Power Automate for desktop version 2.61.132.25266 or later. You must also install the Power Automate web extensions to allow browser interaction. Finally, navigate to the machine settings within the Power Automate portal and toggle Enable for computer use.
Security and Human Supervision
Because Computer Use agents act autonomously and control a virtual mouse and keyboard, strict security protocols are paramount. You must configure credential routing carefully.
For autonomous background tasks, use Maker-provided credentials. You should leverage Azure Key Vault to securely pass passwords to the agent without exposing them in plain text. Do not use internal storage for highly sensitive production systems.
You can restrict the agent's operating scope to explicitly allowed websites (e.g., *.contoso.com) and specific desktop applications (e.g., msedge.exe) to prevent unauthorized browsing or data exfiltration.
Furthermore, you can assign a human reviewer. The agent will pause its execution and email the designated reviewer if it encounters potentially harmful instructions or ambiguous UI states. If unapproved within the specified time limit, the run terminates safely.
The Fallback: AI Self-Healing Selectors in PAD
If your organization still maintains traditional, step-based Power Automate Desktop flows, you are not entirely left behind. You can benefit from the new Self-healing (preview) capability integrated into PAD.
Historically, if a website updated its CSS or a button changed its internal ID, your rigid PAD flow would crash immediately because it could not find the exact UI element. Now, you can open the Error handling settings for any UI or browser automation action in the flow designer.
Turn on the Self-healing (Preview) toggle. If the exact element is missing at runtime, the AI agent will automatically pause the flow, visually analyze the screen, identify the most likely alternative element, and continue the flow execution. This dramatically reduces maintenance overhead for legacy RPA deployments.
Quick Win: Use the new Copilot Studio Computer Use agents for unstructured, highly variable UIs where decision-making is required. Rely on traditional Power Automate Desktop flows (with self-healing enabled) only for high-speed, highly predictable legacy application tasks where execution speed is the primary metric.
3. Licensing Quick Reference
As the platform has shifted heavily toward AI agents, computer vision models, and enterprise-wide orchestration, the licensing structure has been significantly overhauled to reflect capacity and API consumption. Understanding these new tiers is crucial before deploying your Copilot solutions to production.
The legacy "Per Flow" model—which charged $500 per month for a minimum bundle of 5 flows—has been completely retired. The distinction between user-driven cloud flows and autonomous, unattended enterprise bots is now strictly enforced through dedicated licensing tiers.
The table below outlines the primary licensing pathways for Power Automate as of March 2026.
| License Type | Price (March 2026) | Best Use Case | Key Features & Limits Included |
|---|---|---|---|
| Power Automate Free / M365 Seeded | Included with M365 | Basic, personal productivity automation. | Standard connectors only (SharePoint, Outlook). No premium connectors. 750 run limit. |
| Power Automate Premium | $15 / user / month | Individual developers and small team automations. | Unlimited cloud flows, Premium connectors (Dataverse, SQL), Attended RPA, 5,000 AI credits, 40k daily API requests. |
| Power Automate Process | $150 / bot / month | Enterprise-wide, cross-departmental unattended automations. | Unattended RPA bots, Shared organization flows. Replaces legacy "Per Flow" minimums. 250k daily API requests. |
| Hosted Process | $215 / bot / month | High-demand enterprise cloud automation. | Includes Microsoft-managed virtual machines for massive unattended scaling. |
Important Considerations for 2026 Deployments:
The Premium Connector Paywall The moment your flow requires a connection to a non-Microsoft system—such as Salesforce, SAP, ServiceNow, or a custom SQL Server—you must upgrade from the seeded M365 plan to a paid tier. Furthermore, utilizing Dataverse beyond a basic default environment immediately triggers the requirement for a Premium license. Do not attempt to build enterprise integration architectures on the free tier.
The "Process" License Shift The licensing paradigm has shifted from "who built it" to "how it is used." If a flow is built by one individual but serves the entire company (for example, a global expense approval system handling hundreds of requests), it must be licensed with a Power Automate Process license. Premium licenses are strictly meant for individual user contexts and attended desktop operations. Assigning a Premium license to a service account to bypass Process licensing violates compliance terms and will be flagged by the new tenant-level usage dashboards.
Computer Use Billing and Copilot Credits Executing actions via the new Copilot Studio "Computer Use" agents introduces a new billing mechanism. These agents do not run on traditional flow runs. Instead, they consume Copilot Credits. Currently, each autonomous "step" the AI takes—such as launching a browser, reading a screen state, or filling a form field—consumes 5 Copilot Credits. You must ensure your tenant has adequate credit capacity before deploying autonomous agents at scale, as complex UI navigations will rapidly deplete your allocation.
Dataverse and API Limits Finally, be aware of your backend capacity. A Power Automate Premium license grants 250MB of Dataverse database storage and a limit of 40,000 Power Platform Requests (API calls) per day. A Process license drastically increases your API limit to 250,000 requests per day to support high-volume unattended execution, but reduces the individual Dataverse allocation to 50MB. Monitor these limits closely in the Power Platform admin center to avoid throttling during peak operational hours.